8
Pocket Guide
Evita XL
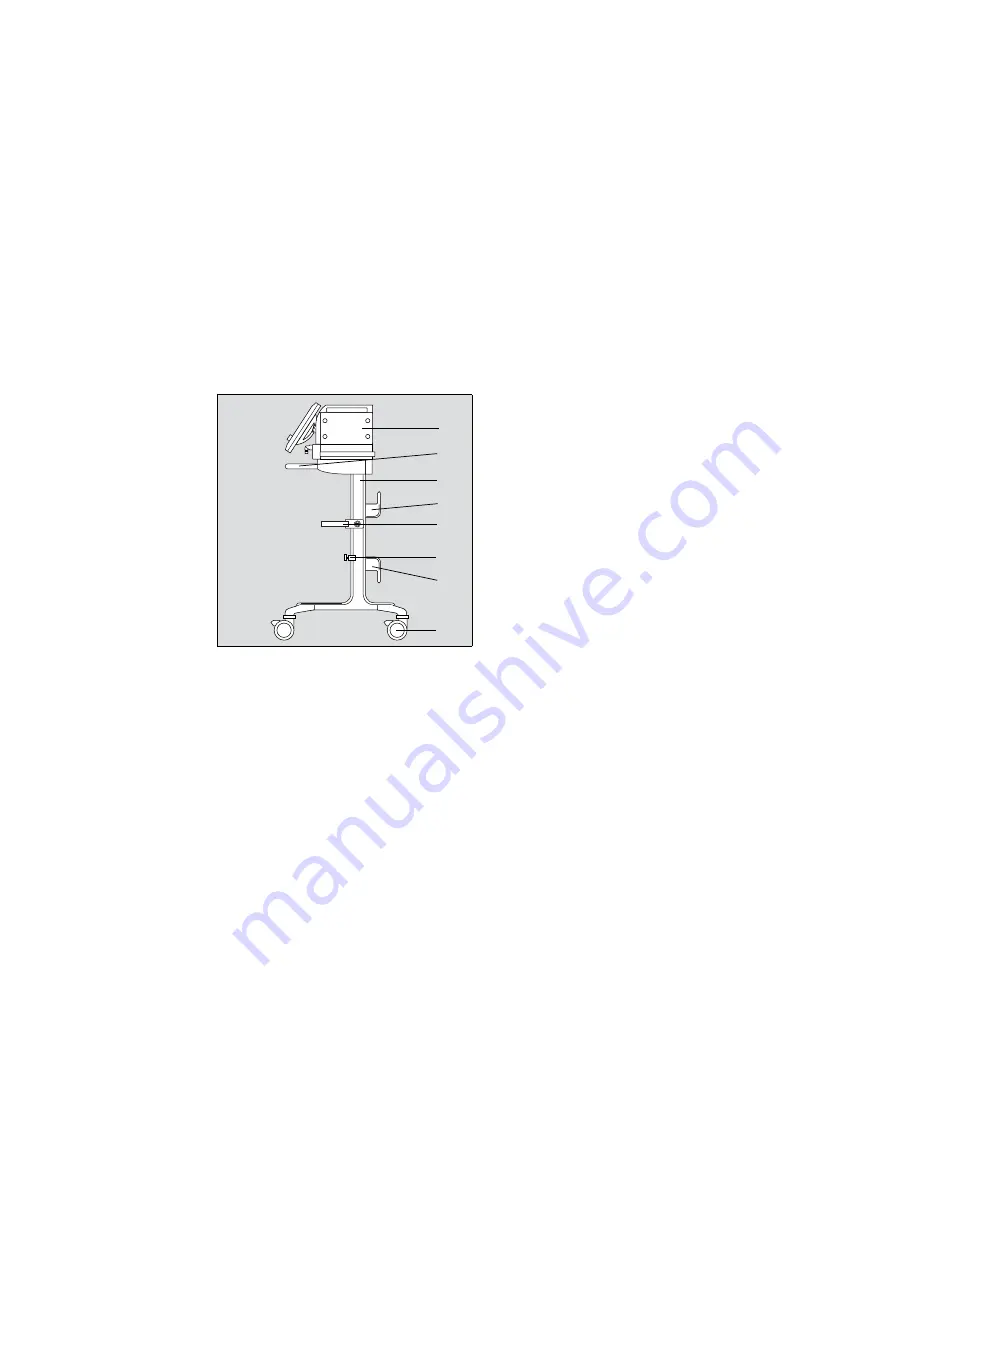
System Overview
Trolley
A
B
Handle
C
Trolley column
D
Hose hook, 2x
E
Humidifier holder (optional)
F
Universal bracket with standard rail (optional)
G
Dual castors with locking brakes, 4x
005
CD
Страница 1: ...he Instructions for Use Any use of the device requires full understanding and strict observation of the Instructions for Use The user must be familiar with the device according to the national and local laws and recommendations There will be no exchange of the Pocket Guide when the product is updated upgraded ...
Страница 2: ...This page has intentionally been left blank 2 Pocket Guide Evita XL ...
Страница 3: ...el 14 Main screen 14 Dialog windows and therapy controls 15 Controls and color scheme 15 Operation 17 Selecting the patient 17 Starting ventilation 18 Setting the ventilation mode 18 Setting the ventilation parameters 19 Bronchial suctioning 20 NIV non invasive ventilation SW 6 12 or higher 21 Standby mode SW 6 12 or higher 22 Switching off Evita XL 23 Alarms 24 On screen alarm messages 24 Display...
Страница 4: ...This page has intentionally been left blank 4 Pocket Guide Evita XL ...
Страница 5: ...ey for future functions F Sensor Parameter key for calibrating sensors and for switching monitoring on or off G System Setup key for configuring device func tions H Start Standby key for switching between ope ration and Standby mode I Rotary knob for selecting and confirming settings NOTE The Evita XL Pocket Guide is not a replacement or substitute for the Instructions for Use Any use of the devic...
Страница 6: ...OR SPIROMETERS B Flow sensor C Flow sensor flap thermal cover D Expiratory valve with expiratory connector port GAS RETURN E Latch for expiratory valve F Nebulizer connection G Inspiratory connector port GAS OUTPUT H Locking screw for protective cover behind it O2 sensor 003 H G F E D C B A ...
Страница 7: ... overview plate not visible on the right hand side panel H Connection for neonatal flow sensor optional I ILV socket for the connecting cable for independent lung ventilation with two ventilators J Connection for oxygen O2 K Connection for medical compressed air AIR L Temp socket for temperature sensor optional M CO2 socket for CO2 sensor optional N COM 1 RS 232C port for RS 232 interface e g for ...
Страница 8: ...vita XL System Overview Trolley A Evita XL B Handle C Trolley column D Hose hook 2x E Humidifier holder optional F Universal bracket with standard rail optional G Dual castors with locking brakes 4x 005 A C D E F G B D ...
Страница 9: ...win dow Connecting to the power supply The mains voltage must correspond to the voltage ran ge indicated on the rating plate z Insert plug into the mains power socket For operation with DC power pack and external battery DC power pack option z Connect optional external battery with cable Connecting to the gas supply 1 Screw on the compressed air hose A to the Air inlet connector and the compressed...
Страница 10: ...the device and push into the socket as far as it will go 3 Push flow sensor to the right and into the rubber lip seal of the expiratory valve as far as it will go Connecting the breathing circuit 1 Attach hinged arm A to the rail on the left hand side of the ventilator and tighten screws 2 Connect breathing hoses of appropriate lengths to the ports B Observe the required hose lengths in dicated in...
Страница 11: ...isplays the Start screen Evita XL will start ventilation with the pre configured set tings unless values are changed or Standby mode is ac tivated within 30 seconds Activating Standby mode 1 Touch Standby button within 30 seconds and press rotary knob to confirm The alarm message Standby activated is displayed in the header bar To acknowledge this message 2 Touch Alarm Reset button to the right of...
Страница 12: ...heck can only be performed in Standby mode 1 Touch the Check tab A Evita XL displays the date and result B of the last De vice Check and Airtight Check 2 Touch the Device Check tab C Evita XL displays a list of the individual checks D The scope of this list depends on the options available on the ventilator No Device Check is possible while the ventilator is per forming an automatic calibration of...
Страница 13: ...ta XL indicates a correct result with a checkmark Faulty results are marked with F Two dashes appear if a test step is not performed In the event of faulty results F 1 Eliminate the cause of the problem 2 Touch the Repeat button Test steps may be skipped by touching the Next test button if this is acceptable Performing the Airtight Check The Airtight Check must be performed after the follo wing ac...
Страница 14: ...he ope rator Therapy status Therapy type ventilation or O2 Therapy ventilation mode and additional set tings Patient category B Main menu bar with buttons for opening dialog win dows and activating functions C Power supply display D Field for device status with type of humidification E Therapy bar with therapy controls for the ventilation parameters of the active ventilation mode and its ad dition...
Страница 15: ...opened by pressing a key or by touching a button in the main menu bar A Dialog window title B Button for accessing additional information if appli cable C Button for closing the dialog window D Tab touch the relevant tab to open a page E Setting assistance field Therapy bar The therapy bar on the main screen contains the thera py controls for the active ventilation mode A Therapy controls Therapy ...
Страница 16: ...s rotary knob 4 the button turns pale green or dark green For therapy controls 1 to select touch 2 the therapy control turns yellow 3 to set turn rotary knob 4 to confirm press rotary knob 5 the therapy control turns pale green or dark green gray not available yellow ready for use pale green available but is not active dark green available and is active 018 019 1 2 4 3 1 2 3 4 5 ...
Страница 17: ...ht kg press rotary knob to confirm Evita XL determines the tidal volume VT and respiratory rate f based on the ideal body weight and displays these values in the lower part of the dialog window F The other ventilation parameters displayed in the lower part of the dialog window are start up values Using the settings of the previous patient Specific patient settings in effect before Evita XL was swi...
Страница 18: ... correspon ding therapy controls C are displayed The selected therapy control is yellow and can be set With the Add settings tab D the active ventilation mode can be extended by additional parameters The following ventilation modes are factory configured SIMV CMV PCV CPAP PSupp Other ventilation modes optional can be selected via the more tab E MMV PCV Assist APRV PPS optional The ventilation mode...
Страница 19: ...lays a message Setting additional functions Prerequisite The Ventilator Settings dialog window must be open 1 Touch Add settings tab A The additional settings of the active or selected ventila tion mode are displayed 2 Touch the tab for the relevant additional setting e g B The page for setting the associated parameter is dis played 3 Touch therapy control C 4 Set the value using the rotary knob a...
Страница 20: ... is detected within 180 seconds Evita XL terminates the oxygenati on procedure During suctioning The time available for suctioning is displayed in se conds in the header bar If suctioning is completed and the patient reconnected within the time available Evita XL will end the disconnection phase After suctioning After reconnection Evita XL resumes ventilation in the set ventilation mode For postox...
Страница 21: ...in new limits can be set in NIV The following alarm limits may be deactivated in order to avoid artifacts MV lower alarm limit for minute volume VTi upper alarm limit for inspiratory tidal volume TApnea upper alarm limit for apnea monitoring If the lower alarm limit for minute volume or the upper alarm limit for apnea monitoring is switched off Evita XL displays a permanent message in the header b...
Страница 22: ...akage compensation With the NIV Plus option Evita XL performs leakage compensation during pressure controlled ventilation in the Adult patient category up to 180 L min Ped patient category up to 60 L min Neo patient category up to 30 L min Standby mode SW 6 12 or higher Switch to Standby mode or Standby Plus mode for the following actions To keep Evita XL ready for operation while the pati ent is ...
Страница 23: ...z Check ventilation settings A 1 Touch Start button B 2 Press rotary knob to confirm The main screen is displayed Evita XL starts ventilati on or z Press Start Standby key Evita XL starts ventilation Switching off Evita XL 1 Switch Evita XL to Standby mode 2 Pivot protective cover upwards 3 Press the On Off switch A until it disengages Evita XL is switched off 032 033 C D B A 004 A ...
Страница 24: ...alarm tone sequences NOTE The Evita XL Pocket Guide is not a replacement or substitute for the Instructions for Use Any use of the device requires full understanding and strict observation of the Instructions for Use 045 A Warning High priority alarm message Red background five tone sequence which is sounded twice and repea ted every 7 seconds Caution Medium priority alarm message Yellow backgroun...
Страница 25: ...nowledging high priority alarm messages z Touch the Alarm Reset button A in the header bar and confirm using the rotary knob Evita XL saves the alarm message which can be dis played in the Data dialog window on the Logbook pa ge Acknowledging Apnea ventilation alarm message The medium priority alarm message Caution Apnea ventilation may be obscured by alarm mes sages of higher priority The alarm m...
Страница 26: ...ng alarm limits z Press Alarm Limits key Evita XL opens the Limits page A The set alarm limits and the current measured value are displayed The values for the upper and lower alarm limit shown in the buttons are start up values which are effective whe never the device is switched on Setting alarm limits 1 Touch the button for the respective alarm limit The button will turn yellow 2 Turn the rotary...
Страница 27: ...ion of patient check ventilator settings NeoFlow sensor not installed in the breathing system Install NeoFlow sensor in the bre athing system Airway pressure high 205 The upper alarm limit for the air way pressure has been excee ded The patient is fighting the ventilator or coughing Check condition of patient Check ventilation pattern Adjust alarm limits if necessary Kinked patient circuit Check p...
Страница 28: ...253 Device has detected a malfunc tion Switch off and again on the de vice If the message disappears ventilation can be continued If the message does not disappear disconnect the patient from the device and continue ventilation immediately with another inde pendent ventilator Call DrägerService Ext battery activated 160 The ventilator is being powered by the external battery due to the absence of ...
Страница 29: ...0 minutes Connect ventilator to the mains supply or to a fully charged exter nal battery within 10 minutes Acknowledge the message with Alarm Reset button and confirm Int battery discharged 254 Due to the lack of power supply and absence of or discharged external battery the device is po wered by the internal battery The time for operation with po wer from the internal battery has expired Connect ...
Страница 30: ... or mask is fitted correctly O2 measurement out of range 132 O2 sensor provides invalid measured values Calibrate O2 sensor replace if necessary O2 measurement malfunction Ventilation can be continued use external O2 monitoring and deac tivate integrated O2 monitoring Call DrägerService O2 supply down 249 O2 supply pressure too low Make sure supply pressure is greater than 43 5 psi 3 cmH2O PEEP hi...
Страница 31: ...f patient Check pattern of ventilation Adjust alarm limit if necessary Leak or disconnection Check that patient circuit and connections are leakproof Vol not const pressure limited 220 Due to pressure limitation or time limit the set tidal volume VT has not been delivered Prolong inspiratory time Tinsp in crease inspiratory flow Flow in crease pressure limitation Pmax Touch the Alarm Reset button ...
Страница 32: ...uch Curve only tab C 2 Touch button for the parameter D to be displayed as a real time waveform Evita XL displays the real time waveform for this para meter The dialog window is closed automatically In the same way it is possible to select trends short trends recruitment trends loops big loops Displaying the logbook 1 Touch Data button in the main menu bar 2 Touch Logbook tab A NOTE The Evita XL P...
Страница 33: ... Evita XL uses the next inspiratory phase for calibration A message is displayed in the header bar O2 sensor calibration O2 sensor calibration is performed at the following inter vals During device check Automatically at least once a day After replacing the O2 sensor wait 15 minutes for the O2 sensor to warm up When measured and set values diverge by more than 2 Vol The O2 sensor calibration can a...
Страница 34: ...osable expiratory valve Dispose of after each patient weekly Spirolog flow sensor daily no outside yes no SpiroLife flow sensor daily no outside yes yes Neonatal flow sensor insert daily no outside yes yes Neonatal flow sensor housing daily yes possible possible yes Temperature sensor daily no outside outside3 yes CO2 sensor daily no outside outside4 no Reusable cuvette of the CO2 sen sor daily ye...
Страница 35: ... 8410580 Expiratory valve autoclavable Expiration valve 8414776 Disposable expiratory valve set of 10 O2 sensor capsule 6850645 Sensor for O2 measurement VentSet Basic MP00320 Disposable breathing circuit 150 cm VentSet Coax with holder MP00317 Disposable coaxial breathing system with Luer Lock el bow and hose holder Filter HME TwinStar 55 MP01805 Filter HME combination HME HumidStar 55 MP01730 He...
Страница 36: ...01017 Nebulizer with electronic micropump Cuvette adults reusable 6870279 Cuvette for CO2 measurement adult reusable Cuvette pediatric reusable 6870280 Cuvette for CO2 measurement pediatric reusable Cuvette adult disposable MP01062 Cuvette for CO2 measurement adult disposable Cuvette pediatric disposable MP01063 Cuvette for CO2 measurement pediatric disposable Product Number Description ...
Страница 37: ...This page has intentionally been left blank Pocket Guide Evita XL 37 ...
Страница 38: ...558 Lübeck Germany www draeger com REGION NORTH AMERICA Draeger Medical Inc 3135 Quarry Road Telford PA 18969 USA Tel 1 215 721 5400 Toll free 1 800 437 2437 Fax 1 215 723 5936 info draeger com Manufacturer Dräger Medical AG Co KG Starting 2010 09 Dräger Medical GmbH 23542 Lübeck Germany The quality management system at Dräger Medical AG Co KG is certified according to ISO 13485 ISO 9001 and Annex...