


EN
9
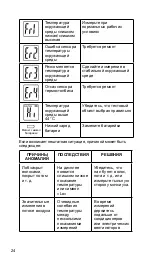
Display Functions
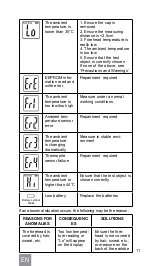
1. When the temperature is lower than 35.0 °C, “”Lo”” appears
on the display. However, if it is higher than 44.0°C, “”Hi” appears
on the display.
2. When the ambient temperature is lower than 5 °C or higher
than 40 °C, “ER1”” appears on the display during operation mode.
3. This device has a low voltage warning function: it stops dis-
playing readings if its voltage is below 2.6±0.2 V.
4. This device automatically shuts off after approximately 30 sec
-
onds of non-use.
INSTRUCTIONS FOR USE
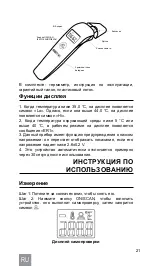
Measurement
Step 1: Push down the cap to remove it.
Step 2: Press ON/SCAN button to turn the device on, it will pro-
cess a self-check, then the will light up.
Self-check display
Step 3: The device is ready for use when the “°C” symbol is blink-
ing on the display.
Step 4: Align the thermometer against the forehead center
(above the eyebrow line) and keep it vertical, the distance should
be <2.5cm between the probe and forehead. Please keep the
thermometer steady, avoid any movement. Hold the ON/SCAN
button, then release it after hearing a beep, the measurement
result will appear on the display.
Step 5: Please wait for the “°C” symbol to start blinking again
before taking another measuring again.
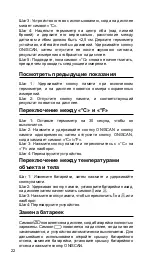
View Previous Readings
Step 1: Hold the memory button when the power is on, and the
saved measurement numbers will appear on the display.
Step 2: Release the memory button, and the relevant result will
appear on the display.
Содержание MI-200
Страница 1: ...dr frei com MODEL MI 200 USER MANUAL d dr frei c INFRARED FOREHEAD THERMOMETER...
Страница 2: ......
Страница 16: ...16 DR FREI Dr Frei MI 200 Dr Frei Dr Frei ON SCAN...
Страница 17: ...RU 17 18 18 MI 200 19 19 20 20 20 21 21 21 22 C F 22 22 22 23 25 25 26 26 27 28...
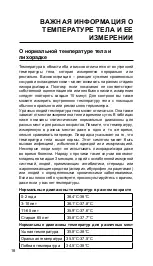
Страница 19: ...RU 19 34 7 C 37 3 C 36 6 C 38 C MI 200 6 1 2 100 3...
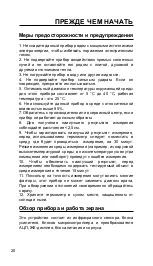
Страница 20: ...20 1 2 3 4 5 5 C 40 C 25 C 6 85 7 8 2 5 9 30 10 15 11 12...
Страница 21: ...RU 21 ON SCAN 1 35 0 C Lo 44 0 C Hi 2 5 C 40 C ER1 3 2 6 0 2 V 4 30 1 2 ON SCAN...
Страница 22: ...22 3 C 4 2 5 ON SCAN 5 C 1 2 C F 1 30 2 ON SCAN ON SCAN C F 3 C F 4 1 2 3 4 ON SCAN...
Страница 23: ...RU 23 Dr Frei 1 ON SCAN C 2 ON SCAN 1 ON SCAN C 2 35 C 1 2 2 5 3 4 5 EEPROM...
Страница 24: ...24 44 C Lo...
Страница 25: ...RU 25 c Lo 2 5 Hi 15 c Lo 30 1 2 3 3...
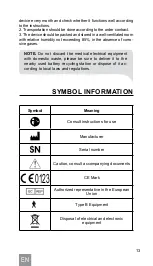
Страница 26: ...26 1 2 3 85 0123 E B...
Страница 29: ...BG 29 DR FREI Dr Frei MI 200 Dr Frei IR Dr Frei ON SCAN...
Страница 30: ...30 31 31 MI 200 32 32 33 33 34 34 34 34 35 C F 35 35 35 36 38 38 39 39 40 41...
Страница 31: ...BG 31 15 3 0 2 36 4 C 38 C 3 10 36 1 C 37 8 C 11 65 35 9 C 37 6 C 65 35 8 C 37 7 C...
Страница 32: ...32 35 8 C 38 C 35 5 C 37 5 C 34 5 C 38 C 34 7 C 37 3 C 36 6 C 38 C MI 200 6 LCD...
Страница 33: ...BG 33 1 2 100 3 1 2 3 4 5 5 C 40 C 25 C 6 85 7 8 2 5 9 30 10 15 11 12...
Страница 34: ...34 1 35 0 C Lo 44 0 C Hi 2 5 C 40 C ER1 3 2 6 0 2 V 4 30 1 2 ON SCAN LCD ON SCAN...
Страница 35: ...BG 35 3 C 4 2 5 ON SCAN 5 C 1 2 C F 1 30 2 ON SCAN ON SCAN C F 3 C F 4 1 2 3 4 ON SCAN...
Страница 36: ...36 Dr Frei 1 ON SCAN C 2 ON SCAN 1 ON SCAN C 2 35 C 1 2 2 5 cm 3 4 5 EEPROM...
Страница 37: ...BG 37 44 C Lo...
Страница 38: ...38 Lo 2 5 Hi 15 Lo 30 1 2 3 3...
Страница 39: ...BG 39 1 2 3 85 0123...
Страница 55: ......


