background image

Installation

02

12

The brown wire is connected with brake signal; for safety, the programs can be seen on the monitor 

after braking the car, but the menu and RCA output are free of it.

If you do not want to use this function, connect it with the negative pole. 

Do not connect the pink wire to the battery, otherwise it will use up the power of the battery.

Note:

*

1

Reverse Gear

Orange
Red


Yellow
Black 

Ignition Key

B

Ground

Rear L 

Speaker

Front L

Speaker

Green/Black 
Green 
White/Black   
White  

Brown

Pink 

Violet/Black  

Blue  

Violet   
Grey/Black  
Grey  

Parking Brake

 Lamp In

Antenna 

power +

Rear R 

Speaker

Front R

Speaker

1

Output Plug(Male) 

2

Output Socket(Female)

+

-

+

-

+

-

+

-

Black

Ground

3

3

2

Fan window

Wiring Connection

Front RCA L/R 

(Dark Grey line with

red & white head)

Rear RCA L/R 

(Light Grey line with 

red & white head)

Rear Zone Out 2/L

Rear Zone Out 2/R

Rear Monitor 2

Rear Zone Out 1/L

Rear Zone Out 1/R

Rear 

Monitor 1

AUX Audio In

(Black line with 

red & white head)

AUX Video In

(Black line with 

yellow head)

Reverse Signal In

(Brown line with 

yellow head)

Subwoofer

Antenna

USB 

Black

Black

(Brown line with

brown head)

(Light Grey line with

white head)

(Light Grey line with 

yellow head)

(Light Grey line with 

red head)

(Light Grey line with 

yellow head)
(Light Grey line with 

red head)

(Light Grey line with

white head)

4

4

Navigation Slot

IR-IN

Green

(Optional)

06 

33

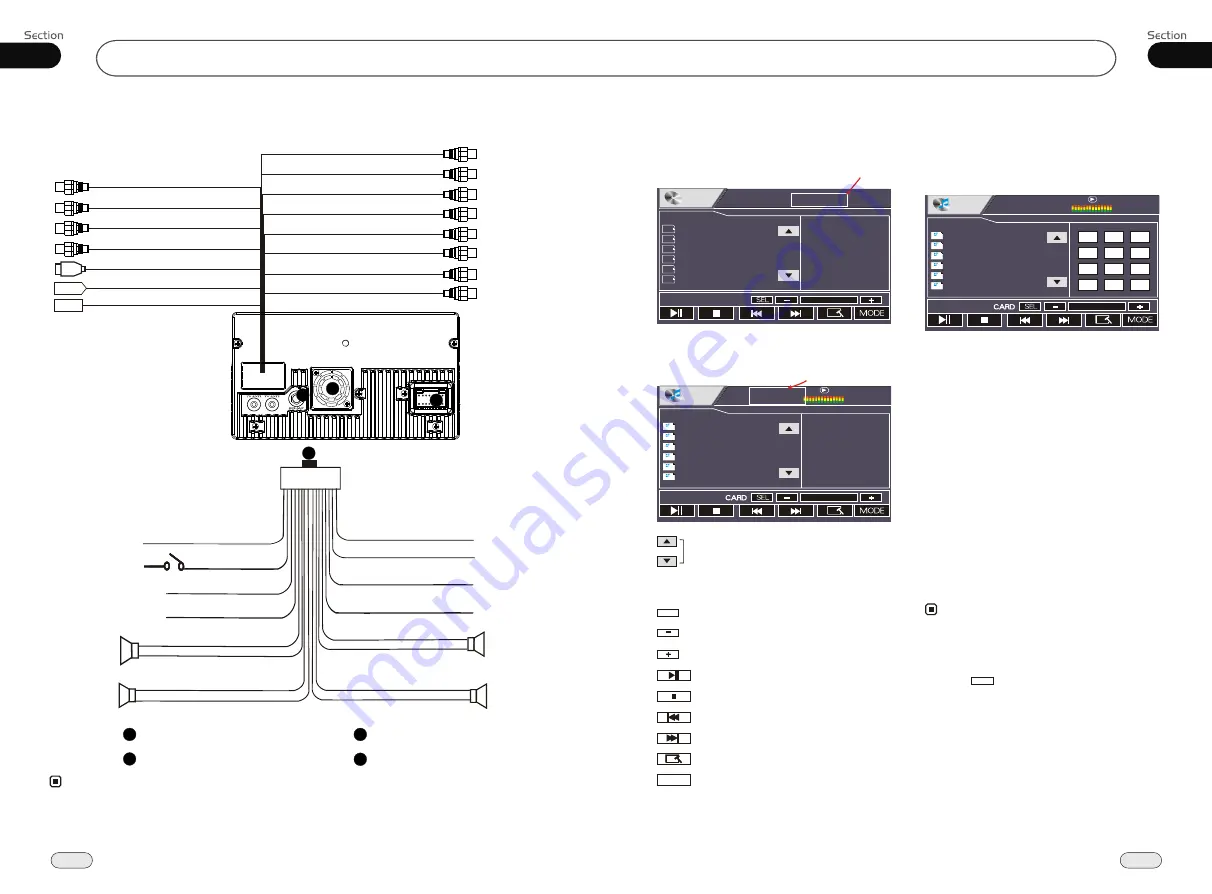
Insert a CD/MP3 disc into the slot, the unit 

will play automatically.

Press REL after turning the unit on, then

i

If a disc/USB/SD card has been loaded, 

press SOURCE on the remote control to 

switch to play, or back to play source to 

select menu, press DVD in the monitor to 

play disc, press SD to play SD card, press

USB to play USB.


nsert an SD card when the TFT is slanted 

and the programs in the card will be played.

From the back of the main unit insert the 

USB and programs in the USB will be pl-

ayed. 

CD/MP3/SD/USB Play

Note:

*

Press SRC on the main unit to switch to DVD

mode. When SD card and USB were inserted 

into, press this key again and again to switch 

among 

SD card and disc.  


USB, 

*

Press           to turn to mode switch. 


MODE

*

Bit rate not more than 320kbps.


*

Supports ID3V1. 


CD/MP3/SD/USB

During CD playback, touching the screen

shows the following menu:

CD/MP3/SD/USB Setup

Track region

During MP3/SD/USB playback, touching

the screen shows the following menu:

Track region

Scan the tracks

CARD

CARD

CARD

 appears in the SD mode and 

USB

appears in the USB mode.

SEL

SEL

Sound characteristics
Decrease volume level, adjust some items
Increase volume level, adjust some items

Play/pause

Stop 

Previous track
Next track
DVD setup menu

MODE

Mode selector

01:18

CD

01  Track
02  Track
03  Track
04  Track
05  Track
06  Track

CD
CD
CD
CD
CD
CD

Track  03/16

Track Region: 

Press this region and the screen 

shows the following menu:

number keys appears, touch the 

number to select tracks. 

Touch the " 

X

 " to exit this menu.

MP3

MP3

MP3

MP3

MP3

MP3

MP3

Demo

amour
Automatic

Be natural_s_e
Can you celebr
clon_bing bing

00:00

001/105

00:00

1

2

3

4

5

6

7

8

9

--

0

X

00:00

001/105

00:00

MP3

MP3

MP3

MP3

MP3

MP3

MP3

Demo

amour
Automatic

Be natural_s_e
Can you celebr
clon_bing bing

Содержание dbd807nav

Страница 1: ... is illegal inmost states There is a safety feature on this device which enables viewing videos only when parked All other features may still be used while driving such as audio and radio etc but must be done with care Please contact an authorized installer for professional installation DBD807NAV ...

Страница 2: ...ction 16 Night Mode 16 Mode Selector 16 Infrared Sensor 16 Double Function 16 3 DVD VCD MP4 5 5 DVD VCD MP4 Setup 22 DVD VCD MP4 Play 22 Selecting Tracks Fast 22 Number Buttons 22 Pause Playback 22 Stop Playback 22 Play tracks at Random 23 Repeat Playing 23 Skip backward forward F F F REW the Playback 23 System Switch 23 Slow Motion Playback 23 Increase Picture Size 23 On Screen Display 23 Setting...

Страница 3: ...ubleshooting Guide No power Check and make sure whether the fuse is blown replace with the proper value if necessary Some errors occur in LCD or no function pressing the button the when Unable to receive stations Poor effect on receiving a station CDs cannot be loaded Sound skips No images Press RESET button Check and make sure whether the antenna is inserted or the antenna is properly connected i...

Страница 4: ...eration that can only be operated by the remote control there are also functions that can be operated by the buttons provided on the main unit To lessen driver distraction from the road please install the unit in an appropriate place Use the unit after starting the engine otherwise the car battery will be drained and the unit cannot be started Do not use the unit in extreme high tem perature or su...

Страница 5: ...Sound and moving pictures Sound and moving pictures Sound only Sound only Size of disc MPEG 4 Sound and moving pictures 01 5 Before You Start 08 40 Bluetooth To Dial by the Unit When a cellphone is connected press to input the call number then press to dial DIAL OK appears when the call is picked up and it appears PICK UP 23 Note Press CLEAR on the remote control or in the monitor to delete wrong ...

Страница 6: ... and connect it again 4 To input the password the password is 1234 5 Press the connect with the Handsfree option on your cellphone and CON NECT appears Bluetooth Connection and Disconnection When a bluetooth connection is established between this unit and the cellphone bluetooth icon on the display appears in red Press PAIR to turn off bluetooth connec tion and appears in blue Press PAIR SUCCESS a...

Страница 7: ...The device supports handsfree profile head set profile A2DP Audio Advanced Distri bution Profile and AVRCP Audio Video Remote Control profile Follow the pairing instructions for the first time use after that the unit will connect automatically Note To provide the best sound with minimal distortion the cellphone or network brings Full duplex conversation Bluetooth ver2 0 compliant Please dial up th...

Страница 8: ... button on the remote control to scan each stored seconds respectively wh ich Number Buttons from 1 to You can press responding N umber Buttons or ton when your desired station is And it starts pl aying that station station 6 stored in 6 the cor AMS but charged 23 4 When press and hold AMS for more than 2 seconds auto matically memory storing The radio will automatically activate the memory storin...

Страница 9: ...the stored station automatically 8 MENU Press it to enter the MENU 9 SRC Press this button to select the signal source 5 The6stationsofthecurrentband Briefly press to select station hold and press to save the current station to one of the 6 stations Manual Automatic Tuning Manual Tuning ress button on the remote control continuously to select a or respectively P or station downward upward Automati...

Страница 10: ...s NUMBER BUTTONS to select the track Number and then press to move the cursor to START press ENTER to start program playing move the cursor to EXIT and press ENTER to exit the program playing Move the cursor to and press ENTER to the previous page move the cursor to and press ENTER to the next page During this process press to cancel the program playing 13 18 The function is only valid on the remo...

Страница 11: ...9 to select a track to play automatically 23 Press track region and the screen shows the number keys touch the number to select tracks Note Selecting Track 2 This function is operated by using the remote control Note Press CLEAR to clear the mistake input 22 During CD playback first press GOTO and TFT shows disc go to press your desired time of the playback by using num ber buttons Second press GO...

Страница 12: ...nit on then i If a disc USB SD card has been loaded press SOURCE on the remote control to switch to play or back to play source to select menu press DVD in the monitor to play disc press SD to play SD card press USB to play USB nsert an SD card when the TFT is slanted and the programs in the card will be played From the back of the main unit insert the USB and programs in the USB will be pl ayed C...

Страница 13: ... car supp screw holes become aligned are tighten the screws see side And then Installation using the screw holes at sides of the unit the Dashboardor Console Bracketsupplied toyourcar 112 112 183 183 1 2 32 05 DVD VCD MP4 Preferencespage Default Example showing howto set factory settings Press or thenpressENTER Press PreferencePage GoToPreferencePage LoadFactorySetting TVType Audio Subtitle DiscMe...

Страница 14: ...Audio Subtitle DiscMenu Parental Password Default Auto Eng Eng Eng PreferencePage TVType Audio Subtitle DiscMenu Parental Password Default Auto Eng Eng Eng Parental Example showing howto set parental control Press or thenpressENTER Press PreferencePage GoToPreferencePage SetParentalControl TVType Audio Subtitle DiscMenu Parental Password Default Auto Eng Eng Eng PreferencePage TVType Audio Subtitl...

Страница 15: ...ume Control Pressing on the main unit or VOL in the monitor performs the same function 14 14 Note This function is operated by using the remote control only EQ Setting Repeatedly pressing button to choose the following modes turn EQ in While listening to popular music classic music or rock music you select the co rresponding preset modes to adjust the sou nd quality ing EQ button can perfectly by ...

Страница 16: ...ken 7 Notes This function is operated by the main unit only Because of the unit s characteristics the display appears different from different angles You can adjust the desired angle Press and hold REL till ANGLE appears in the monitor the press to adjust monitor backward by definite angle press to adjust it forward 6 7 Insert an SD Card Except for navigation press and hold SEL NAVI to activate th...

Страница 17: ...E COLOR BRIGHT SHARP 20 28 05 DVD VCD MP4 GeneralSetupPage Captions Example showing howto set captions on off Press Press or thenpressENTER GeneralSetupPage TVDisplay AngleMark OSDLang Captions ScreenSaver Wide On Eng Off On GoToGeneralSetupPage GeneralSetupPage TVDisplay AngleMark OSDLang Captions Wide On Eng Off ScreenSaver On ClosedCaptions Off On LogoType Def ScreenSaver Example showing howto ...

Страница 18: ...not be set up 05 27 GeneralSetupPage DVD VCD MP4 Example showing howto set picture mode Press Press or thenpressENTER Captions OSDLang OSDLang AngleMark TVDisplay GeneralSetupPage Press or thenpressENTER Press Example showing howto set TV Display mode TVDisplay GeneralSetupPage TVDisplay Example showing how to set language mode Press Press or thenpressENTER ScreenSaver Captions TVDisplay AngleMark...

Страница 19: ...appear on monitor You can press or button to selectyour desired chapter 4 27 23 Selecting Title can During DVD status press TITLE to return to the title menu all of the titles willappear on monitor You also press or button to select your desired chapter 3 1 2 Note 27 23 27 Press on remote control or in the monitor main menu and sub menu will appear on TFT pressing on the remote control SETUP to se...

Страница 20: ...e shot It is invalid to press ANGLE during fast forward fast reverse or pause 3 7 Notes 3 Selecting Channel During VCD status repeatedly press AUDIO button to select the following channel 6 Stereo Mono Left Mono Right Selecting the corresponding channel to set the different sound characters This function is operated by using the remote control only Note Program Playing During VCD mode press PROG t...

Страница 21: ...us Second press GOTO button and the monitor shows input your desired time then press ENTER 2 This function is operated by using remote control the Note Changing audio language Multi audio DVDs can provide audio playback with different languages With DVDs featuring multi audio recordings you can press AUDIO to switch between language and audio systems during playback AUDIO 1 AUDIO 2 AUDIO 3 Selecti...

Страница 22: ...ack press againwithin3seconds toplayprevioustrack press toplay nexttrack 21 21 21 21 Pressing left right twice continuously in the monitor or on the main unit also performs the same function Note Press right corner repeatedly to play the next track shows press left corner to play the previous track shows 05 23 DVD VCD MP4 Repeat Playing During DVD playback press ing RPT on the remote control to pe...

Отзывы: