Dover OPW SiteSentinel Nano M2012 Скачать руководство пользователя страница 33

5.1 Sensor

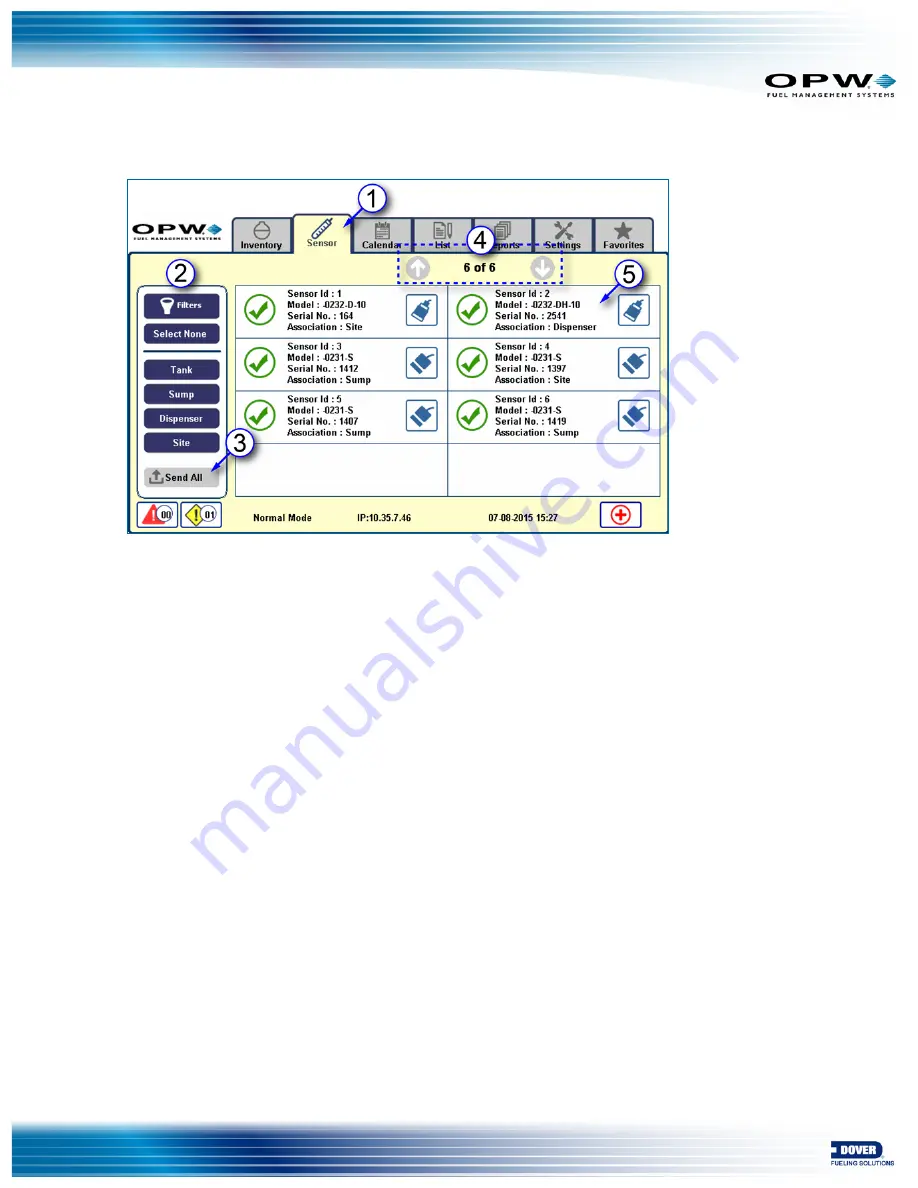
Figure 5-1 Sensor Screen

The Sensor tab shows basic information for all sensors connected to the system.

1. Push the

Sensor

tab.

2. Use the left

Filters

panel to select the sensors you want to see by any combination of sensor

categories (Tank, Sump, Dispenser, Site) or all sensors in the system.

3. To

Send All

of the selected information to a connectedprinter or Address Book recipient see step 6 of

Section 4.1.1, Send Information.

4. The

Sensor

screen can show up to eight (8) connected sensors. The numbers show the current

number of sensors on the screen and the total number of sensors connected to the system. If more than
eight (8) sensors are connected, use the up and down arrows to scroll through the full list.

5. Push one of the sensor information boxes to see

Alarm /Warning

information for the selected sensor.

A new screen will come into view.

Doc. No.: M2012 Rev.: 3

Page 33 of 49

Содержание OPW SiteSentinel Nano M2012

Страница 1: ...Part Number M2012 Rev 3 Issue Date 3 31 2021 Supersedes 11 6 2015 M2012 SiteSentinel Nano Tank Gauge System Operator s Guide 3 71 56 3 Bld 61 1 ...

Страница 2: ... trademarks referenced herein are trademarks of Delaware Capital Formation Inc Dover Corporation Dover Fueling Solutions UK Ltd and their affiliated entities Contact OPW Fuel Management Systems Visit us at http www opwglobal com opw fms or contact us at Call 1 877 OPW TECH 877 679 8324 For calls outside US and Canada call 1 708 485 4200 Monday through Friday 7 a m to 6 p m US CST For technician re...

Страница 3: ...word 11 2 2 Cold Start 12 Section 3 Settings 13 3 1 Set Date and Time 13 3 2 Networking 14 3 3 Configuration 15 3 3 1 Upgrade Procedure 16 3 3 2 Backup and Restore 17 3 4 Other Settings 18 3 5 Shift and Site Information 20 3 6 In Tank Auto Leak Test 23 3 6 1 Auto Leak Test Pop up Screens 24 3 7 In Tank Static Leak Test 25 3 7 1 Static Leak Test Pop up Screens 26 3 8 In Tank Leak Status 27 3 9 Shif...

Страница 4: ...tion 32 5 1 Sensor 33 6 1 Calendar 35 7 1 List 38 8 1 Reports 40 9 1 Favorites 43 Appendix 9 Icon Glossary Tabs 45 Appendix 9 Icons Alarm Warning Notifications 46 Revisions 47 Warranty 48 Doc No M2012 Rev 3 Page 4 of 49 ...

Страница 5: ...x is not in operation another selection on the screen is necessary for the box to become serviceable 3 Buttons Some buttons will be used to make a selection from a list Other buttons will be used to Save information or Apply settings to the system A selected button will show in dark blue 4 Panels There are two 2 panels that can show on a screen a A Filters panel on the left side of the screen show...

Страница 6: ...that have been accessed through a control on a previous screen 7 Current Alarms See Current Alarms and Warnings in the next section for a full explanation on how these buttons are used 8 Calendar Icons Instructions on using these buttons will be given in the List and Calendar sections see Section 5 Calendar and Section 6 List The figure above shows the icons when they are ON full color and OFF fad...

Страница 7: ...e right Filters panel shows the available tanks in the system when Tank is selected in the left Filters panel The right Filters panel for System Alarms is shown next to the Tank Filters panel in the example above this panel will come into view when System is selected in the left Filters panel The right Filters panel for Sensor is shown next to the System Filters panel in the example above this pan...

Страница 8: ...own in the selected language Current languages supported include English Polish Portuguese Turkish Italian Russian French Spanish and Romanian Here is an example of a screen after Portuguese is selected Figure 1 4 SiteSentinel Nano Language Support Doc No M2012 Rev 3 Page 8 of 49 ...

Страница 9: ... has been inactive for a period of time the screen will go blank 2 Tap the screen with your finger to reactivate it 3 The Inventory screen comes into view This is the default view for the Nano GUI console The Inventory screen is explained in detail in Section 4 Inventory Doc No M2012 Rev 3 Page 9 of 49 ...

Страница 10: ...Tube This code and link will take you to the full video The Introduction section of the video will show you how to setup and view the configuration screens using a laptop The QR codes and links that accompany various sections in this manual will take you directly to the portion of the video that is related to that manual topic NOTE The QR codes and web links to videos in this manual are set to sta...

Страница 11: ...ord keypad will pop up Enter the password code using the number keys and push ENT to enter If you make a mistake inputting the number you can clear an entry by pushing the CLR button The default password is 12345 Changing the default password is described in Section 3 4 Other Settings Doc No M2012 Rev 3 Page 11 of 49 ...

Страница 12: ...Sentinel Nano to the factory installed defaults Figure 2 2 Cold Start 1 Push the Settings tab 2 Push System Settings under Filters 3 Push the Cold Start tab 4 Push the icon to Cold Start the system Wait for Cold Start to complete before continuing Doc No M2012 Rev 3 Page 12 of 49 ...

Страница 13: ...s to increase or decrease the hours and minutes If necessary select AM PM push this button to toggle between AM and PM Push Set to save this setting If you do not want to reset the time push Cancel 5 To set the Current Date Push the white box with the date A pop up screen will come into view with controls to adjust the date setting Use the and buttons to increase or decrease the day month and year...

Страница 14: ...his keypad to enter the numbers and push Enter when complete Push CLR to clear an entry Push Cancel to return to the Networking screen without making a change a IP address This is a user defined IP address The same IP address will be used each time the tank gauge system is connected to the network This is the preferred connection type because the system will always have the same IP address when co...

Страница 15: ...is possible for the IP address of the tank gauge system to change since it was last connected to the network 3 3 Configuration Figure 3 3 Configuration The Upgrade procedure will show how to upload files to the ATG from a USB flash drive 1 Push the Settings tab 2 Push System Settings under Filters 3 Push the Configuration tab Doc No M2012 Rev 3 Page 15 of 49 ...

Страница 16: ...TANT Keep the files together on the flash drive Do not remove or copy them to any other directory or device 7 Push OK A screen will come into view listing the files that can be upgraded 8 Select the files to be upgraded a Html HTML zip for remote browser UI upgrades b Database Nano_DBUpgrade sql for database upgrades c Firmware Firmware Zip Main application software d Options XXXXXXX ssr the Xs id...

Страница 17: ... 11 To backup the current configuration push Backup A confirmation popup window will come into view asking Do you want to save existing configuration Push Yes or if you do not want to Backup at this time push No A backup txt file will be placed on the SD card that can be used later to restore the configuration If the file transfer is successful a message window will pop up showing Request Successf...

Страница 18: ...inutes of inactivity before the Back Light turns off from 1 minute minimum to 15 minutes maximum Push the white box A pop up screen will come into view with controls to adjust the minutes setting Use the and buttons to increase or decrease the minutes and push OK when complete NOTE To set the Back Light Off Time to Always On set the minutes to 00 Doc No M2012 Rev 3 Page 18 of 49 ...

Страница 19: ...pop up c Login Timeout Minutes of inactivity before the login screen times out from 5 minutes minimum to 15 minutes maximum Push the white box A pop up screen will come into view with controls to adjust the minutes setting Use the and buttons to increase or decrease the minutes and push OK when complete 5 To reset the password for the remote view of the console to its default Push the Reset button...

Страница 20: ...n This screen will let you enter times related to the Site and Shifts 1 Push the Settings tab 2 Push Shift Site under Filters 3 Set the times for the three 3 Saved Inventory reports Site Open Site Closed and End of Day To set the times Doc No M2012 Rev 3 Page 20 of 49 ...

Страница 21: ...em the normal site operating times After the Site Closed time the system will go into Sentinel Mode and will report decreased product level as theft unauthorized decreased level alarm However the system will still accept increased levels for after hours deliveries without an alarm End of Day is used for systems with ACR Auto Calibration and Reconciliation tanks to set up a Reconciliation Report se...

Страница 22: ...NOTE Shifts are set to a 24 hour clock The system will always make the loop back to the first shift Doc No M2012 Rev 3 Page 22 of 49 ...

Страница 23: ...e the and buttons to increase or decrease the hours and minutes Push Set to save To close this pop up without saving push Cancel 6 Push the Leak Test Warning box A pop up will come into view see below to let you set the number of days for Leak Test Warning this will vary by Recurrence Up to six 6 days Weekly up to 28 days Monthly up to 364 days Yearly Use the and buttons to increase or decrease th...

Страница 24: ...guration refer to the M2011 SiteSentinel Nano Configuration Guide and that percentage will show here 8 Push Save to set the schedule for In Tank Auto Leak Test 3 6 1 Auto Leak Test Pop up Screens Auto Leak Test Pop up Screens Doc No M2012 Rev 3 Page 24 of 49 ...

Страница 25: ...s for the leak test in 30 minute increments Use the and buttons to increase or decrease the hours and minutes Push Set to save To close this pop up without saving push Cancel 6 Push Minimum Volume A pop up will come into view see below to let you set the Minimum Volume as a percentage Use the and buttons to increase or decrease the percentage Push OK to save To close this pop up without saving pus...

Страница 26: ...ee below using the and buttons to set the Hours Minutes Push Set to save To close this pop up without saving push Cancel 9 Push Apply to save the settings on this screen 3 7 1 Static Leak Test Pop up Screens Figure 3 2 Static Leak Test Pop up Screens Doc No M2012 Rev 3 Page 26 of 49 ...

Страница 27: ...plicable 4 This screen can show up to six 6 tank leak status results The number of currently shown results and the total number of results for the selected tank s show at the top right of this screen To view more results if available use the arrow buttons on either side of the numbers to move down right arrow or up left arrow Doc No M2012 Rev 3 Page 27 of 49 ...

Страница 28: ...sh Shift Details under Filters 3 Push a shift tab to see specific details for that shift The selected shift tab will change to dark blue 4 Select a tank number if applicable 5 Push the arrow buttons to scroll down or up to see more details Doc No M2012 Rev 3 Page 28 of 49 ...

Страница 29: ...3 10 Version Figure 3 1 Version 1 Push the Settings tab 2 Push Version under Filters 3 System Version Information is shown Doc No M2012 Rev 3 Page 29 of 49 ...

Страница 30: ...e Product Volume and Water Volume b Product Level and Water Level c Product Temperature 2 This screen can show up to six 6 tanks To view more tanks if available in the system use the arrow buttons on either side of the numbers to move to the next screen right arrow or back left arrow when active 3 Push a graphic to go to the detail screen for an individual tank Doc No M2012 Rev 3 Page 30 of 49 ...

Страница 31: ...re n Product Height Measured product height n Water Height Measured water height n Water Volume Total water volume n Ullage Ullage is calculated as Safe Working Capacity 95 of total capacity generally used as an overfill level minus Gross Product Volume For the example above 15000 x 0 95 14250 12788 82 1461 18 n Density Product density in kg m3 n Weight Product weight NOTE Information from this sc...

Страница 32: ...sh Cancel 7 Send Push this button to send an Inventory report for selected tanks Push this button to bring up the popup to Send Via Print to send to a connected printer or to a recipient s by E mail SMS or Fax Push Print to activate the Apply button Push Apply to send the report to a connected printer To close this popup without saving push Cancel Push Email SMS or Fax to check the yellow box es a...

Страница 33: ...n to a connectedprinter or Address Book recipient see step 6 of Section 4 1 1 Send Information 4 The Sensor screen can show up to eight 8 connected sensors The numbers show the current number of sensors on the screen and the total number of sensors connected to the system If more than eight 8 sensors are connected use the up and down arrows to scroll through the full list 5 Push one of the sensor ...

Страница 34: ...sensor Starting Acknowledge and Ending Times and the Event Type 7 Push the Send button to send this information as a report to a connected printer or a recipient s in the Address Book See Section 4 1 1 Step 6 for details 8 Push the Back button to return to the previous screen Doc No M2012 Rev 3 Page 34 of 49 ...

Страница 35: ...ntly selected month and year is shown at the top right of the calendar To select a different month use the arrow buttons on either side of the month year to scroll forward right arrow or backward left arrow 5 The left Filters panel shows the categories that are seen on the calendar Push any of the four 4 category buttons to turn off a related category icon shown on the calendar A category will sho...

Страница 36: ...rred 8 This screen can show up to 10 alert boxes The number of current alerts and the total number of alerts for the selected date show at the top right of this screen To see more alerts if available use the arrow buttons on either side of the numbers to scroll down right arrow or up left arrow 9 The selected date can be seen at the top left of this screen To select a different date use the arrow ...

Страница 37: ...r the selected alert will come into view 13 Push the Send button to send this information as a report to a connected printer or a recipient s in the Address Book See Section 4 1 1 Step 6 for details 14 Push the Back button to return to the previous screen Doc No M2012 Rev 3 Page 37 of 49 ...

Страница 38: ...use the arrow buttons on either side of the numbers to scroll down right arrow or up left arrow 5 The current month shows at the top left of this screen To select a different month use the arrow buttons on either side of the month to scroll forward right arrow or backward left arrow 6 The left Filters panel shows the categories that are seen on the calendar Push any of the four 4 category buttons ...

Страница 39: ... to send this information as a report to a connected printer or a recipient s in the Address Book See Section 4 1 Step 6 for details 10 To return to the List view push the Back button 11 If the alert is for a Delivery push the Invoice button to show information regarding the delivery invoice Doc No M2012 Rev 3 Page 39 of 49 ...

Страница 40: ...ort to create from the left side Filters menu for example the screen above shows that Active Alarm Count has been selected Use the up and down arrow buttons to scroll through more choices 3 Push Create Report to bring up the next screen Doc No M2012 Rev 3 Page 40 of 49 ...

Страница 41: ...Select Use the and buttons to select the day month and year Push Set to save c Push Day Select if applicable this button only comes into view when Weekly is selected under Recurrence Choose the applicable day and push Set Figure 8 3 Start and End Date and Day Select 7 Set the Report Time a Push Start Select Use the and buttons to select the hour and minutes b Push End Select Use the and buttons to...

Страница 42: ...ivered Send to a connected printer to Print a report or send the report to a recipient s via Email Choose the recipient s from the Address Book popup and push Apply 9 Push Save to save the report settings Doc No M2012 Rev 3 Page 42 of 49 ...

Страница 43: ...t shows it below the Favorites tab to add that screen to the Favorites list Figure 9 2 Favorites List 1 Push the Favorites tab to see the Favorites list 2 Select a Favorite and push the white box to jump directly to that screen Figure 9 3 Remove From Favorites Button Doc No M2012 Rev 3 Page 43 of 49 ...

Страница 44: ...3 To remove a screen from the Favorites list push the Remove from Favorites button Doc No M2012 Rev 3 Page 44 of 49 ...

Страница 45: ...umber and Association Push a sensor graphic on that shows on this screen to see more information for that sensor The Calendar tab shows alerts for Deliveries Compliance Alarms and Warnings in a calendar view The List tab shows a list view of all alerts for a selected tank The Reports tab lets the user set up and send various reports to chosen names in the Address Book The Settings tab lets the use...

Страница 46: ... acknowledged Warning active and unacknowledged Warning active and acknowledged Warning inactive and unacknowledged Warning inactive and acknowledged Leak test passed Leak indicated or failed Leak test in progress Leak test stopped because of forced stop aborted delivery power failure activity etc during test Delivery occurred Doc No M2012 Rev 3 Page 46 of 49 ...

Страница 47: ... 28 3 Build 17 W M Language support 2 834 11 6 15 3 42 38 3 Build 29 Smart Sensors and Multi drop installation capabilities of Probes and Sensors 3 1890 3 31 21 3 71 56 3 Bld 61 1 0 1gph Static Leak Test DMP sup port NOTE It is possible that older software versions might not support all features Doc No M2012 Rev 3 Page 47 of 49 ...

Страница 48: ...any particular purpose and of all other obligations or liabilities on OPW Fuel Management Systems part Further OPW Fuel Management Systems neither assumes nor authorizes any other person to assume for it any other liability in connection with the sale of the systems or any new replacement part that has been subject to any damage from any act of nature or any force majeure Any terms proposed by the...

Страница 49: ......

Отзывы: