


4 OM-DHS(/T)-40(C,A,C2T™)
6. Following “To Start Kettle” instructions in the “Operation” section in this manual,
begin heating the water at the highest controller setting. The heat indicator light
should come on, and heating should continue until the water boils.
If the kettle functions as described, it is ready for use. If the unit does not operate
as designed, contact an authorized Service Agent.
OPERATION
WARNING: WHEN TILTING KETTLE:
1) WEAR PROTECTIVE OVEN MITT AND PROTECTIVE APRON.
2) USE DEEP CONTAINER TO CONTAIN AND MINIMIZE PRODUCT SPLASHING.
3) PLACE CONTAINER ON STABLE, FLAT SURFACE, AS CLOSE TO KETTLE AS
POSSIBLE.
4) STAND TO RIGHT OF KETTLE WHILE POURING — NOT DIRECTLY IN POUR PATH
OF HOT CONTENTS.
5) POUR SLOWLY, MAINTAINING CONTROL OF KETTLE, AND RETURN KETTLE
BODY TO UPRIGHT POSITION AFTER CONTAINER IS FILLED OR TRANSFER IS
COMPLETE.
6) DO NOT OVERFILL CONTAINER. AVOID SKIN CONTACT WITH HOT CONTAINER
AND ITS CONTENTS.
WARNING: AVOID ALL DIRECT CONTACT WITH HOT SURFACES AND HOT FOOD OR WATER IN
THE KETTLE. DIRECT CONTACT COULD RESULT IN SEVERE BURNS.
CAUTION: DO NOT OVERFILL THE KETTLE WHEN COOKING, HOLDING OR CLEANING.
KEEP LIQUIDS AT LEAST 2-3” (5-8 CM) BELOW THE KETTLE RIM TO ALLOW
CLEARANCE FOR STIRRING, BOILING AND SAFE PRODUCT TRANSFER.
WARNING: AVOID ALL DIRECT CONTACT WITH HOT FOOD OR WATER IN THE KETTLE.
DIRECT CONTACT COULD RESULT IN SEVERE BURNS.
CAUTION: HEATING AN EMPTY KETTLE MAY CAUSE THE RELEASE OF STEAM FROM THE
PRESSURE RELIEF VALVE.
CAUTION: DO NOT TILT KETTLE BODY WITH COVER OR BASKET INSERT IN PLACE. COVER
MAY SLIDE OFF, CAUSING INJURY TO OPERATOR.
CAUTION: ANY POTENTIAL USER OF THE EQUIPMENT MUST BE TRAINED IN SAFE AND
CORRECT OPERATING PROCEDURES.
WARNING: KEEP AREA AROUND KETTLE FREE AND CLEAR OF ALL COMBUSTIBLE
MATERIALS. DO NOT ATTEMPT TO LIGHT ANY BURNER WITH A FLAME.
3
.
0
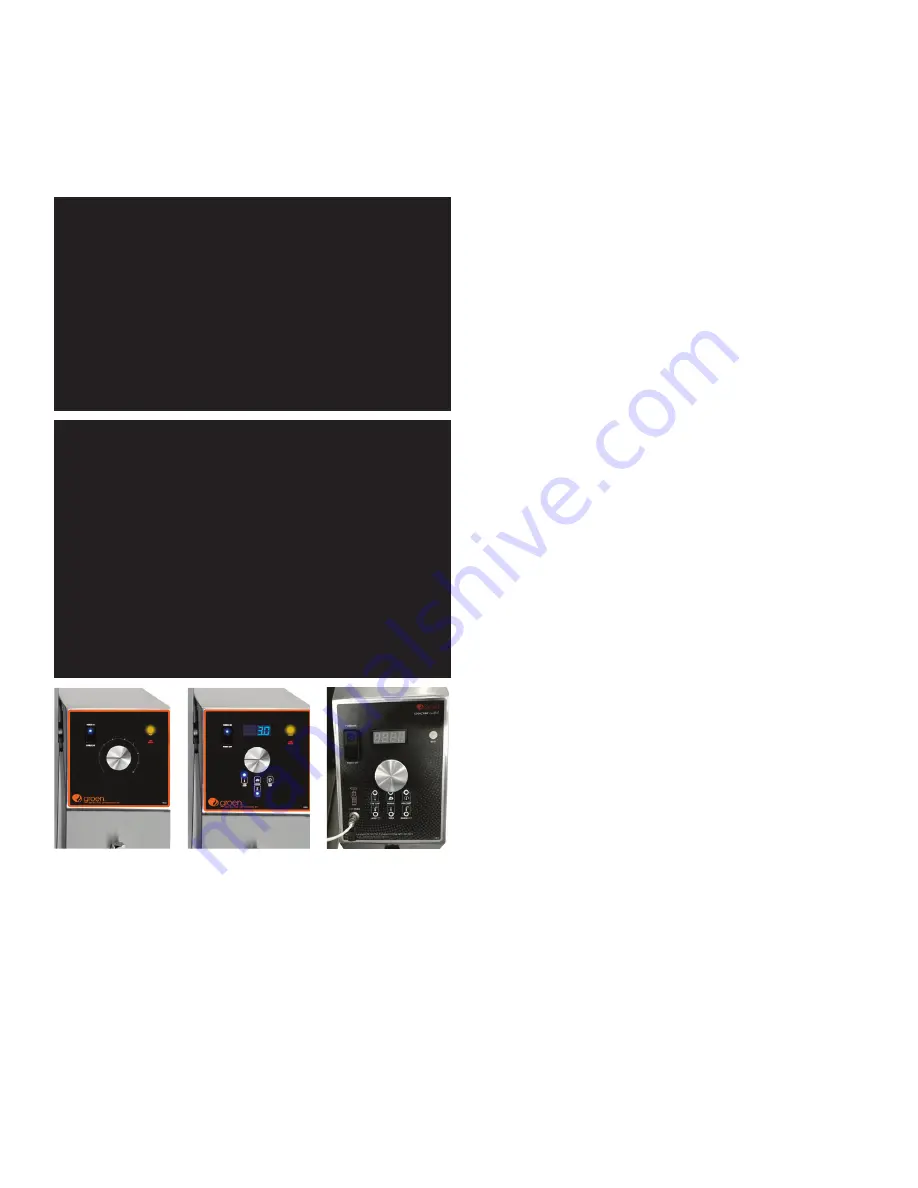
Classic Control
Advanced Control
Cook2Temp Control
CONTROLS
1. Classic Control (-C) Models
a. The manual gas shut-off valve supplies inlet gas to the unit.
b. Lighted Power ON switch located on the control console. Controls main
power to the unit.
c. The temperature knob, located on the control console, is used to set the
kettle heat values between 1 and 10.
d. Heating indicator light located on the control console, lights when the
controller sends call to open the main gas valve and will cycle on and off
once the unit reaches set temperature. If the unit is tilted, the main gas
valve will be disabled and the light will turn off until the unit is returned to
the cooking position.
e. A LOW WATER indicator light, located on the control console, illuminates
when the jacket water falls below acceptable levels. When lit, the main
gas valve is disabled and will not function until the jacket water is refilled
using the procedure in this manual.
f. Crank tilt – a handle controls the worm and gear mechanism that smoothly
tilts the kettle body and holds it in the desired position.
2.
Advanced Control (-A) Models
a. The manual gas shut-off valve supplies inlet gas to the unit.
b. Lighted Power ON switch located on the control console. Controls main
power to the unit.
c. The temperature knob, located on the control console, is used to set
the kettle heat values between 1.0 and 10.0. The current setting will be
reflected on the display.
d. Heating indicator light located on the control console, lights when the
controller sends call to open the main gas valve and will cycle on and off
once the unit reaches set temperature. If the unit is tilted, the main gas
valve will be disabled and the light will turn off until the unit is returned to
the cooking position.
e. A LOW WATER indicator light, located on the control console, illuminates
when the jacket water falls below acceptable levels. When lit, the main
gas valve is disabled and will not function until the jacket water is refilled
using the procedure in this manual.
f. SET TnnP Mode - Allows power to the controller and gas to the pilot without
the kettle heating; the kettle will heat once the LOW TEMP, MANUAL or
HIGH TEMP button is selected.
g. LOW TEMP Button – Used to set operating temperature of the kettle at a
preset low intensity (default = 2.0). Can be pressed at any time during
operation of the unit to change the set temperature to the preset value
except when there is an active TIMER enabled.
h. MANUAL Mode button – Enables the user modify the desired cooking
temperature of the kettle (between 1.0 and 10.0) using the temperature
knob and display (default = 5.0). The operator will press the MANUAL
button and set the desired temperature using the temperature knob and
display. Once the desired intensity is displayed, the user may either press
the MANUAL button again or wait 5 seconds and the set temperature will
be accepted by the controller and locked in. After the set temperature is
accepted, it may be changed at any time by pressing the MANUAL button
and resetting the temperature using the same process above.
i. HIGH TEMP button – Used to set operating temperature of the kettle at a
preset high intensity (default = 7.0). Can be pressed at any time during
operation of the unit to change the set temperature to the preset value
except when there is an active TIMER enabled.
1. TIMER button - once the appropriate set temperature is selected using
the HIGH TEMP, MANUAL or LOW TEMP buttons; a countdown timer
can be set to remind the user when the cooking process is completed.
Range – 1 minute to 10 hours
2. When the timer expires:
a. the set temperature will automatically change to the LOW TEMP
setting and will continue at this setting until the user changes the
temperature via MANUAL or HIGH TEMP buttons
b. An audible alarm will notify the user that attention is required,
the alarm will continue to sound until the user presses the TIMER
button.
3. An active timer can be cancelled by pressing and holding the TIMER
button for 5 secs.
4. Set temp can be changed during an active timer by pressing the
MANUAL button and adjusting the set temp using the Temperature
knob and display.
5. HIGH TEMP and LOW TEMP presets cannot be used to change the
setpoint once a TIMER has started.


