Lit. No. B64093, Rev. 09
16
April 15, 2011
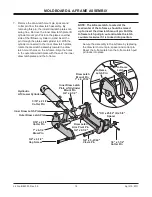
13. Hook each extension spring to the receiving holes
on the pivot beam and attach the opposite end of
the spring to its respective spade bolts. Install the
spade bolts through the extension spring mounting
angle on the top rear of the blade. Secure each
spade bolt by placing one 5/8"
fl
at washer on the
bolt and thread one 5/8" locknut. Tighten each
locknut until a piece of paper can pass between
the third and fourth coils on the spring.
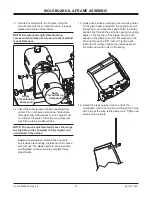
14. Install the blade guides at each end of the
moldboard. Insert the cap screw through the holes
at the top of the wing reinforcement rib. Tighten all
screws with locknuts.
MOLDBOARD & A-FRAME ASSEMBLY
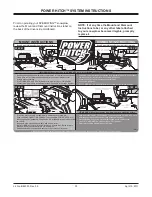
11. Secure the manifold to the A-frame. Align the
mount holes with the A-frame brackets. Properly
replace and tighten all hardware.
NOTE: A medium-strength threadlocking
compound should be used to secure the manifold
mount fasteners.
12. Insert the cable through the pivot bushing from
center. Pin on A-frame extensions. Slide cable
through spring. Add washer and nut. Adjust nuts
on cable at full angle so that the wing stops just
touch the outside moldboard ribs.
NOTE: Too much adjustment will cause the wings
to stop before the snowplow is fully angled and
could stretch the cables.
Adjust with snowplow centered, then angle to
see if stops are touching. Install and lock in place
with jam nut. The blade needs to be operational
and installed on the vehicle to complete these
adjustments.
Apply
Threadlocking
Compound
Apply
Threadlocking
Compound
Содержание BLIZZARD SPEEDWING 760SW
Страница 51: ...Lit No B64093 Rev 09 51 April 15 2011 NOTES...


