background image

English

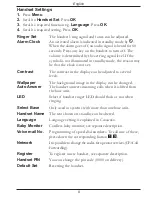
Handset Settings

1.

  Press 

Menu

.

2.

  Scroll to 

Handset Set

. Press 

OK

.

3.

  Scroll to required function e.g. 

Language

. Press 

OK

.

4.

  Scroll to required setting. Press 

OK

.

Ringer Set 

The handset’s ring signal and tones can be adjusted.

Alarm Clock


An activated alarm is indicated in standby mode by 

H

When the alarm goes off, an audio signal is heard for 60 

seconds. Press any key on the handset to turn off. The 

volume is determined by the set ring signal level. If the 

symbol is not illuminated in standby mode, the reason may 

be that the clock is not set.

Contrast


The contrast in the display can be adjusted to several 

levels.

Wallpaper


The background image in the display can be changed.

Auto Answer


The handset answers incoming calls when it is lifted from 

the base unit.

LED 

Select if handset ringer LED should flash or not when 

ringing.

Select Base


Only used in systems with more than one base unit.

Handset Name

  The text shown on standby can be altered.

Language


Language setting is explained in 

Connection

.

Baby Monitor


Cordless baby monitor, see separate description.

Voice mail No.

  Programming of speed dial numbers. To call one of these, 

press down the corresponding button 

1

-

3. 

Network


It is possible to change the codes for operator services (CF=Call 

Forwarding).

Register


To register a new handset, see separate description.

Handset PIN


You can change the pin code (0000 on delivery).

Default Set


Resetting the handset.

Содержание MoveEasy 316

Страница 1: ...doro MoveEasy 316 ...

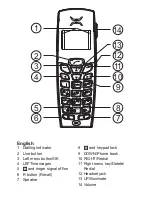
Страница 2: ...ling indicator 2 Line button 3 Left menu button OK 4 LEFT messages 5 and ringer signal off on 6 R button Recall 7 Speaker 8 and keypad lock 9 DOWN Phone book 10 RIGHT Redial 11 Right menu key Delete Redial 12 Headset jack 13 UP Illuminate 14 Volume ...

Страница 3: ......

Страница 4: ...mode 4 Key lock 4 Speaker Group listening 4 Paging 4 Phonebook 5 Incoming numbers caller ID 6 SMS messages 7 Handset Settings 9 Cordless Baby Monitor 10 Register 10 System settings 11 Call barring 12 Net Provider 13 Network services 13 Expanded system 1 14 Specific absorption rate SAR 15 Declaration of conformity 15 UK 15 Guarantee 15 Troubleshooting 16 ...

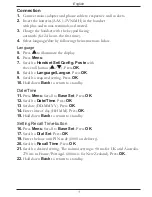
Страница 5: ...l to Language Langue Press OK 9 Scroll to required setting Press OK 10 Hold down Back to return to standby Date Time 11 Press Menu Scroll to Base Set Press OK 12 Scroll to Date Time Press OK 13 Set date DD MM YY Press OK 14 Enter time of day HH MM Press OK 15 Hold down Back to return to standby Setting Recall Time button 16 Press Menu Scroll to Base Set Press OK 17 Scroll to Dial Set Press OK 19 E...

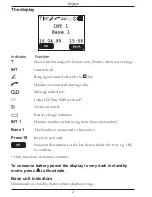
Страница 6: ...d H Alarm activated Battery charge indicator INT 1 Handset number when using more than one handset Base 1 The handset is connected to base unit 1 Press 19 Key lock activated Function description for the key shown below the text e g OK to confirm Only functions in certain countries To conserve battery power the display is very dark in standby mode press to illuminate Base unit indicators Illuminate...

Страница 7: ...minimize the risk of interference It is normal for the device to become warm during charging and is not dangerous Use only DORO original batteries The guarantee does not cover any damage caused by incorrect batteries Coverage The telephone s coverage will vary normally between 50 and 300 metres depending on whether the radio waves carrying the conversation are blocked by obstacles in their path Co...

Страница 8: ...placed on the table leaving your hands free Group listening means that you hold the handset to your head in the usual way but the call will be heard through the speaker if you want other people in the room to listen 1 Once the call has been connected press several times to switch between group listening speaker mode and handset mode 2 Press q to terminate call Please note Please remember that in h...

Страница 9: ...nge between upper lower case Store name number in handset 1 Press b Press Option 2 Scroll to Add Entry Press OK 3 Press equivalent digit key one or more times for desired name 4 Scroll to Number Enter the telephone number including the area code Press OK You can insert a space in the telephone number by pressing and holding R Dialling from the phonebook 1 Press b 2 Scroll among the entries It is a...

Страница 10: ... All Calls The number of received calls is displayed Press OK 3 Scroll to selected entry Press O to dial number or press Back Caller identification messages Date time not set Unavailable No information received e g an international call Withheld Number cannot be shown Possibly a call from a telephone exchange Deleting a number 1 Scroll to required entry according to description above 2 Press Optio...

Страница 11: ...oviding the destination offers a compatible service Settings for your Telstra fixed line SMS service can be changed by calling 0198 339 999 and following the prompts UK only Program the correct SMS Centre numbers as described on next page under the section Entering the telephone numbers in SMS centre operator E g for BT Send 14701709400 Receive 080058752 Terminal No 9 To register for the SMS text ...

Страница 12: ...mber or press Option to retrieve the telephone number from the telephone book 7 Press Option 8 Scroll to Send Press OK 9 The display shows if the SMS has been sent successfully or not If no error report is shown the message has been sent successfully Requires special subscription Remember to store special numbers in the service centre for E mail below Entering the telephone number in SMS centre op...

Страница 13: ... several levels Wallpaper The background image in the display can be changed Auto Answer The handset answers incoming calls when it is lifted from the base unit LED Select if handset ringer LED should flash or not when ringing Select Base Only used in systems with more than one base unit Handset Name The text shown on standby can be altered Language Language setting is explained in Connection Baby...

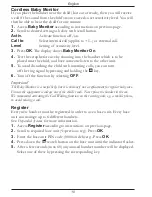
Страница 14: ... ring signal by pressing and holding the key 6 Turn off the function by selecting OFF Important The Baby Monitor is a useful help but it is obviously not a replacement for regular baby care Ensure the equipment is always out of the child s reach Never place the handset in the cot We recommend activating the Call Waiting function on the receiving unit e g a mobile phone to avoid missing a call Regi...

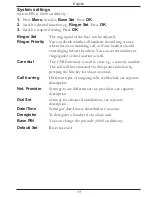
Страница 15: ...of ring signals for this function as well Care dial The CARE memory is used to store e g a security number The call will be connected via the speaker function by pressing the line key for about a second Call barring Different types of outgoing calls are blocked see separate description Net Provider Settings to use different service providers see separate description Dial Set Settings for advanced ...

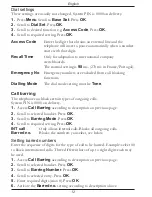
Страница 16: ...all barring The telephone can block certain types of outgoing calls System PIN is 0000 on delivery 1 Access Call Barring according to description on previous page 2 Scroll to selected handset Press OK 3 Scroll to Barring Mode Press OK 4 Scroll to required setting Press OK INT call Only allows internal calls Blocks all outgoing calls Barred no Blocks the numbers you select see below Setting barred ...

Страница 17: ... is not selected the digits will be added to every call Network services Most usual operator extra services can be accessed via the menu or with the menu buttons during a call Some functions are pre programmed but is not certain that all functions will work on delivery as this will depend on the country of installation operator You can change the codes that are sent see Other Settings Please note ...

Страница 18: ...ase unit already The handset number used for internal calls is shown in the display on standby The base unit should be positioned centrally so that the coverage area is roughly equal for all handsets You can register up to 6 handsets to one base unit This model is GAP Generic Access Profile compatible which means that the handset and the base unit can both be used with most other GAP compatible un...

Страница 19: ...ly you can write to Customer Services Doro UK Ltd 1 High Street Chalfont St Peter Buckinghamshire SL9 9QE Guarantee This product is guaranteed for a period of 12 months from the date of purchase In the unlikely event of a fault occurring during this period please return the item with a copy of the purchase receipt to your place of purchase Proof of purchase is required for any service or support r...

Страница 20: ... to their respective wall sockets Check that you have selected Tone Dial see System Settings Dial Check the charge status of the handset batteries The telephone continues to ring The telephone s ring signals do not follow the line signal which means that the signal may continue for up to 10 seconds after answering a call SMS does not work In order for this feature to function you must subscribe to...

Страница 21: ...guarantee shall not apply to a fault caused by an accident or a similar incident or damage liquid ingress negligence abnormal usage not reasonably maintained or any other circumstances on the purchaser s part Furthermore this guarantee shall not apply to a fault caused by a thunderstorm or lightning excessive or any other voltage fluctuations or faults on the telephone line As a matter of precauti...

Страница 22: ...f the product by Telecom nor does it provide any sort of warranty Above all it provides no assurance that any item will work correctly in all respects with another item of Telepermitted equipment of a different make or model nor does it imply that any product is compatible with all of Telecom s network services This equipment shall not be set to make automatic calls to the Telecom 111 Emergency Se...

Страница 23: ...19 English ...

Страница 24: ...English Version 3 0 ...

Отзывы: