background image

6

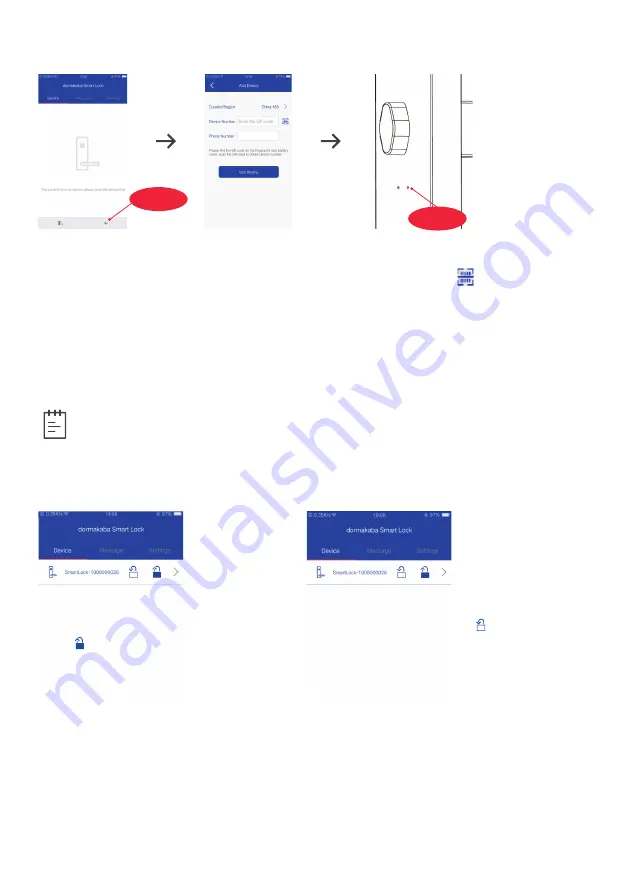
Bind Devices

1.  Enter the device interface and click the binding icon “+” on the bottom;
2.  On the device binding interface, click the code scanning icon ”     “, Scan the Device 

Number QR code which you will find on the back of the battery pack and enter  
the mobile phone number and click “start binding”.

3.  When the app sending request of binding and the lock prompts “In operation”, 

press “M” button (right hand side) on the back lock body.

4.  Choose the default name or input a new name, following the instruction  

“Please name this device” and click “save” button to confirm.


Device Management

Refresh device information: 

Enter device management interface and press one  

binding device until a selection menu pops up. Click “Refresh Device Information” to 
synchronize the data in app and smart lock system. 

Unbind the device: 

Enter device management interface and press one binding device 

until a selection menu pops up. Click “Unbind the Device” and then click“OK” to delete 
the device from the app device list.

Bind icon

Unlocking: 

enter management 

Interface and click the unlocking  
icon “   “. 
The smart lock is unlocked.

Locking: 

enter management Interface, 

and click the locking icon ”   “. 
The smart lock is successfully locked.

Note

• 

One app can be bound with maximum 10 devices.

D button

M button

Содержание Grange

Страница 1: ...1 The Grange User s Guide ...

Страница 2: ...Grange will remain in factory default mode until a user code is created Indicators This guide will assist in using the features and functions of the lock Please download the app dormakaba SmartLock from the app store or Google Play or scan QR codes found on page 5 Thank you for choosing The Grange by dormakaba Operate successfully buzzer long beeps green LED stays for 2 seconds Operate unsuccessfu...

Страница 3: ... the screen b Press 1 A beep is heard and green symbol is shown on the screen c Input a 6 12 digit user code d Press the lock icon A beep is heard and green symbol is shown on the screen e A second beep is heard and green symbol is shown on the screen to confirm user code has been added M 1 M 2 D 1 D 2 USER CODE Add a new user with an RFID card a Press the M button for 3 seconds A beep is heard an...

Страница 4: ...ay be useful if you are expecting visitors or a delivery The handle will take a maximum of 10 codes at any one time You can find both one time and timed codes via the app you can enter a maximum 10 of each Timed codes are very useful in the following scenarios B B accommodation allowing guests access from 10am Friday to 10am Sunday Allowing your cleaner trade person or visitors access on a certain...

Страница 5: ...ure or fingerprint ensuring the Bluetooth function in phone is turned on You can enter device management automatically after successful login iOS Apple Store Google Play Login By Fingerprint Login By Gesture Login By Password Cancel Login By Fingerprint Please enter password Login Login By Gesture Login By Password Cancel Login By Fingerprint Login By Gesture Login By Password Cancel Click to unlo...

Страница 6: ...ick save button to confirm Device Management Refresh device information Enter device management interface and press one binding device until a selection menu pops up Click Refresh Device Information to synchronize the data in app and smart lock system Unbind the device Enter device management interface and press one binding device until a selection menu pops up Click Unbind the Device and then cli...

Страница 7: ...on is only available to administrator s account Binding list Enter the Device Information interface and click Bind List to display the mobiles bound with the smart lock Click the deleting icon on the right of the user you want to delete and then click OK to confirm the operation Shake to unlock Enter the Device Information interface and shake your mobile to unlock Note Shaking to unlock can be ena...

Страница 8: ...ck All Devices after entering Message interface 2 Select a device name click All Messages to unfold options including All Messages Open Messages User Messages Operation Messages and Alarm Messages You can click All Times to unfold operations including All Times Recent 1 day Recent 7 days Recent 15 days Recent 30 days and Custom time zones 3 Select the required message type or time zone to view Syn...

Страница 9: ...on to the selected lock name Hold on to the selected lock name Hold on to the selected lock name Click on the selected lock name Click on the selected lock name Refresh device information Unbind device Click OK to confirm Download all records Share your bluetooth key Choose the start date time and valid period Generates Key View or Change Device Name User List Capacity Current Time Battery Product...

Страница 10: ...ill go into lockout mode for 3 minutes The buzzer will beep 10 times and the red LED will flash 10 times When the battery is low the system will indicate this each time the door is opened by beeping 5 times and the LED will flash 5 times To change the batteries undo screw at the bottom of internal handle then pull battery case out Requires 8x AA Alkaline batteries When the maximum of 100 access co...

Страница 11: ...for warranty must be made by contacting dormakaba at the address listed above at the earliest stage that the defect becomes obvious to enable prompt action and to avoid further damage and must be made no later than 1 month from the defect date of repair becoming obvious 5 Any warranty claim must be accompanied by appropriate documentation which stipulates the date of the installation he invoice nu...

Страница 12: ...ned as recommended by dormakaba l maintenance items which are the responsibility of the purchaser m Products installed maintained or operated other than in accordance with dormakaba s instructions and n overhaul replacement or repair works undertaken prior to approval from dormakaba of any warranty claim LIMITATIONS 9 dormakaba makes no express warranties or representations other than set out in t...

Отзывы: