background image

A89995_A 

©

2019 All rights reserved.

3/8

BEST is a trademark of dormakaba USA Inc.

1

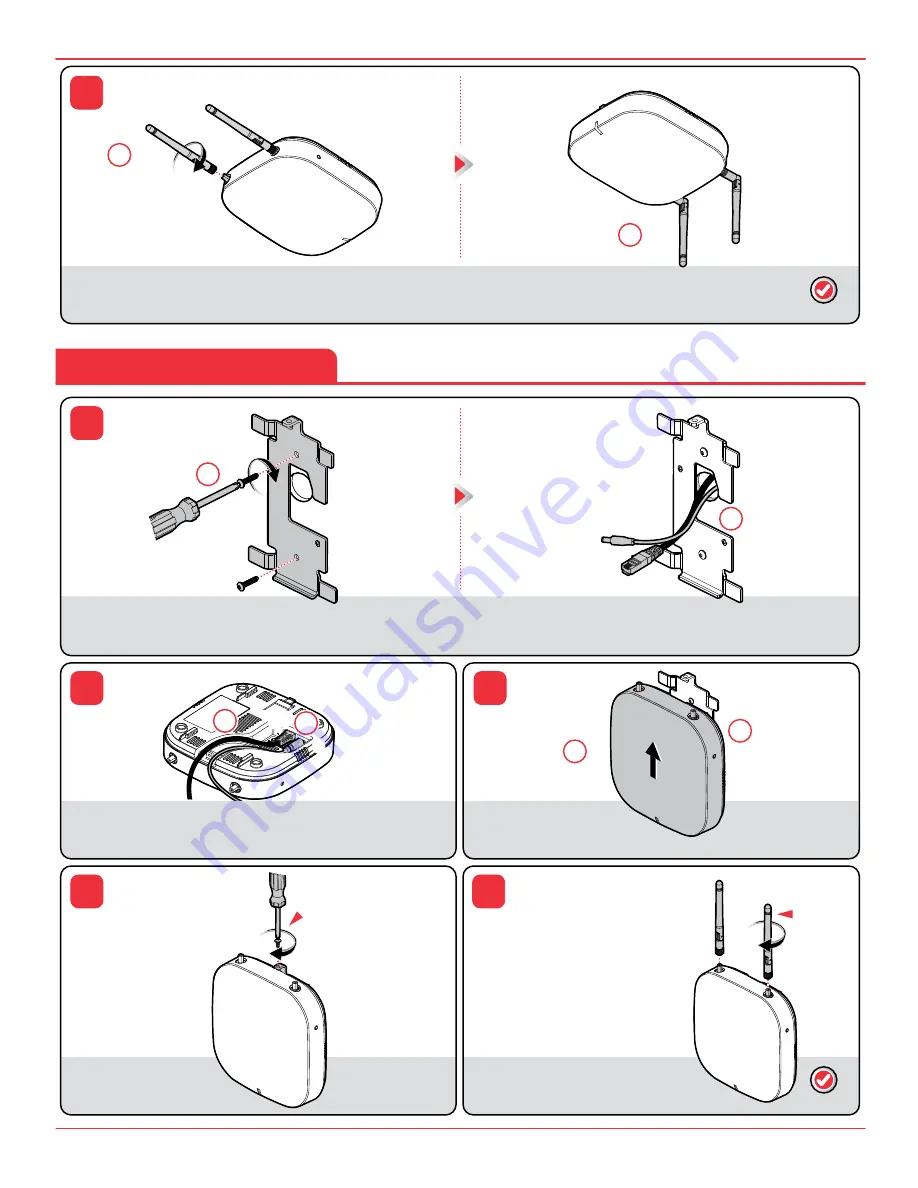
Attach the mounting bracket assembly 

(C)


to the wall using the appropriate anchors 
and screws.

2

If the Ethernet cable 

(H)

 and the DC power cable 

(G) 

will be pulled through the wall surface, both cables 
must exit the wall in the area shown.

Install the #6-19 x 1/4" 
retaining screw 

(F)

.

Install the antennas 

(B

(2x)

)

 onto the gateway 

(A)


using 4-6 in-lb torque.  The antennas 

(B

(2x)

)

must be oriented vertically when installed.

1

2

3

4

5

1

Slide the gateway 

(A)

 onto the 

mounting bracket assembly feet 

(C)


until it snaps into place.

2

Push any excess cable 
back into the wall.

2

ATTACH MOUNTING
BRACKET ASSEMBLY

CONNECT
CABLES

SLIDE/SNAP
ON GATEWAY

INSTALL
RETAINING
SCREW

INSTALL
ANTENNAS

ROUTE
CABLES

F

C

H

G

H

A

A

A

C

G

B

(2x)


1

Connect the Ethernet cable 

(H)


and the DC power cable 

(G)

to the gateway 

(A)

2

Route the Ethernet cable

 (H) 

and the 

DC power cable 

(G)

 into the channel 

on the bottom of the gateway 

(A)

.

NOTE: 

 Anchors and 

screws not included

NOTE:


 Ethernet cable 

(H)


not included, required for 
install; DC power cable 

(G) 

optional to use, not needed 
if powered by PoE

NOTE:


#6-19 x 1/4" 

retaining screw 

(F)

optional to use

NOTE:


Ethernet cable 

(H)


not included, required for 
install; DC power cable 

(G) 

optional to use, not needed 
if powered by PoE

6

1

Install the antennas 

(B

(2x)

)

 onto the

gateway 

(A) 

using 4-6 in-lb torque.

2

The antennas 

(B

(2x)

)

 must be

oriented vertically when installed.

INSTALL
ANTENNAS

VERTICALLY ORIENT
ANTENNAS

B

(2x)

B

(2x)

A

A

COMPLETE

COMPLETE

Wall Or Rigid Ceiling Installation

1

1

1

1

2

2

2

2

Содержание BEST Wi-Q

Страница 1: ...e Survey helps you determine the number and optimum location of the Gateways and verify the signal strength before permanently installing the Gateway hardware It is important to perform the Site Survey process as many times as needed to determine the optimal positions of the Gateways that allow a strong signal connection to be achieved for all of the locks Refer to the Wi Q User Guide for more inf...

Страница 2: ...assembly C into the four hooks of the ceiling grid bracket assembly D until it is centered 3 The gateway antennas B 2x will be on the end of the mounting bracket assembly C with the narrow tab 1 2 4 Tighten the two 6 x 1 4 set screws included in assembly C using a 2 Phillips screwdriver Connect the Ethernet cable H and the DC power cable G to the gateway A The cables must exit the ceiling in the a...

Страница 3: ...T CABLES SLIDE SNAP ON GATEWAY INSTALL RETAINING SCREW INSTALL ANTENNAS ROUTE CABLES F C H G H A A A C G B 2x 1 Connect the Ethernet cable H and the DC power cable G to the gateway A 2 Route the Ethernet cable H and the DC power cable G into the channel on the bottom of the gateway A NOTE Anchors and screws not included NOTE Ethernet cable H not included required for install DC power cable G optio...

Страница 4: ...CH MOUNTING BRACKET ASSEMBLY F H C G A A C A Install the antennas B 2x onto the gateway A using 4 6 in lb torque 1 2 INSTALL ANTENNAS A B 2x 1 1 Connect the Ethernet cable H and the DC power cable G to the gateway A 2 Route the Ethernet cable H and the DC power cable G into the channel on the bottom of the gateway A CONNECT CABLES A B 2x B 2x E 2x 1 Connect the Ethernet cable H and the DC power ca...

Страница 5: ...eparately anchors and screws not included 2 Slide the gateway A onto the mounting bracket assembly feet C until it snaps into place 3 The omni directional cable I will pass through the holes in the top of the IPG enclosure J 5 I A 1 Install the antennas B 2x onto the gateway A using 4 6 in lb torque The antennas B 2x must be oriented vertically when installed 1 Install the Omni Directional Antenna...

Страница 6: ...señal para todas las cerraduras Consulte la Guía del usuario de Wi Q para obtener más información Deberá probar la intensidad de la señal en las ubicaciones de todas las puertas cerca del perímetro del área de cobertura así como las ubicaciones donde una obstrucción física pueda provocar interferencias 3 Montaje de las compuertas Una vez que se haya determinado la ubicación óptima de las compuerta...

Страница 7: ...su lugar 3 Las antenas B 2x pasarán a través de los orificios de la parte superior del gabinete IPG J NOTA El gabinete IPG J es opcional y se vende por separado PASO 5 6 OPCIÓN 2 INSTALE EL KIT DE LA ANTENA 1 Kit de la antena Instale el kit de la antena omnidireccional I en la compuerta A DESLICE ENCASTRE EN LA COMPUERTA 2 Kit de la antena Deslice la compuerta A en la base del conjunto del soporte...

Страница 8: ...l enceinte IPG J sur le mur à l aide des ancrages et des vis appropriés REMARQUE L enceinte IPG J est facultative et vendue séparément les ancrages et les vis ne sont pas inclus ÉTAPE 2 ACHEMINER CÂBLES Acheminez le câble Ethernet H et le câble d alimentation CC G dans l enceinte IPG J à l aide des entrées défonçables et des passe câbles fournis REMARQUE Le câble Ethernet H n est pas inclus mais i...

Отзывы: