


9
System Overview
A BEST Access Control System with integrated Wi-Q Technology combines powerful
access control software with Wi-Q Gateways, Wireless Access Controllers, and multiple
controller formats that work together to enable all decision making at the door. The BEST®
Wi-Q system runs remotely with no need for hard wiring, providing innovative access
control in any environment. The Wi-Q Interface system is versatile, so you can create a
whole new system, retrofit existing hardware, and include various video camera, alarms,
and inputs/outputs.
Basic Wi-Q Interface Components
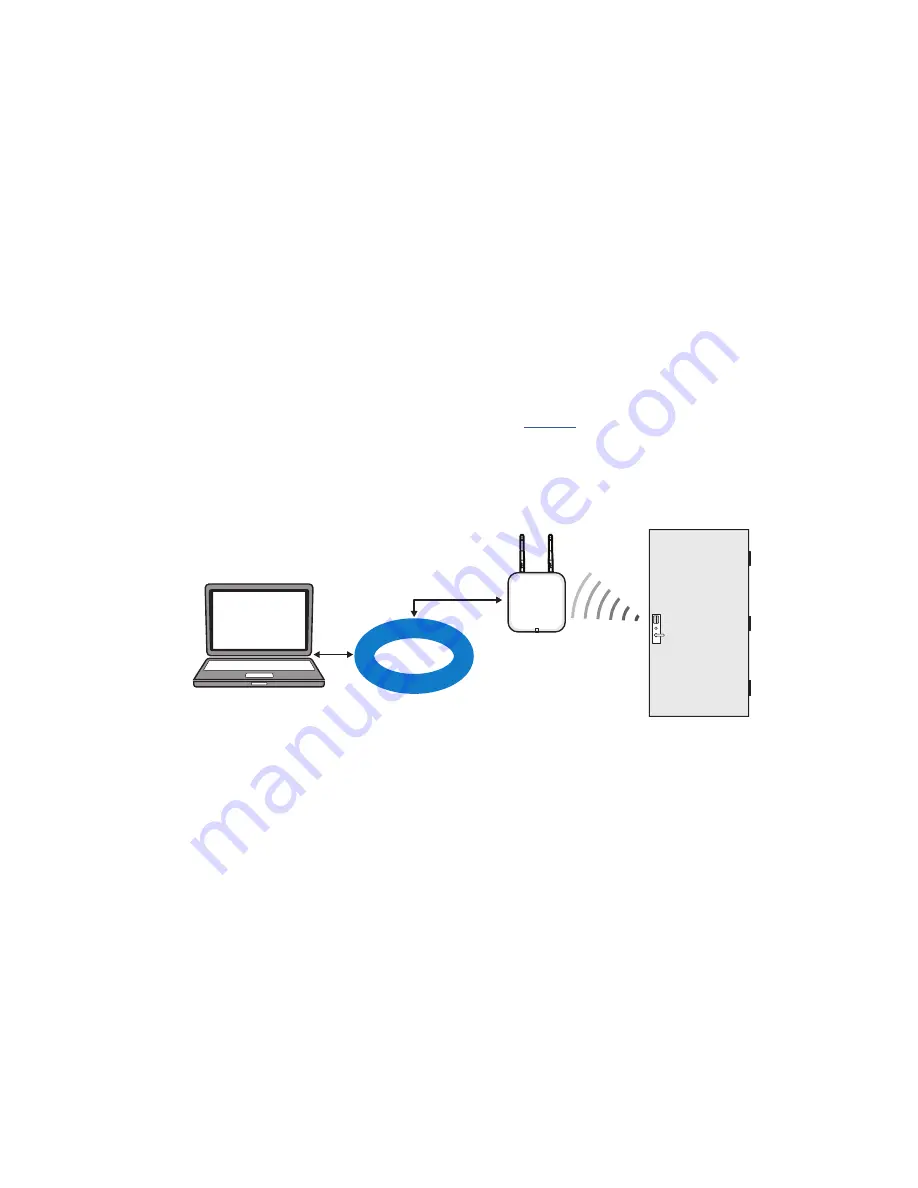
A basic Wi-Q Interface system has four components: (1) a Server running the System
Software, (2) a host computer with the Wi-Q Interface Software installed, (3) a Wi-Q
Gateway, and (4) a Wireless Controller at the door.
these four components.
Figure 1 Four Basic Components
1 Server with System Software
Existing systems and operators can continue to work with OnGuard as normal to
control Wi-Q wireless components.
Note
The System Software must be installed and operational prior to the installation and
operation of the Wi-Q components.
2 Wi-Q Interface software
Wi-Q Interface software is installed either on the same computer as the OnGuard
Server or another Host computer and set up to translate data between the two
systems to allow normal access control functionality.
3 Wi-Q Gateway
The Wi-Q Gateway is a wireless device connected to the Host computer through a
secure IP address, similar to the way your computer is connected to the internet. It
transfers data signals from Wireless Controllers to and from the Host computer. The
Host
LAN/WAN
Wi-Q
Gateway
Wireless
Door
Controller
Содержание BEST Wi-Q ONGUARD
Страница 7: ...A Glossary Glossary 109 B Lock Installation Lock Installation 113 ...
Страница 40: ...40 2 Select Inbound Rules Figure 13 Inbound Rules Select Inbound Rules ...
Страница 44: ...44 6 Select Allow the connection Click Next to continue See Figure 17 Figure 17 Allow the Connection ...
Страница 45: ...45 7 De select the Public option Click Next Figure 18 De select Public ...
Страница 52: ...52 Figure 27 Wi Q Interface Setup Wizard Click Next ...
Страница 57: ...57 Figure 33 Custom Setup Options Click Next ...
Страница 58: ...58 10 The wizard is now ready to begin installation Click Install Figure 34 Begin Installation Click Install ...
Страница 75: ...75 To add a new Sign On Credential 1 Select Add Figure 52 Add Segment Sign On Credential 1 ...
Страница 113: ...B Lock installation ...
Страница 168: ...6161 East 75th Street Indianapolis IN 46250 USA Phone 1 800 392 5209 https dhwsupport dormakaba com hc en us 172713 S3 ...


