


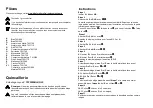


Pi ces
Pi ces de rechange, visitez www.dhpfurniture/fre/replacement-parts
Tout dans 1 grosse bo te!
Il y a des bo tes int rieures qui contiennent les composants pour completer
l'assemblage.
Avant de jeter l'emballage, s'il vous pla t utiliser les cases cocher pour
identifier les pi ces et assurez-vous que vous avez toutes les pi ces
n cessaires pour l'assemblage.
Quincaillerie
Emballage coque #: TFF5000BLKS-00
Remarque:
Ne serrez pas compl tement les boulons jusqu' ce que
l'ensemble est achev , sauf indication contraire dans les intructions tape
par tape.
Les vis & les boulons utilis s dans chaque tape sont pr sent s en
taille r elle dans le coin inf rieur droit de la page.
Instructions
A
B
O
P
G
H
Q
L
R
E
D
S
T
V1
Bras:T621680
Bras:T621690
Armature en Maille:T621700
Armature en Maille:T621710
Rail:T621720
Connecteur du ch ssis:T621730
Entretoise :T621740
M canisme:T621750
M canisme:T621760
Connecteur d'armature :T612300
Pied Central:T621770
Maiteneur:T613540
Crochet:T612410
Capuchon:T621780
Couverture en tissu:T621600
Matelas:T621610
tape 1
Ins rer
V
x
4
dans
A/B
.
tape 2
Attacher
L
A
R
B
avec
,
.
La partie sup rieure des m canismes peut sembler diff rente en raison de
leurs parties mobiles. Veuillez d terminer l'orientation en fonction de la partie
inf rieure des m canismes.
Conseil: Serrer l' crou
l'aide de la cl
, puis serrer le boulon
l'aide
de la cl
.
tape 3
Attacher
G
x
2
H
x
1
avec
.
R p tez la m me proc dure pour l'autre
G
X 2 et
H
.
tape 4
Attacher
D
x
2
H
x
2
avec
.
tape 5
Attacher
G
x
4
A/B
avec
,
.
tape 6
6.1
Ins rer
E
x 2 dans
O
et attacher avec
.
6.2
Ins rer
P
sur
E
x 2 et attacher avec
.
R p tez la m me tape pour les autres
E
,
O
,
P
.
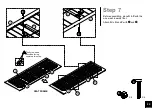
tape 7
Avant l'assemblage, placez
O
et
P
avec le treillis m tallique face au sol.
Attacher
Q
O
et
P
avec
et
.
tape 8
Avant l'assemblage, placez
O
et
P
avec le treillis m tallique face au sol.
8.1
Attacher
Q
O
et
P
avec
et
.
8.2
A
Q
O
et
P
avec
et
.
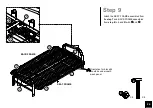
tape9
Fixez le cadre de si ge assembl dans
l' tape 7
et le cadre du dossier
assembl dans
l' tape 8
L
et
R
en utilisant
et
.
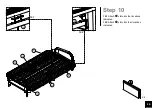
tape10
10.1
Collez
x 4 avec
H
x 2 o indiqu .
10.1
Collez
x 4 avec
G
x 4 o indiqu .
tape11
Soulevez le cadre du dossier et mettez-le dans la deuxi me position comme
indiqu .
Содержание FF5000BLKS
Страница 9: ...9 Step 4 Attach D x 2 to H x 2 with X 2 5 H H D D H D...
Страница 10: ...10 Step 5 Attach G x 4 to A B with X 8 10 X 4 1 A B G G G G G A 1 10...
Страница 16: ...16 Step 11 Lift the Back Frame to the second position First position Second position...
Страница 17: ...17 Step 12 O O P P T T Attach T x 3 to O x 2 and P x 2 T T T...
Страница 18: ...18 Step 13 O P S S S X 4 8 Attach S x 2 to O and P with...


