Dorel Home Products FF5000BLKS Скачать руководство пользователя страница 2

Contact Us!


[email protected]

DHP Consumer Services

12345 Albert Hudon, Suite 100,
Montreal, Quebec, Canada H1G 3L1

Read Before Beginning Assembly 


1-800-267-1739


Warranty Information 


Caution


DHP warrants this product to be free from defects in material and workmanship and 
agrees to remedy any such defect. This warranty covers one year from the date of 
original purchase. This is solely limited to the repair or replacement of defective 
parts and assembly labor is not included.

This warranty does not apply to any product which has been improperly assembled, 
subjected to misuse or abuse or which has been altered or repaired in any way. 
Liability for consequential damages is excluded to the extent exclusion is permitted 
by law. This warranty gives you specific legal rights and you may also have other 
rights which vary from state to state.

To obtain warranty service, purchaser must present original bill of sale. Components
repaired or replaced are warranted through the remainder of the original warranty 
period only. The defective components will be repaired or replaced without charge, 
subject to the terms and conditions described above. 

Visit 

www.dhpfurniture.com

 to view the limited warranty valid in the U.S. and 

Canada.

   Call our toll free number if you need assistance.
   Work in a spacious area and near where the unit will be used, preferably on a 

carpet, or use a piece of the cardboard packaging to protect your floor and product. 

   Recommended # of people needed for assembly: 

2

 (however it is always better 

to have an extra hand). Estimated assembly time is 

1 h 30 min

.

   Make sure all parts are included.  Most parts are labeled or stamped on the raw 

edge.

   Read each step carefully. It is very important that each step of the instructions is 

performed in the correct order. If these steps are not followed in sequence, 
assembly difficulties will occur.

   You can visit our site 

https://

helpcenter.dhpfurniture.com

 (Scan below 

QR-code if you possess a smartphone or tablet) for assembly videos and more! 

   This product is designed for home use and not intended for commercial use.
   This product contains small components. Please ensure that they are kept away

from small children. 

   Do not use power tools to assemble your furniture. Power tools may strip or 

damage the parts.

For help with assembly, identifying parts, product information or to order parts, 
please contact us:

9:00

 am to 

9:00

 pm (Eastern Time)

10 

am to 

6:30 

pm (Eastern Time)

11 

am to 

pm (Eastern Time)

Monday to Friday

Saturday

Sunday

SCAN


me

& I'll guide you to 

DHP Helpcenter

!

Содержание FF5000BLKS

Страница 1: ...e Metal Arm Futon If parts are missing or damaged we will gladly ship your replacement parts free of charge Lot Number Thank you for purchasing from DHP THIS INSTRUCTION BOOKLET CONTAINS IMPORTANT SAF...

Страница 2: ...urniture com to view the limited warranty valid in the U S and Canada Call our toll free number if you need assistance Work in a spacious area and near where the unit will be used preferably on a carp...

Страница 3: ...include components required to complete this assembly Replacement Parts visit www dhpfurniture com eng replacement parts A Arm T621680 X 1 B O P G H Q L R E A B O O P P G G H E Q A L R Arm T621690 X...

Страница 4: ...he parts needed for the assembly There are inner box es that include components required to complete this assembly Replacement Parts visit www dhpfurniture com eng replacement parts D S T V1 D S S T V...

Страница 5: ...se indicated in the step by step instructions The screw s bolt s to be used at each step are shown in actual size in the lower right corner of the page 6 7 8 4 5 3 2 1 1 4 X 1 3 8 X 8 5 16 X 2 7 16 X...

Страница 6: ...ches with the shoulder of V1 A B V1 V1 V1 V1 V1 B Avoid fraying the surface of parts during assembling please lay the part A and B on a piece of cardboard You need an extra hand and a mallet to help w...

Страница 7: ...9 4 X 4 4 4 4 4 9 9 9 The top of Mechanisms L R may look different due to the movable joints Please determine the orientation based on their bottom sides Hint Hold Nut using wrench key and then tighte...

Страница 8: ...8 Step 3 Attach G x 2 to H x 1 with Repeat the same procedure for another G x 2 and H X 8 8 G H G G G H G H...

Страница 9: ...9 Step 4 Attach D x 2 to H x 2 with X 2 5 H H D D H D...

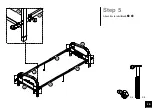
Страница 10: ...10 Step 5 Attach G x 4 to A B with X 8 10 X 4 1 A B G G G G G A 1 10...

Страница 11: ...11 Step 6 6 1 Insert E x 2 into O and fasten with 6 2 Insert P onto E x 2 and fasten with Repeat the same procedure for remaining parts E O and P X 8 P O X 2 8 O O E E P E 6 1 6 2...

Страница 12: ...Step 7 Before assembling place O P with the wire mesh towards floor Attach Q to O and P with and X 4 9 3 X 4 P O SEAT FRAME O O Q Q 9 9 3 3 O P Q Q Q The Screw head should be facing upward in this ste...

Страница 13: ...2 X 2 6 X 2 7 3 9 6 7 8 1 8 2 BACK FRAME and Before assembling place O P with the wire mesh towards floor 8 1 Attach Q to O and P with and 8 2 Attach Q to O and P with and O P Q Q 7 6 The Screw head s...

Страница 14: ...P P R L X 8 X 8 2 O P R 2 2 9 9 Attach the SEAT FRAME assembled from the step 7 and BACK FRAME assembled from step 8 to L and R with and SEAT FRAME BACK FRAME Orientation for brace Q should be undern...

Страница 15: ...15 Step 10 10 1 Attach x 4 to H x 2 at locations indicated 10 2 Attach x 4 to G x 4 at locations indicated 11 X 8 G G 10 1 10 2 H G G H H G...

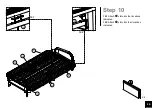
Страница 16: ...16 Step 11 Lift the Back Frame to the second position First position Second position...

Страница 17: ...17 Step 12 O O P P T T Attach T x 3 to O x 2 and P x 2 T T T...

Страница 18: ...18 Step 13 O P S S S X 4 8 Attach S x 2 to O and P with...

Страница 19: ...er flat and open the two zippers located on each side of the cover 14 2 Put the Pads into each compartment in the cover and close the zippers 14 3 Place the sub assembly Pad Cover on the frame you jus...

Страница 20: ...sh the backrest forward as much as possible then slowly pull it back all the way until you reach the sleeping position FOR SEATING POSITION FOR BED POSITION HOW TO USE YOUR FUTON Two different positio...

Страница 21: ...with two people lifting and carrying the unit to its new location Your DHP furniture can be disassembled and reassembled to move Some parts have been pre assembled for this item They are illustrated o...

Страница 22: ...a v lida en los Estados Unidos y Canad Informaci n sobre la garant a Para solicitar ayuda con el ensamblaje identificaci n de partes informaci n del producto o simplemente ordenar otras partes dirijas...

Страница 23: ...21770 Retenedor T613540 Gancho T612410 Cubierta T621780 Forro de tela T621600 Colch n T621610 Paso 1 Insertar V1 x 4 dentro de A B Paso 2 Una L con A con R con B con La parte superior de los mecanismo...

Страница 24: ...2 Paso 13 Una S x 2 con O P con Paso 14 14 1 Coloque la funda en posici n plana y abra los dos cremalleras que se encuentran en los lados 14 2 Coloque las 4 partes del colch n dentro de cada uno de lo...

Страница 25: ...oir la garantie limit e valide aux tats Unis et au Canada Informations sur la garantie Besoin d aide pour assembler identifier des pi ces s informer sur le produit ou pour commander des pi ces contact...

Страница 26: ...hon T621780 Couverture en tissu T621600 Matelas T621610 tape 1 Ins rer V x 4 dans A B tape 2 Attacher L A R B avec La partie sup rieure des m canismes peut sembler diff rente en raison de leurs partie...

Страница 27: ...P x 2 tape13 Attacher S x 2 O P avec tape 14 14 1 Placez la couverture sur le sol et ouvrez les deux fermetures clair sur chaque c t 14 2 Ins rer les 4 parties du matelas l int rieur de chacun de chaq...

Отзывы: