background image

FR

Limite de Poids: 
Lit d'appoint: 400 Lb / 181 Kg
Lit gigogne: 250 Lb / 113 Kg

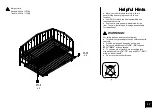
Conseils utiles

   D placez votre nouveau mobilier avec soin, nous recommandons deux 

personnes pour soulever et transporter le mobilier vers son nouvel emplacement.

   Votre mobilier DHP peut  tre d mont  et reassembl  pour faciliter les 

d m nagements.

   Certaines pi ces ont  t  pr -assembl es pour ce produit. Ils sont illustr s sur 

cette page et disponibles pour le remplacement.

Avertissement

Pour des raisons de s curit  et pour pr venir les blessures: 

   Ce lit n'est pas con u pour  tre utilis  par des enfants de moins de 

4

 ans. 

   Interdire le saut et le chahut sur le lit. 
   Utilisez uniquement un matelas de 

74"-75"

 de long par

 37 "-38 "

 de large.


Pour optimiser l'utilisation de votre lit inf rieur, utilisez un  matelas individuel 

de maximum 

8''

 d' paisseur.

   Ne pas utiliser rehausseur de lit sous ce produit.

Содержание 4374139N

Страница 1: ...dle Z W 2019 3 25 If parts are missing or damaged we will gladly ship your replacement parts free of charge Lot Number Thank you for purchasing from DHP THIS INSTRUCTION BOOKLET CONTAINS IMPORTANT SAFETY INFORMATION PLEASE READ AND KEEP FOR FUTURE REFERENCE 1 2014 Dorel Home Products All Rights Reserved Twin White Weight Limit Daybed 400 Lb 181 Kg Trundle 250 Lb 113 Kg ...

Страница 2: ...furniture com to view the limited warranty valid in the U S and Canada Call our toll free number if you need assistance Work in a spacious area and near where the unit will be used preferably on a carpet or use a piece of the cardboard packaging to protect your floor and product Recommended of people needed for assembly 2 however it is always better to have an extra hand Estimated assembly time is...

Страница 3: ...ly There are inner box es that include components required to complete this assembly Replacement Parts visit www dhpfurniture com eng replacement parts Headboard T974430 X 1 T Footboard T974440 X 1 Rear Guard Rail T974500 X 1 Side Rail T922090 X 2 Slats T922100 X 22 Slat Spacer T919490 X 21 Slat Spacer T919480 X 22 Plastic plug T392590 X 44 T1 I J O Q W Y T T1 I J O Y Q W ...

Страница 4: ...embly There are inner box es that include components required to complete this assembly Replacement Parts visit www dhpfurniture com eng replacement parts Side Rial T949260 X 2 End Rail T910300 X 2 Slats T922100 X 20 Caster T949280 X 2 Locking caster T949270 X 2 Slat Spacer T919490 X 19 Slat Spacer T919480 X 20 Plastic Plug T392590 X 40 E M O N N1 Q W Y E M N1 N O Y W Q ...

Страница 5: ...lete unless otherwise indicated in the step by step instructions The screw s bolt s to be used at each step are shown in actual size in the lower right corner of the page 1 1 4 X 2 3 16 X 4 5 16 X 1 X 8 5 16 Spring Washer X 8 5 16 Metal Washer X 8 4mm X 1 2 4 3 5 Hardware Pack For Daybed T4374139N 00 ...

Страница 6: ...mbly is complete unless otherwise indicated in the step by step instructions The screw s bolt s to be used at each step are shown in actual size in the lower right corner of the page 1 2 3 4 5 1 4 X 1 5 16 X 4 1 4 X 5 8 X 8 1 4 X 4 4mm X 1 Wrench X 1 Hardware Pack For Trundle T5585096 02 ...

Страница 7: ...ions will illustrate how to assemble the Daybed from Step 1 to Step 4 Please use the Daybed Hardware Pack T4374139N 00 Attach J x 2 to T and T1 with T T1 J J T J 2 3 4 4 3 2 2 3 4 X 8 X 8 X 8 Wide side of the slot should be facing up ...

Страница 8: ...8 Step 2 X 4 T1 T I I T 1 1 Attach I to T and T1 with 1 ...

Страница 9: ...9 Step 3 J O O O Y O J J J 3 1 3 2 3 1 Insert O into J X 2 as illustrated 3 2 Lock O into place with Y Y ...

Страница 10: ...10 Step 4 W Q O O O Q W O 4 1 4 2 4 1 Press W onto O approximately in the middle of O as illustrated 4 2 Attach Q to W alternating left and right as illustrated ...

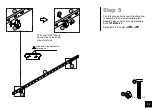
Страница 11: ...ssemble the Trundle from Step 5 to Step 9 Please use the Trundle Hardware Pack T5585096 02 Attach N1 x 2 to one E with and X 2 E E E N1 N1 N1 N1 1 1 3 X 2 3 Wide side of the slot should be facing up The Lever OFF should be oriented on the same side of slat slots ...

Страница 12: ...12 Step 6 Attach N x 2 to the other E with and X 2 3 1 X 2 1 3 E N E N E N N Wide side of the slot should be facing up ...

Страница 13: ...13 Step 7 Attach M x 2 to E x 2 with X 8 E E M M M E 2 2 ...

Страница 14: ...14 Step 8 E E O E E O O Y O E 8 1 8 2 8 1 Insert O into E X 2 as illustrated 8 2 Lock O into place with Y Y ...

Страница 15: ...15 Step 9 9 1 Press W onto O approximately in the middle of O as illustrated 9 2 Attach Q to W alternating left and right as illustrated 9 1 9 2 W Q O W O ...

Страница 16: ...er ON as illustrated How to lock caster To store Trundle Unlock the casters by pulling up the lever ON as illustrated How to unlock caster and push in the Trundle underneath the Daybed Keep casters in lock condition under normal use to prevent unintentional movement which may lead to instability and tipping WARNINGS How to lock caster How to unlock caster ...

Страница 17: ...acement WARNINGS For safety reasons and to prevent injuries This bed is not intended for use by children under 4 years old Prohibit jumping and horseplay on this bed Only use a mattress which is 74 75 long and 37 38 wide on daybed To optimize use of trundle use a standard twin size mattress which is 74 75 long and 37 38 wide no thicker than 8 Do not use risers under this bed Helpful Hints Weight L...

Страница 18: ...t a limitada v lida en los Estados Unidos y Canad Informaci n sobre la garant a Para solicitar ayuda con el ensamblaje identificaci n de partes informaci n del producto o simplemente ordenar otras partes dirijase a cs dhpfurniture com 1 800 267 1739 Lunes Viernes 9 00 am 9 00 pm hora del este S bado 10 am 6 30 pm hora del este Domingo 11 am 7 pm hora del este DHP Servicios al Cliente 12345 Albert ...

Страница 19: ...0 Tubos T922100 Separador para tubo T919490 Separador para tubo T919480 Cubiertas de pl stico T392590 Paso 1 Las instrucciones siguientes ilustrar n c mo ensamblar el Div n del Paso 1 al Paso 4 Utilice el paquete Daybed Hardware T4374139N 00 Una J x 2 con T y T1 con Paso 2 Una I con T y T1 con Paso 3 3 1 Inserte O dentro de J X 2 como se ilustra 3 2 bloquee O en su lugar con Y Paso 4 4 1 Prensa W ...

Страница 20: ...adas en este producto Se encuentran ilustradas en esta p gina y disponibles para reemplazo Precauc on Por razones de seguridad y para prevenir lesiones Este producto no ha sido dise ado para ser utilizado por ninos menores de 4 a os Prohibido saltar o jugar sobre la cama Utilice nicamente un colch n que sea de 74 75 de largo y 37 38 de ancho Para optimizar el uso de la cama inferior use un colch n...

Страница 21: ...e com pour voir la garantie limit e valide aux tats Unis et au Canada Informations sur la garantie Besoin d aide pour assembler identifier des pi ces s informer sur le produit ou pour commander des pi ces contactez nous cs dhpfurniture com 1 800 267 1739 Lundi Vendredi 9 00 am 9 00 pm Heure de l Est Samedi 10 am 6 30 pm Heure de l Est Dimenche 11 am 7 pm Heure de l Est DHP Services la Client le 12...

Страница 22: ...tretoise latte T919490 Entretoise latte T919480 Bouchon de plastique T392590 tape 1 Les instructions suivantes illustrent comment assembler la Mer dienne de l tape 1 l tape 6 s il vous pla t utiliser le Pack M ridienne T4374139N 00 Attacher J x 2 dans T et T1 avec tape 2 Attacher I dans T et T1 avec tape 3 3 1 Ins rer O J X 2 puis verrouiller O 3 2 Avec Y tel qu illustr tape 4 4 1 Presser W sur O ...

Страница 23: ... pi ces ont t pr assembl es pour ce produit Ils sont illustr s sur cette page et disponibles pour le remplacement Avertissement Pour des raisons de s curit et pour pr venir les blessures Ce lit n est pas con u pour tre utilis par des enfants de moins de 4 ans Interdire le saut et le chahut sur le lit Utilisez uniquement un matelas de 74 75 de long par 37 38 de large Pour optimiser l utilisation de...

Отзывы: