background image


F

10 

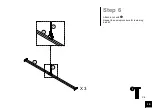
Step 6


1

X 6

Attach 

L

 to 

with 

.

Repeat the same procedure for remaining

and 

I

.


I

I

L

L

X 3

Содержание 4156029

Страница 1: ...ed Bed C W 2019 4 1 If parts are missing or damaged we will gladly ship your replacement parts free of charge Lot Number Thank you for purchasing from DHP THIS INSTRUCTION BOOKLET CONTAINS IMPORTANT SAFETY INFORMATION PLEASE READ AND KEEP FOR FUTURE REFERENCE 1 2014 Dorel Home Products All Rights Reserved Full Black Faux Leather Weight Limit 450 Lb 204 Kg ...

Страница 2: ...furniture com to view the limited warranty valid in the U S and Canada Call our toll free number if you need assistance Work in a spacious area and near where the unit will be used preferably on a carpet or use a piece of the cardboard packaging to protect your floor and product Recommended of people needed for assembly 2 however it is always better to have an extra hand Estimated assembly time is...

Страница 3: ...lete this assembly Replacement Parts visit www dhpfurniture com eng replacement parts A B C C1 D E F G H I J K L M Post T949760 X 1 Post T949770 X 1 Headboard T949950 X 1 Fabric Back Panel T949960 X 1 Footboard T949970 X 1 Side Panel T949810 X 1 Side Panel T949820 X 1 Side Panel T949830 X 1 Side Panel T949840 X 1 Slats T949980 X 3 Leg T949860 X 2 Leg T949870 X 2 Leg T938080 X 3 Bracket T949880 X 2...

Страница 4: ...re until the entire assembly is complete unless otherwise indicated in the step by step instructions The screw s bolt s to be used at each step are shown in actual size in the lower right corner of the page 1 2 3 4 5 6 1 4 X 3 4 X 30 1 4 X 2 X 8 5 16 X 1 3 5 X 6 5 16 X 3 4 X 4 X 18 4mm X 1 ...

Страница 5: ... 1 Stick C1 to the back of C with Velcro as illustrated Please align the holes with the ones on headboard C1 C To avoid fraying the fabric during the assembly please lay the Headboard C on a Piece of carboard ...

Страница 6: ...6 Step 2 3 X 6 5 X 6 Attach A B to C with and A B C C B 3 5 Holes for side rail should be facing toward the front ...

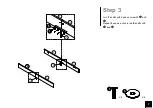
Страница 7: ...7 Step 3 1 5 X 8 X 8 Join F and H with J and secure with and Repeat the same action to join E and G with and F H F H J J 1 5 E E G J ...

Страница 8: ...8 Step 4 1 2 X 4 X 4 4 1 Attach M to F with 4 2 Attach K to H with Repeat the same step for remaining parts M K and sub assembly E and G 4 1 4 2 F F H H M K 1 2 E G K M K ...

Страница 9: ...et M must seat on the top of bolt and the washer must be outside the bracket as illustrated 5 X 4 X 4 4 Attach subassembly from previous STEP to A B with and Don t completely tighten the bolts until STEP 8 is completed A B B 4 5 5 M M M ...

Страница 10: ...10 Step 6 1 X 6 Attach L to I with Repeat the same procedure for remaining L and I I I L L X 3 ...

Страница 11: ...11 Step 7 1 X 12 Attach subassembly from previous STEP to E F G H with E F G H F H ...

Страница 12: ...12 Step 8 2 X 4 Attach D to K with Then properly tighten all the bolts D K K D ...

Страница 13: ... Do not use risers under this bed Move your new furniture carefully with two people lifting and carrying the unit to its new location Your DHP furniture can be disassembled and reassembled to move Clean the product with a soft damp cloth DO NOT use harsh chemicals or abrasive cleaners Some parts have been pre assembled for this item They are illustrated on this page and available for replacement E...

Страница 14: ...arant a limitada v lida en los Estados Unidos y Canad Informaci n sobre la garant a Para solicitar ayuda con el ensamblaje identificaci n de partes informaci n del producto o simplemente ordenar otras partes dirijase a cs dhpfurniture com 1 800 267 1739 Lunes Viernes 9 00 am 9 00 pm hora del este S bado 10 am 6 30 pm hora del este Domingo 11 am 7 pm hora del este DHP Servicios al Cliente 12345 Alb...

Страница 15: ...vor utilice la Casilla de Verificaci n para identificar sus partes y garantizar de que cuenta con todas las piezas necesarias para el ensamblaje Los tornillo s perno s que se utilizar n en cada paso se muestran en tama o real en la esquina inferior derecha de cada p gina Instrucciones Paso 1 Coloque C1 en la parte posterior de C con el cierre m gico como se ilustra Paso 2 Una la parte A y B con C ...

Страница 16: ...lice productos qu micos o abrasivos de limpieza Algunas partes han sido pre ensambladas en este producto Se encuentran ilustradas en esta p gina y disponibles para reemplazo Precauc on Por razones de seguridad y para prevenir lesiones Este producto no ha sido dise ado para ser utilizado por ninos menores de 4 a os Prohibido saltar o jugar sobre la cama Utilice nicamente un colch n que sea de 74 75...

Страница 17: ...re com pour voir la garantie limit e valide aux tats Unis et au Canada Informations sur la garantie Besoin d aide pour assembler identifier des pi ces s informer sur le produit ou pour commander des pi ces contactez nous cs dhpfurniture com 1 800 267 1739 Lundi Vendredi 9 00 am 9 00 pm Heure de l Est Samedi 10 am 6 30 pm Heure de l Est Dimenche 11 am 7 pm Heure de l Est DHP Services la Client le 1...

Страница 18: ...marque Ne serrez pas compl tement les boulons jusqu ce que l ensemble est achev sauf indication contraire dans les intructions tape par tape Les vis les boulons utilis s dans chaque tape sont pr sent s en taille r elle dans le coin inf rieur droit de la page Instructions tape 1 Coller C1 l arri re de C avec le Velcro comme illustr tape 2 Attacher A et B C avec et tape 3 Rejoignez F et H avec J et ...

Страница 19: ...vec un chiffon doux NE PAS utiliser de produits chimiques ou abrasifs Certaines pi ces ont t pr assembl es pour ce produit Ils sont illustr s sur cette page et disponibles pour le remplacement Avertissement Pour des raisons de s curit et pour pr venir les blessures Ce lit n est pas con u pour tre utilis par des enfants de moins de 4 ans Interdire le saut et le chahut sur le lit Utilisez uniquement...

Отзывы: