


Inspection, Maintenance and Adjustment
4-61
DX380LC-7
to be cleaned or replaced regularly even before
the expected replacement date.
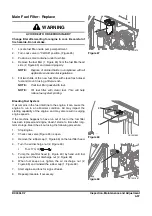
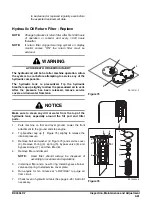
Hydraulic Oil Return Filter - Replace
NOTE:
Change hydraulic oil return filter after first 250 hours
of operation or rebuild, and every 1,000 hours
thereafter.
NOTE:
If return filter clogged warning symbol on display
monitor comes "ON" the return filter must be
serviced.
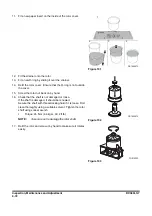
1.
Park machine on firm and level ground. Lower the front
attachment to the ground and stop engine.
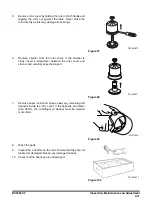
2.
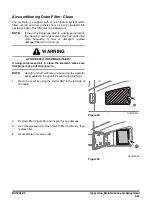
Tip breather cap up (1, Figure 75) slightly to release the
internal pressure.
3.
Remove bolt and washer (2, Figure 75) and service cover
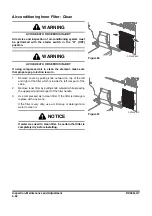
(3). Remove O-ring (4), spring (5), bypass valve (6) and
bypass strainer (7), and then filter (8).
4.
Remove filter and discard.
NOTE:
Used filter should always be disposed of
according to local laws and regulations.
5.
Install new filter and a new O-ring. Install bypass strainer,
valve and spring. Install service cover plate.
6.
Run engine for ten minutes at "LOW IDLE" to purge air
from circuit.
7.
Check level in hydraulic oil tank (See page 4-26). Add oil if
necessary.
DS1901513
1
2
3
Figure 75
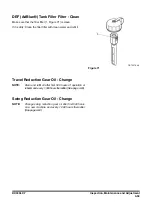
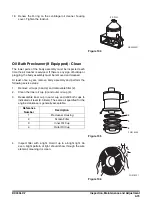
WARNING
AVOID DEATH OR SERIOUS INJURY
The hydraulic oil will be hot after machine operation. Allow
the system to cool before attempting to service any of the
hydraulic components.
The hydraulic tank is pressurized. Tip the hydraulic
breather cap up slightly to allow the pressurized air to vent.
After the pressure has been released, remove service
covers or drain water from tank.
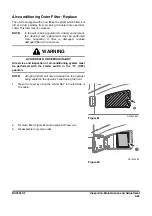
EX1400648
3
8
6
5
4
7
8
7
6
3
5
4
2
Figure 76
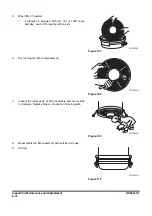
NOTICE
Make sure to clean any dirt or water from the top of the
hydraulic tank, especially around the fill port and filter
ports.
Содержание DX380LC-7K
Страница 6: ...DX380LC 7 Table of Contents IV ...
Страница 19: ...Safety 1 1 DX380LC 7 1Safety ...
Страница 22: ...DX380LC 7 Safety 1 4 Information and Location for Safety Decals DS1900721 24 24 15 16 1 Figure 2 ...
Страница 196: ...DX380LC 7 Operating Controls 2 98 ...
Страница 399: ...Transportation 5 7 DX380LC 7 2 2 3 3 2 2 3 3 EX1300750 Figure 13 ...
Страница 406: ...DX380LC 7 Specification 6 6 Working Range 0 M A B I K L F C J H D d E G G L EX1401493 2 500 mm Figure 5 ...
Страница 418: ...DX380LC 7 Specification 6 18 ...