background image

6

6. Ice cubes

Fill the ice tray to 4/5 with drinking water, and place the ice

tray  on  the  ice-tray  shelf.  Wipe  off  any  excess  water  to

prevent the ice tray from freezing to the surface.
To speed up the making of ice cubes, turn the thermostat to

position „MAX” for a short while. Remember to turn the dial

to its normal setting when the ice cubes are frozen.
To remove the cubes from the ice tray, hold it under running

water. The ice cubes can now be taken out easily.

7. Useful suggestion

Do  not  overfill  the  appliance.  It  is  advisable  to  leave  some

space  between  the  products  in  the  cabinet  to  ensure

efficient  and  even  cooling.  If  the  shelves  are  packed  too

tightly there may be unacceptable temperature variations.

8. Defrosting, cleaning and 

maintenance

Frost will gradually form on the cooling surfaces and it must

not  be  allowed  to  become  too  thick  since  it  acts  as  an

insulator and interferes with the cooling.

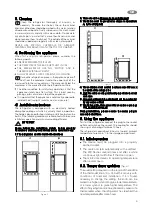
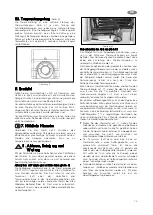
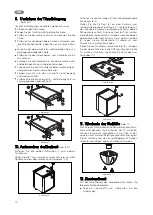
Fuzzi logic and times switch defrosting (fig. 4)

This frost-formation is kept back by the FUZZY LOGIC system

built  into  the  appliance  by  switching  off  the  unit  for  two

hours in every 24 hours. The frost will melt and the defrost

water will run through the drain tube from the drip channel

into an evaporating vessel located at the bottom rear of the

refrigerator  at  all  models.  (Fig.  6.)  The  defrost  water  will

evaporate automatically into the circulating air and the vessel

will not need emptying manually.

Figure 5.

Semi-automatic defrosting (fig. 5)

A semi-automatic defrosting model device can be identified

by the push -button in the centre of the thermostat dial. To

defrost,  push  in  the  button  in  the  centre  of  the  thermostat

dial but do not turn the dial to another position-leave it at its

usual setting.
Close the door.

The  defrost  button  will  stay  in  and  the  cooling  unit  will

remain switched off until the frost has melted. The defrost

button  will  then  automatically  spring  out  to  its  normal

position  and  the  refrigerator  will  start  work  again.  The

time taken to defrost will depend on the amount of frost

to be removed and the room temperature.
If we want to switch off the unit, turn the thermostat knob

to  "0",  disconnect  the  refrigerator  from  the  electricity

supply and leave the cabinet door open. After defrosting

the  cabinet  interior  should  be  wiped  out  with  a  clean,

damp cloth. 
In the case of increased air humidity, frost may form on

the cooling ribs. Should the frost layer attain a thickness

of  approximately  3  mm,  the  refrigerator  must  be

defrosted to avoid impairing the performance level. Even

if this is not the case, the (**) freezer compartment must

be  defrosted  on  a  regular  basis  following  heavy  ice

formation every 2-3 months. This is carried out as follows:
-    Set  the  thermostat  at  „0”,  disconnect  at  the  mains,

remove food and ice dish and leave the doors open.

Do not expose the refrigerator to external heat and do

not  attempt  to  scratch  away  the  frost  with  sharp

objects.

-    The  drained  water  runs  in  a  groove  and  from  there

continues along a pipe through the refrigerator's rear

panel  and  into  a  collection  container  on  the  cooling

unit,  where  the  water  evaporates  by  itself  (fig.  6.).

Should  the  frost  layer  become  very  thick,  there  is  a

danger of the collection basin overflowing. In this case

the water should be absorbed by a cloth placed under

the ribs. The water in the freezer compartment should

also be absorbed by a cloth.

-    Following defrosting, the refrigerator should be wiped

dry with a cloth, reconnected and the food returned.

However,  you  should  wait  until  the  following  day

before freezing ice cubes.

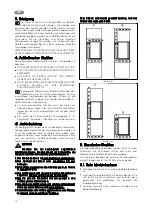
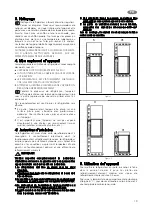
9. Reversing the door hang

(Fig. 6-7)

The direction the door opens can be transferred from one

side to the other by carrying out the following steps:


disconnect at the mains

  lay the refrigerator down carefully on its back
  remove the lower hinge ‚ and detach the door
  remove  the  two  upper  left-hand  screws  and  detach

the covering plate ƒ by pulling it forward

  detach the upper hinge and mount it on the opposite

side

  remove the hinge bolt and screw it in from below
  insert  the  covering  plate  in  the  upper  right-hand

corner  by  pushing  it  in  and  secure  it  with  the  two

screws

  position the door on the upper hinge bolt and mount

the lower hinge

  ensure  the  door  can  move  freely  and  the  seal  is

correctly positioned.

  Remove  the  hinge  plate  „  and  mount  it  on  the

opposite side

GB

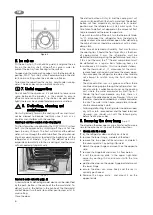
Figure 4.

Содержание WA3200

Страница 1: ...80 miniCool IT FR DE NL ES PT GB OperatingInstructions Bedienungsanleitung Moded emploi Istruzioniperl uso Handleiding ManualdeInstrucciones Instru esdeUtiliza o Bruksanvisning Bruksanvisning Betjeni...

Страница 2: ...to do this will result in component failure and possible content loss See installationinstructions Partswhichheatupshouldnotbeexposed Whereverpossiblethebackoftheproductshould be close to a wall but l...

Страница 3: ...tection information 15 Recycling GB Attention Warranty arrangements are in accordance with EC Directive 44 1999 CE and the normal conditionsapplicableinthecountryconcerned Forwarrantyorotherservicing...

Страница 4: ...ediately to the transportation firm 2 Viewoftheappliance 1 door 2 bottle retainer 3 evaporator 4 thermostat knob 5 sensor 6 freezer 7 hinge plate 8 lamp 9 freezer Figure 1 WA 3210 WA 3200 IN CASE IF Y...

Страница 5: ...y at intervals as necessary Remove the shelves these the cabinet interior and the door should be washed with a warm solution of sodium bi carbonate Finally wipe over with a cloth rinsed in warm water...

Страница 6: ...rature If we want to switch off the unit turn the thermostat knob to 0 disconnect the refrigerator from the electricity supply and leave the cabinet door open After defrosting the cabinet interior sho...

Страница 7: ...tilation become obstructed If after checking all the above points the refrigerator is still not working satisfactorily contact your nearest service engineer State the problem model product and serial...

Страница 8: ...nt 15 Recycling After unpacking the appliance the packing materials should be delivered to a local collection site At the end of its useful lifetime the appliance should be delivered to a specialized...

Страница 9: ...oder auch zum AusfallvonGer tekomponentenunddadurchzumVerderbdesK hlrauminhaltsf hren Teile diesichaufheizen d rfenvonau ennichtzug nglichsein DasGer tsolltesoaufgestellt werden dass der Abstand zwisc...

Страница 10: ...ngen entsprechen der EU Richtlinie 44 1999 CE und den im jeweiligen BestimmungslandgeltendenGesetzen Bei Fragen zu Garantie und Kundendienst sowie f r Ersatzteile wenden Sie sich bitte an unser Dometi...

Страница 11: ...tragten Unternehmen 2 Ger te bersicht 1 T r 2 Flaschenbeh lter 3 Verdampferplatte 4 Thermostatregler 5 Sensor 6 Tiefk hllagerfach 7 Scharnierplatte 8 Beleuchtung 9 Tiefk hllagerfach Abbildung 1 BEIGER...

Страница 12: ...SEHR GER USCHARM NACH INBETRIEBNAHME KANN ES MINDESTENS DREI STUNDEN DAUERN BIS EINE ERKENNBARE K HLWIRKUNG EINSETZT W hrend des K hlprozesses leitet das Ger t ber den Kondensator der sich hinter dem...

Страница 13: ...ist 13 Abbildung 5 HalbautomatischesAbtauen Abb 5 Das Modell l sst sich halbautomatisch abtauen wenn sich in der Mitte des Thermostatreglers ein Knopf befindet Zum Abtauen dr cken Sie diesen Knopf ohn...

Страница 14: ...d aus dem unteren Scharniergelenk 2 3 Abbildung 8 Entfernen Sie die Schrauben 4 und die entsprechende Rahmenkante 5 Ziehen Sie die Zierfront 6 aus dem Rahmen und schieben Sie die neue Front hinein 7 A...

Страница 15: ...K ltemittel eingesetzt Als Treibmittel f r die PU Schaum Isolierung wird das ozonfreundliche Cyclopentan eingesetzt Natriumchromat wird als Korrosionsschutz verwendet weniger als 2 Gew des K hlmediums...

Страница 16: ...rte ventuelledesoncontenu Voirlesinstructionsd installation Lespi cesd gageantdelachaleurnedoiventpas treexpos es Danslamesuredupossible l arri redel appareildoit tresitu proximit d unmur enlaissantun...

Страница 17: ...iant l annexe environnement de l accord EEE et galement conformes auxloisapplicablesdanslesdiverspays Si vous avez des questions concernant la garantie le service apr s vente ou les pi ces de rechange...

Страница 18: ...les imm diatement la soci t de transport 2 Aper udel appareil 1 porte 2 compartiment bouteilles 3 vaporateur 4 bouton de thermostat 5 capteur 6 cong lateur 7 penture 8 lampe 9 cong lateur Figure 1 SI...

Страница 19: ...une chaleur par rayonnement rayons solaires radiateur proximit d un four etc 4 1 Instructionsd installation Le r frig rateur est muni d une unit de refroidissement absorption r chauffement lectrique...

Страница 20: ...es Ainsi le givre fond et l eau d gel e s coule via le tube de drainage dans un r cipient d vaporation situ dans le bas l arri re du r frig rateur sur tous les mod les fig 6 Le r cipient ne doit jamai...

Страница 21: ...a porte peut se mouvoir librement et que le joint est correctement plac enlevez la penture et fixez la sur le c t oppos Figure 6 Figure 7 10 Remplacementdupanneau deported coratif fig 8 10 D vissez le...

Страница 22: ...atique Le cas ch ant tournez le bouton de Mod le WA 3210 WA 3200 WA 3200 Type MB20 80 MB20 80 MB20 80 Volume total 61 litres 61 litres 61 litres Tension d alimentation 220 240V AC 220 240V AC 220 240V...

Страница 23: ...ereistruzioniperl installazione Non esporre i componenti soggetti a riscaldamento Posizionare possibilmente il retro dell apparecchiocontrounaparetemantenendoladovutadistanzaperunabuonaventilazione co...

Страница 24: ...ente 15 Riciclaggio IT Attenzione Le condizioni di garanzia sono conformi alla direttiva CE 44 1999 CE nonch alle disposizioni specificheapplicabilinelpaeseinteressato Per questioni di garanzia o altr...

Страница 25: ...te la societ di trasporti 2 Schemadell apparecchio 1 porta 2 mensola portabottiglie 3 evaporatore 4 pomello termostato 5 sensore 6 congelatore 7 bandella 8 lampada 9 congelatore Figura 1 SEILFRIGORIFE...

Страница 26: ...Il frigorifero dotato di un unit di refrigerazione ad assorbimento riscaldata elettricamente che funziona in modo silenzioso Il frigorifero stato progettato per un installazione libera ma pu essere in...

Страница 27: ...La brina si scioglie e l acqua di sbrinamento scorre lungo il tubo di scolo dal gocciolatoio fino ad una vaschetta di evaporazione posta sul retro del frigorifero in basso in tutti i modelli fig 6 L a...

Страница 28: ...2 3 Rimuovere le viti 4 ed estrarre il bordo del telaio 5 Far scivolare il pannello decorativo 6 dal telaio della porta e inserire il nuovo pannello 7 in modo che il bordo superiore del pannello coinc...

Страница 29: ...l frigorifero dovrebbe riprendere la procedura di raffreddamento il passaggio per la ventilazione non sia ostruito Modello WA 3210 WA 3200 WA 3200 Typo MB20 80 MB20 80 MB20 80 Volume lordo 61 litre 61...

Страница 30: ...erugia Cavallino Verona Rubano Indirizzo Via Mazzini 144 Via Terravecchia Inf 99 Via Salomone 23 Via Acquasanta Zona Ind P zza della Pace 7 F Via Paolucci 14 B Via Collegarola 70 Via Darsena 74 Str Pe...

Страница 31: ...ok installatie aanwijzingen Onderdelen die warm worden moeten verborgen zijn Probeer altijd het product tegen een muur te plaatsen maar laat zoals vermeld in de installatie aanwijzingen voldoende ruim...

Страница 32: ...ming 15 Recyclage NL Letop Garantiebepalingen zijn conform EU richtlijn 44 1999 CE en de wettelijke bepalingen van het landwaarinhetproductwordtgebruikt Voor vragen over garantie klantenservice en ond...

Страница 33: ...ortfirma 2 Afbeeldingvanhettoestel 1 deur 2 flessenhouder 3 verdamper 4 thermostaatknop 5 sensor 6 vriesvak 7 scharnierblad 8 lamp 9 vriesvak Afbeelding 1 IS UW KOELKAST UITGERUST MET EEN SLOT DAN IS...

Страница 34: ...ngseenheid die nagenoeg geruisloos functioneert De koelkast kan als dusdanig worden ge nstalleerd of ingebouwd waarbij voor een doeltreffende werking en een maximale koelingseffici ntie rekening moet...

Страница 35: ...n van de thermostaatschaal bevindt Om het toestel te ontdooien dient men deze knop in te drukken zonder evenwel de thermostaatschaal in een andere stand te draaien Laat deze dus staan zoals ze initiee...

Страница 36: ...aneel kan makkelijker worden aangebracht in de bovenste hoek van het kader als de twee hoeken met ongeveer 5x5 mm worden afgerond NL 8 Plaats de steun van het kader terug 5 en hecht het vast met de sc...

Страница 37: ...chevereisten Voor u de koelkast aanzet dient u na te gaan of het voltage hetzelfde is als dat vermeld op het gegevensplaatje van het toestel 14 Informatieinzake milieubescherming Als koelmiddel in het...

Страница 38: ...producir alg n fallo en sus componentes as como el deterioro del contenido Consulte las instruccionesdeinstalaci n Antesderealizarladescongelaci n limpiezaomantenimiento aseg resedeapagarlaunidad ydes...

Страница 39: ...a corresponden a la Directiva 44 1999 CE de la Uni n Europea y lasrespectivasleyesvigentesdelpa sdondeseutiliceesteaparato Si usted tiene alguna pregunta sobre la garant a y el servicio al cliente o...

Страница 40: ...ansporte 2 Descripci ndelaunidad 1 puerta 2 compartimento para botellas 3 evaporador 4 bot n del termostato 5 sensor 6 congelador 7 bisagra 8 bombilla 9 congelador Figura 1 EN CASO DE QUE SU FRIGOR FI...

Страница 41: ...or fico est equipado con una unidad de enfriamiento por absorci n el ctrica del calor que en la pr ctica tiene un funcionamiento totalmente silencioso Est dise ado para su instalaci n al descubierto p...

Страница 42: ...en todos los modelos Fig 6 El agua de descongelaci n se evaporar autom ticamente por lo que no es necesario vaciar la vasija de forma manual Figura 5 Descongelaci nsemiautom tica fig 5 Se pueden iden...

Страница 43: ...el borde del marco 5 Deslice el panel embellecedor 6 por fuera del marco de la puerta e inserte el nuevo panel 7 de forma que el borde superior del panel discurra en paralelo con el borde superior del...

Страница 44: ...la unidad 14 Informaci nrelativaala protecci ndelmedio ambiente El amon aco compuesto natural de hidr geno y nitr geno es el agente de refrigeraci n que se emplea en esta unidad El ciclopentano no pe...

Страница 45: ...es e uma poss velperdadoconte do Vejaasinstru esdemontagem Aspe asqueaquecemn odever oficarexpostas Semprequeforposs vel apartetraseirado produto dever ficar pr xima de uma parede deixando se a dist n...

Страница 46: ...gem PT Aten o Os acordos referentes garantia est o em concord ncia com a directiva CEE 44 1999 CEE e comascondi esnormaisaplic veisnopa semquest o Para garantia ou outros servi os tais como pe as sobr...

Страница 47: ...el pelo transporte avisando a da ocorr ncia 2 Vistadoaparelho 1 Porta 2 Fixador das garrafas 3 Evaporador 4 Bot o do term stato 5 Sensor 6 Congelador 7 Dobradi a 8 L mpada 9 Congelador Figura 1 ADOMET...

Страница 48: ...lho n o esteja exposto radia o directa do calor luz solar radiador perto de um forno etc 4 1 Instru esdemontagem O frigor fico est equipado uma unidade refrigeradora de absor o aquecida electricamente...

Страница 49: ...gua de descongela o evaporar se automaticamente no ar circulante e o recipiente n o necessitar de ser esvaziado manualmente Figura 5 Descongela osemi autom tica fig 5 O dispositivo do modelo com desc...

Страница 50: ...odopainel decorativodaporta fig 8 10 Remova os dois parafusos 1 da dobradi a superior da porta Afaste a porta da arma o juntamente com a dobradi a e puxe para cima o pino da dobradi a inferior 2 3 Re...

Страница 51: ...ativa protec odomeioambiente A am nia composto natural de hidrog nio e nitrog nio usada na unidade de refrigera o como agente de refrigera o O ciclopentano que in cuo para o ozono activado como agente...

Страница 52: ...tion d komponentfel och ven f rst rda matvaror kan bli resultatet Se installationsinstruktionerna Delarsomblirvarmab rintevaral tt tkomliga Kylsk petsbaksidab ralltidvaraplaceradmot en v gg men nd var...

Страница 53: ...5 tervinning OBS Garanti tagandensk tsenligtEUdirektiv44 1999 CEochenligtnormalavillkorf raktuelltland Vid garanti eller servicefr gor s som ang ende reservdelar kontakta v r Dometic Kundservice avdel...

Страница 54: ...porteras till transportf retaget omedelbart 2 Bildp kylsk pet 1 d rr 2 flaskh llare 3 f r ngare 4 termostatratt 5 sensor 6 frysfack 7 g ngj rnsplatta 8 lampa 9 frysfack Figura 1 OM KYLSK PET UTRUSTATS...

Страница 55: ...T J MNT UNDERLAG R REN P BAKSIDAN BLIR VARMA N R KYLSK PET R I DRIFT KYLSK PET HAR INGEN MOTOR OCH AVGER D RF R INGA LJUD DET TAR MINST 3 TIMMAR INNAN KYLSK PET R KALLT Under kylprocessen f r kylsk pe...

Страница 56: ...kommer sedan att ka ut automatiskt till sitt normala l ge och kylsk pet s tter ig ng igen Avfrostningstiden beror p frostm ngden och rumstemperaturen St ng av kylsk pet genom att vrida termostatratte...

Страница 57: ...na och de terst ende fyra skruvarna f r framtida behov Figur 11 12 Kundservice Innan du ringer en servicetekniker b r du utf ra f ljande enkla test r det str mavbrott Kontrollera s kringarna r kontakt...

Страница 58: ...Kylsk pet kan endast drivas med nominell n tsp nning vilket anges p typskylten Kylsk pets n tkontakt f r anslutas till jordat uttag Om det kr vs elarbeten f r att installera produkten skall dessa utf...

Страница 59: ...tet og innholdet i kj leskapet kan bli bedervet Semonteringsinstruksjonene Delersomvarmesopp b rikkev retildekket N rdetermulig b rbaksidenavapparatetst inntil en vegg men med tilstrekkelig avstand fo...

Страница 60: ...4 Milj informasjon 15 Resirkulering Merk GarantigisihenholdtilEU direktiv44 1999 CEoggjeldendelokaleregler Kontakt Dometics servicenettverk dersom du har sp rsm l om garanti eller annen service for ek...

Страница 61: ...aks rapportere dette til transportfirmaet 2 Tegningavkj leskapet 1 d r 2 flaskeholder 3 evaporator 4 termostatbryter 5 sensor 6 fryser 7 hengselplate 8 lampe 9 fryser Figur 1 HVIS KJ LESKAPET ER UTSTY...

Страница 62: ...r f rste gang m du v re oppmerksom p f lgende KONTROLLER AT KJ LESKAPET ST R P ET FLATT UNDERLAG R RENE P BAKSIDEN AV KJ LESKAPET BLIR VARME UNDER BRUK KJ LESKAPET HAR INGEN MOTOR OG ER DERFOR NESTEN...

Страница 63: ...skapet begynner g igjen Den tiden som det tar avise er avhengig av tykkelsen p rimlaget og romtemperaturen Hvis du vil sl av apparatet setter du termostatbryteren til 0 kopler fra str mledningen og la...

Страница 64: ...vare p fotstykkene p 40 mm og de fire gjenv rende skruene Figur 11 12 Kundeservice Kontroller f lgende f r du kontakter en servicetekniker Er det en str mfeil Kontroller sikringene Er stikkontakten s...

Страница 65: ...ttspenningene som er angitt p informasjonsplaten Stikkontakten p kj leskapet kan settes i et st psel som er jordet i samsvar med reguleringene Alt elektrisk arbeid som er n dvendig for montere dette a...

Страница 66: ...d risiko for tabafindhold Seinstallationsvejledningen Dele somblivervarme b rikketild kkes Produktetsbagsideskals vidtmuligtplacerest t p en v g dog s ledes at der er den p kr vede ventilationsafstand...

Страница 67: ...skyttelse 15 Genbrug Bem rk GarantibetingelserneerioverensstemmelsemedEU direktiv44 1999 CEogmedlovgivningen idetp g ldendebestemmelsesland Ved sp rgsm l om garanti og kundeservice samt reservedele be...

Страница 68: ...n skal De straks meddele dette til transportfirmaet 2 Afbildningafk leboksen 1 L ge 2 Flaskeholder 3 Fordamper 4 Termostatknap 5 Sensor 6 Fryser 7 H ngselplade 8 Lampe 9 Fryser Figur 1 I TILF LDE AF A...

Страница 69: ...PLACERET P EN PLAN OVERFLADE R RENE P BAGSIDEN BLIVER VARME N R DE ER I BRUG K LEBOKSEN HAR INGEN MOTOR OG ER DERFOR PRAKTISK TALT LYDL S DE M REGNE MED AT DER MINDST G R 3 TIMER F R DER SES TEGN P K...

Страница 70: ...Figur 5 Halvautomatiskafrimning fig 5 En halvautomatisk afrimningsmodel kan genkendes p trykknappen i midten af termostat drejeknappen For at afrime trykker man knappen i midten af termostat drejeknap...

Страница 71: ...rammens kant 5 p plads igen og fastg r den med skruerne DK Figur 9 Plac r l gen p det nederste h ngsel 9 lad det verste h ngsel glide ind i bningen skub l gen mod huset og fastg r den med de to skrue...

Страница 72: ...lektriskekrav Inden De t nder for k leboksen skal De kontrollere at netsp ndingen er den samme som er angivet p k leboksens typeskilt 14 Informationom milj beskyttelse Ammoniak naturlig brint og kv ls...

Страница 73: ...urioitumisenehk isemiseksi Katsoasennusohjeita Kuumenevien osien on oltava suojattuna Mik li mahdollista laitteen takaosa on sijoitettava l helle sein vasten kuitenkin riitt v lle et isyydelle sein st...

Страница 74: ...an 14 Ymp rist nsuojelu 15 Materiaalien kierr tys Huomio Takuum r ykset vastaavat Euroopan Unionin direktiivi 44 1999 CE ja kunkin maan vastaavia lainm r yksi Dometic huoltoverkosto vastaa mielell n k...

Страница 75: ...tava kuljetusliikkeelle 2 Kuvaj kaapista 1 ovi 2 pulloteline 3 h yrystin 4 termostaatin s t nuppi 5 termostaatin anturi 6 pakastelokero 7 saranelevy 8 lamppu 9 pakastelokero Kuva 1 JOS J KAAPISSA ON L...

Страница 76: ...TO KUUMENEE K YT N AIKANA J KAAPPI EI SIS LL MOOTTORIA JA SEN TOIMINTA ON K YT NN SS NET NT ODOTA J HTYMISEN MERKKEJ V HINT N 3 TUNTIA J hdytysvaiheen aikana laite luovuttaa lauhduttimen kautta l mp u...

Страница 77: ...nonappisulatuksella varustetut mallit kuva5 Puoliautomaattisella painonappisulatuksella varustetun laitteen voi tunnistaa termostaattinupin keskell olevasta painikkeesta kuva 5 Paina sulatuksen k ynni...

Страница 78: ...n alareuna pois 5 Ved koristepaneeli 6 irti ovikehyksest ja ty nn uusi paneeli 7 paikalleen siten ett paneelin yl reuna kulkee t sm lleen samansuuntaisena kehyksen yl reunan kanssa Uusi paneeli on hel...

Страница 79: ...sulatusnappia painettu vahingossa ainoastaan malleissa joissa on puoliautomaattinen painonappisulatus Jos n in on k nn termostaatin s t nuppi asentoon 0 T m vapauttaa sulatuspainikkeen K nn termostaat...

Страница 80: ...Rev 2019 02 10 T m laitet ytt seuraavatEU direktiivit LVD direktiivi 2014 35 EU EMC direktiivi 2014 30 EU CE direktiivi 93 68 EEC RoHS direktiivi 2011 65 EU FI...

Отзывы: