background image

14

R

RS

S448855  IInntteerrffaaccee

• The unit is equiped with an RS485 interface. You

can use this interface to connect the unit to a PC

or to network it to other refrigerating equipment.

• For information about connection options and

software, contact your local service centre.

C

Clleeaanniinngg

• The refrigerator should be cleaned and if

necessary disinfected before you use it for the

first time and then at regular intervals thereafter.

TTeem

mppeerraattuurree  rreeccoorrddeerr  ((ooppttiioonnaall))

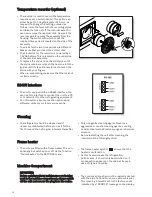
• The recorder is used to record the temperature

response over a certain period. This period can

either be set to 7 days (preset) or 24 hours, as

required. To change the setting, proceed as

follows: raise the lever with the recording stylus

and take the lock nut off the recorder axis. You

can now remove the recorder disk. Now pull the

recorder axis to remove the assembly from the

housing. The switch with which to set the

required time period is located on the side of the

assembly.

• The disks for the two time periods are different.

Make sure that you insert the correct disk.

• The clockwork for the recorder is powered by a

1.5V AA battery. This is located on the underside

of the recorder assembly.

• To replace the stylus, take the old stylus out of

the stylus retainer and push the new one into the

guides until it stops. Be careful not to touch the

stylus with your fingers.

• When re-assembling, make sure that the lock nut

is sited correctly.

• Only use gentle cleaning agents. Never use

aggressive or caustic cleaning agents, scouring

powder, steel wool, abrasive sponges or chemical

solvents. 

• Before restarting the unit after cleaning, the

interior must be thoroughly dried.

FFrraam

mee  hheeaatteerr

• The units are fitted with a frame heater. This can

optionally be switched on or off via the function

“Frame heater” in the SETTINGS menu. 

• The frame heater symbol  

shows, that the

heater is switched on.

• As this heater impairs the refrigeration

performance, it should only be switched on, if

condensation appears on the cabinet frame in

case of high air humidity. 

10:32

220V

DOOR OPEN

BATTERY FAIL

10:32

220V

M

Maacchhiinnee  C

Coom

mppaarrttm

meenntt

IIM

MP

PO

OR

RTTA

AN

NTT::

B

Beeffoorree  ccaarrrryyiinngg  oouutt  aannyy  m

maaiinntteennaannccee  oorr  cclleeaanniinngg

w

woorrkk  iinn  tthhee  m

maacchhiinnee  ccoom

mppaarrttm

meenntt,,  aallw

waayyss  ssw

wiittcchh

ooffff  tthhee  uunniitt  aanndd  rreem

moovvee  tthhee  pplluugg  ffrroom

m  tthhee  m

maaiinnss..

• The condenser/liquefier must be regularly dusted

with the aid of a hand brush or a vacuum cleaner.

This cleaning interval is set in the factory and is

indicated by a “SERVICE” message on the display.

Содержание UF 455G

Страница 1: ...820 9505 09 ed1210 UF 755 G UF 455 G O OP PE ER RA AT TI IN NG G I IN NS ST TR RU UC CT TI IO ON NS S...

Страница 2: ...Dometic S r l op der Hei 17 L 9809 Hosingen Luxembourg...

Страница 3: ...Button functions _____________________________________________________7 Setting the language __________________________________________________7 The SETTINGS Menu _____________________________________...

Страница 4: ...aintenance work always switch the machine off and disconnect the mains plug Always pull the plug and never the cable If the plug is not accessible switch off at the safety device The unit s cooling sy...

Страница 5: ...right next to air conditioning equipment Net weigth without load UF455G 441 lbs UF755G 507 lbs The unit is fitted with castors Once it is in its final location the feet must be unscrewed to immobilis...

Страница 6: ...and switching it on for the first time allow it to stand for 30 minutes To prevent problems with other electrical equipment causing this unit to malfunction it should be connected to a separate circui...

Страница 7: ...e function of the appliance Access to the SETTINGS menu can therefore be protected by a password It is recommended to use this protection to limit access to the parameters press the MENU key select SE...

Страница 8: ...n Pressing the ENTER button will launch the following alarm test cycle 1 Phased increase of the internal temperature until the upper alarm limit is reached Triggering of the temperature alarm 2 Phased...

Страница 9: ...tting the contrast with the and keys POS NEG POSITIVE NEGATIVE Changing the display from positive blue white to negative display white blue BACKL TIMEOUT TIME OUT 0 127 Duration of the display indicat...

Страница 10: ...SPANISH PORTUGUESE DANISH SWEDISH NORWEGIAN FINNISH MALAYSIAN RUSSIAN DIAGNOSTICS Display of the current status of the appliance only for service purposes PARAMETERS Display of the current setting of...

Страница 11: ...ill however function normally The maximum value stored in the electronics depends on the temperature class of the appliance in question and cannot be changed LOW AMBIENT TEMP analogous to HIGH AMBIENT...

Страница 12: ...per Make sure that the loading does not touch the reference bottle of the display sensor Do not store warm items in the freezer Before being used the freezer must have reached the set point temperatur...

Страница 13: ...nised service technician Before dismantling the battery the appliance must be switched off and the plug pulled out The battery is a lead acid storage battery that must be disposed of separately in the...

Страница 14: ...r and push the new one into the guides until it stops Be careful not to touch the stylus with your fingers When re assembling make sure that the lock nut is sited correctly Only use gentle cleaning ag...

Отзывы: