14
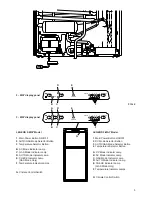
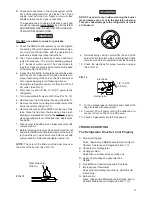
H. LP gas pressure low at burner.
Set main regulator so pressure does not drop
below 11 inches of water column at pressure test
port. (See FIG. 12).
I. Burner not located properly under flue tube.
Relocate.
J. Burner damaged.
Replace.
K. Odor from fumes.
1. Dislocated burner
2. Damaged burner
3. Dirty flue tube
L. FUSES
1. Refrigerator control system
2. Refrigerator AC Supply
3. 3-Way only, in-line fuse for 12 volt DC heater
See page 12, part FUSES.
If the refrigerator fails to work, check the following
points before calling a service technician:
•
that the fuses are intact
•
that the power cord is plugged in
•
that 12 volt DC is connected to the refrigerator
The refrigerator is equipped with an overheating protec-
tion.
An authorized service technician can check if it has been
triggered or not.
NOTE: AVOID SPRAYING WATER THROUGH THE
REFRIGERATOR VENTS WHILE WASHING YOUR RV.
All the above instructions are to be followed closely. The
refrigerator is quality-guaranteed. However, we are not
responsible for any failures caused by improper adjust-
ments and unfavorable installation conditions. Contact
service point or distributor service dept. for assistance.
CHANGING DOOR HINGES FROM ONE
SIDE TO THE OTHER
The refrigerator is equipped with convertible doors. To
change the door swing, consult the parts manual for the
Conversion Kit Number. For further information, please
contact Dometic Corporation listed on the front page.
INSTRUCTIONS FOR MOUNTING
THE DOOR PANEL
The refrigerator is normally delivered without door panels.
Before starting the mounting work, check that the panel
dimensions are in compliance with those given in the
table and the instructions are read thoroughly.
When mounting the panel, proceed as follows:
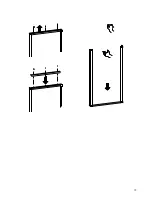
See figure page 15.
A. Open the door 90 degrees.
On new refrigerators, the decoration strips are
taped inside the door; if installed on the door,
remove the door decoration strip (2) by removing
its three screws (1).
B. Insert the vertical edges into the grooves of the
door frame (3).
C. Push the panel downward so that the lower hori-
zontal edge of the panel (4) is fitted into the bottom
grove (5).
D. Put the decoration strip across the door so that the
gap is covered. Secure the decoration strip with the
three screws removed in Step A (1).
Содержание RM2662
Страница 2: ......
Страница 15: ...15...
Страница 18: ...18 RM2662 RM2862 RM2663...
Страница 19: ...19...
Страница 20: ...20 MO FO 0448...


