18
EN
Service Procedures
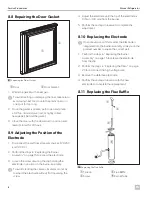
8.8 Repairing the Door Gasket
q
w
9
Repairing the Door Gasket
q
Door
w
Door Gasket
1. Warm the gasket with a heat gun.
I
To avoid melting or damaging the liner, take care to
avoid using heat too close to the plastic liner or in
one spot for too long.
2. Once the gasket is pliable, pull it open and place
a 0.25 in. (6 mm) dowel rod (or tightly rolled
newspaper) behind the gasket.
3. Close the door with the dowel rod in position and
leave it closed for 24 hours.
8.9 Adjusting the Position of the
Electrode
1. Disconnect the unit from all power sources (120 VAC
and 12 VDC).
2. Perform the steps in “Replacing the Burner
Assembly” on page 15 to access the electrode.
3. Loosen the screw securing the clip holding the
electrode in position on the burner assembly.
I
To avoid cracking the ceramic insulator, do not try
to adjust the electrode without first loosening the
screw.
4. Adjust the electrode until the tip of the electrode is
3/16 in. (4.8 mm) from the burner.
5. Perform these steps in reverse to complete the
adjustment.
8.10 Replacing the Electrode
I
On some versions of this model, the electrode is
integrated into the burner assembly. Always use the
product number to aquire the correct part.
1. Perform the steps in “Replacing the Burner
Assembly” on page 15 to release the electrode
from the clip.
2. Perform the steps in “Replacing the Piezo” on page
20 to disconnect the high voltage wire.
3. Remove the defective electrode.
4. Perform these steps in reverse with the new
electrode to complete the replacement.
8.11 Replacing the Flue Baffle
q
w
e
r
10
Removing the Flue Baffle
q
T-piece
e
Flue Baffle
w
Screw
r
Burner Tube

