Dometic RM 4203 Скачать руководство пользователя страница 12

For best performance also at high ambient temperatures
there must be a free air circulation over the cooling unit at
the rear of the refrigerator.

The refrigerator is designed for a free-standing installation
and the clearance to side walls etc., should be at least
5 cm (2'').

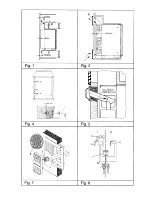
If the refrigerator is to be built-in, openings with sufficient
area must be foreseen for the access and exit of air for the
cooling unit, as shown in fig. 2. The letters in the figure refer
to:

F Access for cooling air

G Exit for air (upwards)

H Exit forwards (alternative)

Installation in a caravan or motorhome

The refrigerator must be installed in a recess (fig. 2) with
the dimensions given in TECHNICAL DATA.

The refrigerating unit is ventilated via two openings in the
wall of the caravan. The opening must be fitted with suitable
grilles, to give a free cross-section of at least 250 cm

2

.

Grilles specially developed for this application can be obtai-
ned from DOMETIC (model A 1620).

Four fasteners are fitted in the plastic bushings in the side
walls of the fridge, fig. 4. They are used for securing the
refrigerator in the enclosure.

The side walls of the enclosure and/ or any wooden braces
installed to fix the refrigerator must be dimensioned to seat
the screws securely, also considering the forces due to the
movement of the vehicle.

With the refrigerator in place, drive the screws through the
bushings in the lining of the refrigerator into the walls of the
enclosure. There must not be more than 3mm of clearance
between refrigerator and enclosure on each side. If neces-
sary, wooden strips or similar should be fitted.

Note: This is the only approved means of securing the
refrigerator to the enclosure and to the vehicle. Fasteners
penetrating other parts of the insulation (PU) foam of the
refrigerator might damage components like electric wiring
etc.

Flue gas must be exhausted through a flue extension, to be
ordered separately or purchased through our service organi-
sation,

The distance between the flue tube and combustible
material must not be less than 20 mm at any point. The
space around the tube where it passes through the caravan
wall should be packed with glass wool protected with
suitable metal plates. Install the flue extension as shown in
fig. 5.

The upper DOMETIC grille has an integrated flue
outlet, fig. 7. In this case the traditional flue outlet, is not
needed which simplifies the installation.

If there is no outer grille at floor level where leaking gas can
escape, a 40 mm hole should be made in the floor of the
recess to drain the gas. The hole should be fitted with wire
mesh and an angled plate to protect it from stones, mud
etc.

LP GAS CONNECTION

The refrigerator is designed for operation on liquified petro-
leum gas (LPG), the pressure of which must be:

for Butane type LPG 28 mbar

for Propane type LPG 37 mbar

Check that this is stated on the data plate.

The refrigerator is not designed for operation on town gas or
natural gas.

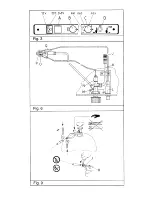
The gas equipment is shown in fig. 6. In the burner (P) is a
thermocouple (O), which generates an electric current
throught the flame failure device (N), keeping it open as
long as the flame burns. The valve (M) opens/closes the
gas mechanically. It also has a ``MIN'' position for cold
weather. The piezo igniter (L) is connected to the spark plug
(Q). The gas connecting tube (K) has a nipple (J) with left
hand 
thread R 1/4.

... in open air applications

For this application a hose connection to the LPG-bottle is
used. Only use rubber hose with crimped on connectors
approved for LPG.

A pressure regulator (as described above) is assembled to
the LPG-bottle. Check that the rubber gasket in the shut off
valve of the bottle is clean and undamaged, as also the
sealing surface in the pressure regulator. The nut should
only be thightened by hand - otherwise the gasket might be
damaged.

The connection is made as follows (figs. 6/9):

Put the refrigerator on its side

Connect hose to nipple (J) and thigten by hand. (Note:
left hand thread!).

Thigten carefully with a wrench, thereby holding the
nipple (J) with second wrench.

In the same way, connect other end of hose to pressure
regulator on LPG bottle.

Open shut off valve of bottle, putting the hose under
pressure.

Check for leaks at the connections, using water with
detergent, watching for bubbles. If leaking: carefully
thigten with two wrenches as explained above until
formation of bubbles stops.

In similar way check also thigtness between nipple (J)
and tube (K) and thighten if necessary.

Also check connection between pressure regulator and
LPG bottle. If leaking, clean sealing surfaces and inspect
for damage. If found defective: exchange (return LPG
bottle), but do not use any foreign sealing compound.

CAUTION: If there are still leaks, call in a service

technician.

... indoors

The gas installation should only be carried out by an
authorisid gas fitter.

CAUTION !

CHECK THAT THE GAS SUPPLIED TO THE

REFRIGERATOR IS AT THE CORRECT PRESSURE.

CHECK THE REDUCING VALVE ON THE LP GAS

11

Содержание RM 4203

Страница 1: ... 1 English Page 7 Svenska Sida 31 Dansk Side 37 Norsk Side 43 Français Page 13 Italiano Pagina 19 Español Pagina 25 Nederlands Pag 49 Suomi Sivu 55 RM 4203 Typ C60 70 821 2652 01 T B Rev 09 2005 MANUAL World Fridge ...

Страница 2: ...STUNGSSCHILD Kontrollieren Sie am Leistungsschild siehe unten daß Sie das richtige Modell bekommen haben und daß Netzspan nung und Gasanschlussdruck den vorgeschriebenen Wer ten entsprechen in BRD 230 Volt 30 bzw 50 mbar Das Leistungsschild ist im Inneren des Kühlschrankes angebracht und enthält u a folgende Angaben Modellbezeichnung Produktnummer Seriennummer Diese Daten werden bei evtl Kontakten...

Страница 3: ...opf C noch 10 15 Sekunden einge drückt 7 Danach loslassen und kontrollieren daß die Flamme weiterbrennt Der Gasbetrieb wird ausgeschaltet indem man den Knopf C auf stellt 230 V Betrieb Bevor Sie den Kühlschrank in Betrieb nehmen prüfen Sie bitte daß die Spannung des Hausanschlusses oder des Campingplatzes mit der auf dem Typenschild angegebenen Spannung übereinstimmt Dann gehen Sie wie folgt vor G...

Страница 4: ...mit einem Tuch aufgenommen werden Nach dem Abtauen wird der Schrank mit einem Lappen trocken gewischt wieder angeschaltet und die Lebensmittel hinein gelegt Mit der Eiswürfelbereitung sollten Sie jedoch bis zum nächsten Tag warten PFLEGEANLEITUNG Den Kühlschrank zuerst ausschalten und abtauen wie zuvor beschrieben Lose Teile Etageren Tragroste usw ausbauen spülen und trocknen Einen Lappen mit lauw...

Страница 5: ...ng Innerhalb der gesetzlichen Garantiezeit 6 Monate werden Schäden und Mängel am Gerät unentgeltlich behoben Ab dem 7 Monat wird jedoch eine Anfahrpauschale erhoben Der Kühlschrank hat zusätzlich eine Europagarantie ge mäß der im Schrank eingelegten Drucksache KUNDENDIENST UND ERSATZTEILE Kundendienst und Ersatzteile können vom Händler oder einer Kundendienststelle der Fa Electrolux europaweit bez...

Страница 6: ...ftungsgitter angebracht werden kleinster freier Quer schnitt 250 cm2 Gitter die für diese Anwendung speziell entwickelt wurden können von DOMETIC bezogen werden Modell A 1620 In den Seitenwänden des Kühlschrankes sind vier Kunstoff buchsen mit Schrauben zur Befestigung des Kühlschrankes vorgesehen Fig 4 Die Seitenwände der Nische und oder zur Kühlschrankbefestigung angebrachte Leisten müssen entsp...

Страница 7: ... des Gas und Wasserfaches DVGW und vom Deut scher Verband Flüssiggase DVFG herausgegeben Es wird empfohlen den Kühlschrank mit Sicherheits schlauch und stecker nach DIN 3383 Teil 3 anzuschlies sen Installation in Fahrzeugen Der Gasanschluß zum Kühlschrank muß starr erfolgen Schlauchanschluß ist unzulässig Er darf nur von einem zugelassenen Fachmann ausgeführt werden Der Anschluß erfolgt mittels ei...

Страница 8: ...ed DATA PLATE Check the data plate inside the refrigerator to ensure that you have received the right model The right gas pressure is 30 mbar The right voltage is 230 volts The data plate contains e g the following details Model designation Product number Serial number Since these details will be needed if you have to get in touch with service personnel it is a good idea to make a note of them her...

Страница 9: ...unning otherwise your battery will soon be discharged If applicable turn off the gas operation Depress the voltage selector A to position 12 V WINTER OPERATION Please check that the ventilation grilles or the flue outlet are not blocked by snow leaves etc DOMETIC ventilation grilles A 1620 fig 11 can be fitted with winter covers modell WA 120 to protect the cooling unit against cold air The covers...

Страница 10: ...ty of deter gent But not the door gasket which should only be cleaned with soap and water and then thoroughly dried The cooling unit behind the refrigerator should be cleaned with a brush from time to time but make sure that the refrigerator is switched off when doing this TURNING OFF THE REFRIGERATOR If the refrigerator is not to be used for some time Shut off any on board valve in the gas line t...

Страница 11: ...g min 0 16 kg Cooling medium Ammonia R 717 INSTALLATION INSTRUCTIONS REPOSITIONING THE HINGES The door hinges can be moved to the opposite side in the following way Unscrew the upper hinge pin taking care not to lose the set of washers and bushes Lift the door from the lower hinge pin Unscrew the pin and mount it on the opposite side hinge Unscrew the travel catch and mount it on the opposite side...

Страница 12: ...which simplifies the installation If there is no outer grille at floor level where leaking gas can escape a 40 mm hole should be made in the floor of the recess to drain the gas The hole should be fitted with wire mesh and an angled plate to protect it from stones mud etc LP GAS CONNECTION The refrigerator is designed for operation on liquified petro leum gas LPG the pressure of which must be for ...

Страница 13: ...your plug in the United Kingdom proceed as follows The wire which is coloured GREEN AND YELLOW must be connected to the terminal in the plug which is marked with the letter E or by the earth symbol or coloured green or green and yellow The wire which is coloured BLUE must be connected to the terminal which is marked with the letter N or coloured black The wire which is coloured BROWN must be conne...

Страница 14: ......

Страница 15: ......

Страница 16: ......

Отзывы: