10
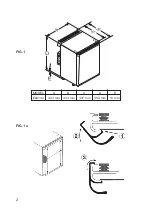
Remove the two cover caps (3) from the housing and place them in the open
hinge holes on the housing. Place the bottom righthand hinge in the top left
of the door and the top righthand hinge in the bottom left of the door and
hang the door on its hinges in the open cover cap holes in the housing.
Secure the hinges and cover caps with the 8 screws.
Check that the door closes easily and is sealed properly.
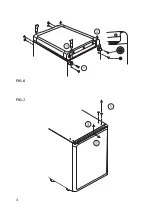
Replacing the decorative door panel, Fig. 7-9
Remove the two screws (1) from the upper hinge of the door.
Pull the door together with the hinge away from the housing and up off the
lower hinge bolt (2-3).
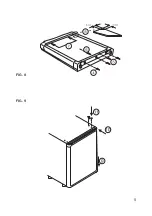
Remove screws (4) and pull off the frame edge (5).
Slide the decorative panel (6) out of the door frame and insert the new panel
(7), so that the upper edge of the panel runs exactly parallel to the upper
edge of the frame. A new panel can be inserted more easily into the upper
edge of the frame when the two corners are cut off by approx. 5x5 mm (8).
Put the frame edge (5) back in place and secure with screws (4).
Place the door on the lower hinge (9), slot the upper hinge into the opening,
press together with the door against the housing and secure with the two
screws (11).
TROUBLE-SHOOTING
Before you call a service engineer, carry out the following simple tests:
Is there a power failure? Check the fuses.
Is the plug firmly connected to the socket and is the socket switched on?
Check the socket by plugging in another appliance, eg a table lamp.
Is the thermostat at the correct setting? (normally 3 or 4).
Has the defrosting button been inadvertently pushed in? If so, turn the
thermostat dial to "0" and the defrosting button will be released. Reset the
dial to its usual position and the refrigerator should start cooling again.
Has the door not been closed properly causing the inside temperature to
rise too quickly?
Ist the refrigerator level?
Has the vantilation become obstructed?
If after checking all the above points, the refrigerator is still not working
satisfactorily, contact your nearest service engineer. A list of service
Содержание miniCool EA 3140
Страница 1: ...EA 3140 Operating instruction 207 5027 01 miniCool...
Страница 2: ...2 FIG 1 MODEL A B C D E EA3140 423 mm 434 mm 397 mm 552 mm 12 mm FIG 1a...
Страница 3: ...FIG 2 A min 200 cm2 B min 200 cm2 Z min 105 mm FIG 3 FIG 4 FIG 5...
Страница 4: ...4 FIG 7 FIG 6...
Страница 5: ...5 aaaa aaaa FIG 8 FIG 9...
Страница 12: ...Printed by Xerox Hungary Ltd Rev 2003 11 27...

