background image

10

EN

Installation 

Self-Contained Air Conditioning System

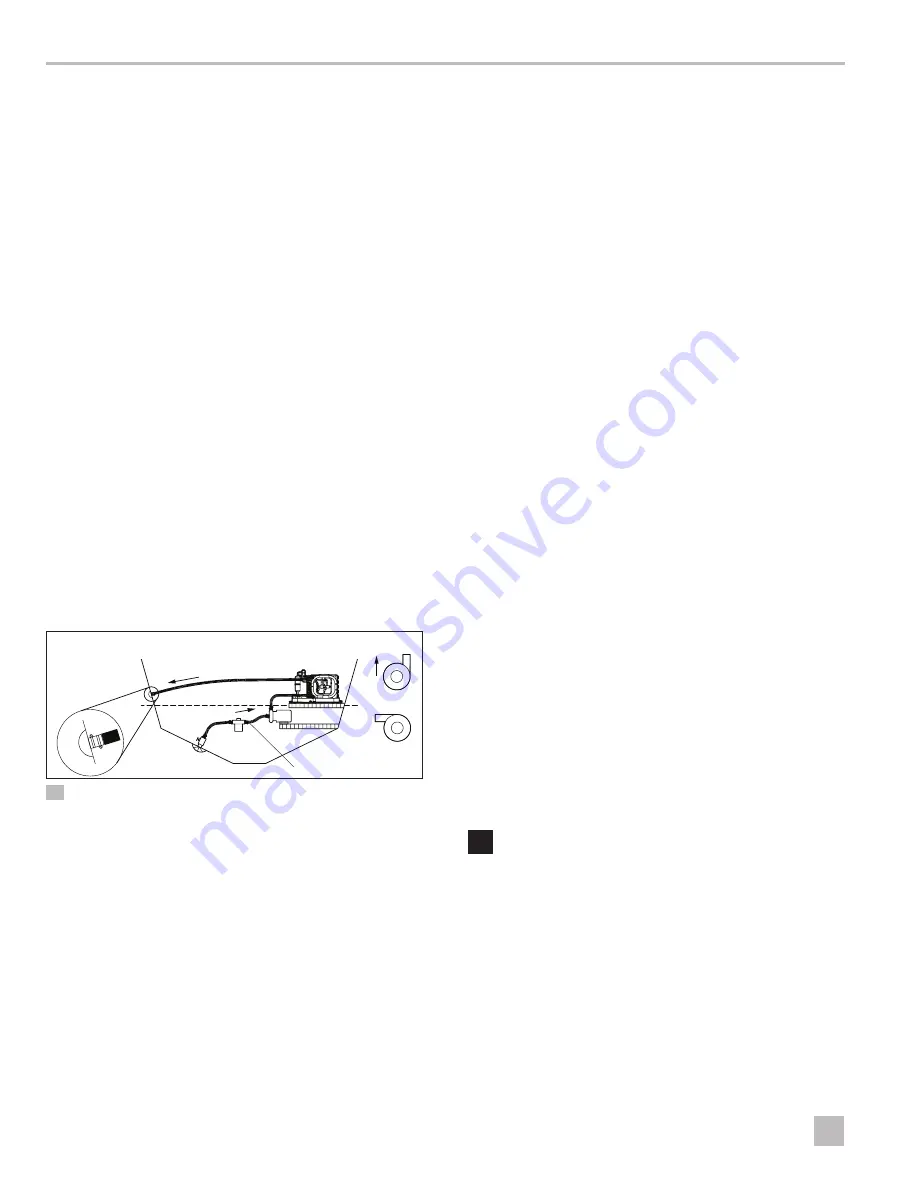
6 .7  Installing the Seawater System


I

Failure to follow this procedure will void the 
warranty.

Observe the following considerations when setting up 
the seawater system:

•  The strainer must be below the pump.

•  Hoses must be double clamped.

•  Hoses must not have kinks, loops, or high spots 

where air can become trapped.

•  The pump and strainer must be below the water line.

•  The thru-hull inlet, ball valve, hose, and strainer 

should be no smaller than the pump inlet.

•  Install the thru-hull fitting as far below the water line as 

possible.

•  The pump must have a dedicated thru-hull.

•  Avoid 90° elbow fittings as much as possible.

•  Ensure that the pump head is rotated toward the 

direction of water flow. 

•  Use threaded seal tape on all threaded connections.

a

o

i

u

y

t

r

e

w

q

12 

Seawater System

q

 Seawater Outlet

u

 Uphill Inlet Flow

w

 Outlet Flow

i

 Ball Valve

e

 Air Conditioning Unit

o

 Scoop Thru-Hull Inlet

r

 Seawater Pump

a

 Water Line

t

 Hose Clamps

s

 Correct Pump Head 

Orientations

y

 Strainer

1.  Install a seawater scoop thru-hull inlet as close to 

the keel and as far below the water line as possible. 
Secure the scoop thru-hull inlet using a marine sealant 
designed for underwater use.

2.  Install a bronze, full-flow seacock on the seawater 

scoop thru-hull inlet.

3.  Install a seawater strainer below the level of the pump 

with access to the filter.

4.  Mount the pump above the strainer and at least one 

foot below the waterline.

5.  Connect the seacock and strainer with an uphill run of 

reinforced marine-grade hose.

6.  Connect the discharge from the pump uphill 

to the bottom inlet of the air conditioning unit’s 
condenser coil with a 5/8 in. (15.9 mm) reinforced, 
marine-grade hose.

7.  Connect the discharge from the condenser coil to 

the overboard discharge thru-hull fitting with a 5/8 
in. (15.9 mm) reinforced marine-grade hose.

8.  Avoid loops, high spots, or the use of 90° elbows 

with the seawater hose. Each 90° elbow is equivalent 
to 2.5 in. (0.762 m) of hose and a 90° elbow on the 
pump outlet is equivalent to 20.0 in. (61 m) of hose.

9.  Double-clamp all hose connections using two 

stainless steel clamps, reversing the clamps where 
necessary.

10. Connect all metallic parts in contact with seawater to 

the vessel’s bonding system.

Refer to “Operating Water Temperature and Pressure” 
on page 5 for maximum and minimum wat
er 
temperature and pressure values.

6 .8 Making the Electrical 
Connections


WARNING: ELECTRICAL SHOCK HAZARD .

Always turn off the air conditioning power supply 
breaker before opening the electrical box. Failure 
to obey this warning could result in death or serious 
injury.


I

Failure to properly ground and bond the system will 
void the warranty.

s

Содержание DCG

Страница 1: ...ERS 339708 Form No L 4111 11 19 2019 Dometic Corporation WARNING Cancer and Reproductive Harm www P65Warnings ca gov DCG DCMG DCU DLM DLU DMT DTG DTU ECD MCS EN Self Contained Air Conditioning System Installation Manual 2 ...

Страница 2: ...nstructions to help you eliminate or reduce the risk of accidents and injuries 1 1 Recognize Safety Information This is the safety alert symbol It is used to alert you to potential physical injury hazards Obey all safety messages that follow this symbol to avoid possible injury or death 1 2 Understand Signal Words A signal word will identify safety messages and property damage messages and also wi...

Страница 3: ...rvision This appliance should not be accessible to the general public Failure to follow these precautions could result in death or serious injury WARNING EXPLOSION HAZARD Do not install the air conditioning unit in a location containing gasoline engines tanks LPG CPG cylinders regulators valves or fuel line fittings Unless labeled otherwise self contained units do not meet federal requirements for...

Страница 4: ...hoses electrical power connections location of the control and seawater pump placement to assure easy access for routing and future servicing See Figure 1 for an overview of the components in a typical self contained air conditioning system installation h j g f d s a o i u y t r e w q 1 Component Identification qSupply Air Grille and Transition Box oSeacock Shut Off Valve wDigital Display aSeawate...

Страница 5: ...ameter in mm 3 0 76 4 0 102 5 0 127 6 0 152 6 0 152 7 0 178 7 0 178 8 0 203 Minimum Duct Area sq in sq cm 6 8 44 12 6 81 19 6 126 28 3 183 28 3 183 38 5 248 38 5 248 50 3 325 Minimum Return Air Grille sq in sq cm 64 0 413 64 0 413 80 0 516 100 0 645 130 0 839 200 0 1290 200 0 1290 240 0 1548 Minimum Supply Air Grille sq in sq cm 12 0 77 32 0 206 48 0 310 60 0 387 70 0 452 80 0 516 100 0 165 140 0 ...

Страница 6: ...ning unit for installation 5 1 Determining the Installation Location 4 0 in 102 mm 3 0 in 76 mm 2 Placement Relating to Airflow qReturn Air Grille wBulkhead Allow for 3 0 in 76 mm minimum clearance in front of the evaporator coils and 4 0 in 102 mm minimum clearance in front of the return air grille 5 2 Rotating the Blower If needed rotate the blower to the direction that allows the most direct ai...

Страница 7: ...ne particles from the cabin air and keep the evaporator coil clean Place one air filter either on the air conditioning unit or in the return air grille for each air conditioner unit Refer to General Information on page 4 for air filter placement 5 4 Placing the Grilles and Transition Boxes Install the supply air grille as high as possible in a location that will provide uniform air distribution th...

Страница 8: ...tting 1 2 in HB x 12 MPT rDrain Pan wSolid Washer tLocking Nut eLiquid Seal Washer 1 Using the hose barb knock out a slug from an aft facing drain hole by applying one quick strike with a rubber mallet Discard the slug knockout 2 Install the hose barb For Turbo systems screw the hose barb into the threaded drain hole and tighten securely For all other systems thread the hose barb through a solid w...

Страница 9: ...lation Insulate ducting when it is located in high heat areas Ensure that ducting is properly protected against damage when routed through open areas Do not route ducting through an engine room or any area where it may be exposed to dangerous vapors or exhaust fumes If a transition box is used the total area of supply air ducts going out of the box should be at least equal to the total area of the...

Страница 10: ...ull flow seacock on the seawater scoop thru hull inlet 3 Install a seawater strainer below the level of the pump with access to the filter 4 Mount the pump above the strainer and at least one foot below the waterline 5 Connect the seacock and strainer with an uphill run of reinforced marine grade hose 6 Connect the discharge from the pump uphill to the bottom inlet of the air conditioning unit s c...

Страница 11: ...oat Within the boat itself ensure that the AC ground bus is connected to the DC ground bus at exactly one place All pumps metallic valves and fittings in the seawater circuit that are isolated from the air conditioning unit by PVC or rubber hoses must be individually bonded to the boat s bonding system 7 Disposal M M Place the packaging material in the appropriate recycling waste bins whenever pos...

Страница 12: ...com dealer YOUR LOCAL SUPPORT dometic com contact YOUR LOCAL SALES OFFICE dometic com sales offices A complete list of Dometic companies which comprise the Dometic Group can be found in the public filings of DOMETIC GROUP AB Hemvärnsgatan 15 SE 17154 Solna Sweden ...

Отзывы: