EN
Maintenance
CT(E), CTLP, CT(E)S, CTW
26
8.3
Cleaning the bayonet fitting and greasing the
bayonet seal
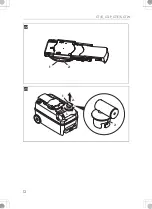
1. Remove the cassette tank and place it on a firm surface (fig.
2. Unlatch the slider handle and pull it out (fig.
3. Turn the slider anti-clockwise and release it from the cassette (fig.
4. Clean the bayonet fitting (fig.
1
, page 12) on the slider.
In the state upon delivery and after extended use, the bayonet fitting can be
loosened only with difficulty.
5. Evenly grease the bayonet seal (fig.
2
, page 12) with silicone grease.
6. Place the slider back on.
8.4
Greasing the O-ring of the cassette vent
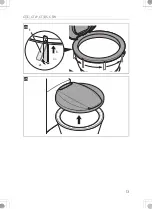
1. Take the adapter (fig.
1
, page 12) off the cassette.
2. Grease only the attached O-ring (fig.
, page 12) with silicone grease.
3. Place the adapter back on.
9
Maintenance
This chapter describes maintenance that may be performed by the user. Have all
other maintenance and service work performed by qualified personnel (see
dometic.com/contact).
When contacting customer service, make a note of the following information on the
data plate:
•
Model Designation
•
Product Number
•
Serial No.
•
MLC
I
NOTE
You can find the data plate in the cassette housing after removal of the
cassette.
Содержание CT 4050
Страница 3: ...CT E CTLP CT E S CTW 3 6 7 10 11 9 4 5 3 2 1 8 1 1 2 3 5 4 2 ...
Страница 4: ...CT E CTLP CT E S CTW 4 1 2 3 90 90 4 ...
Страница 5: ...CT E CTLP CT E S CTW 5 5 6 ...
Страница 6: ...CT E CTLP CT E S CTW 6 1 3 2 7 2 1 3 8 ...
Страница 7: ...CT E CTLP CT E S CTW 7 2 1 9 1 2 3 0 ...
Страница 8: ...CT E CTLP CT E S CTW 8 a b ...
Страница 9: ...CT E CTLP CT E S CTW 9 c d 1 2 e ...
Страница 10: ...CT E CTLP CT E S CTW 10 f 1 3 2 g h ...
Страница 11: ...CT E CTLP CT E S CTW 11 i j k ...
Страница 12: ...CT E CTLP CT E S CTW 12 l 1 2 m 1 2 1 2 ...
Страница 13: ...CT E CTLP CT E S CTW 13 6x 1 2 1 n o ...
Страница 14: ...CT E CTLP CT E S CTW 14 CLICK p 7 5 X2 X4 X3 X1 X0 2 1 1 q ...
Страница 15: ...CT E CTLP CT E S CTW 15 2 1 1 2 A B C D CLICK r ...

