background image

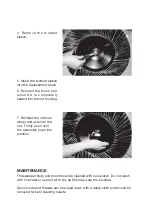
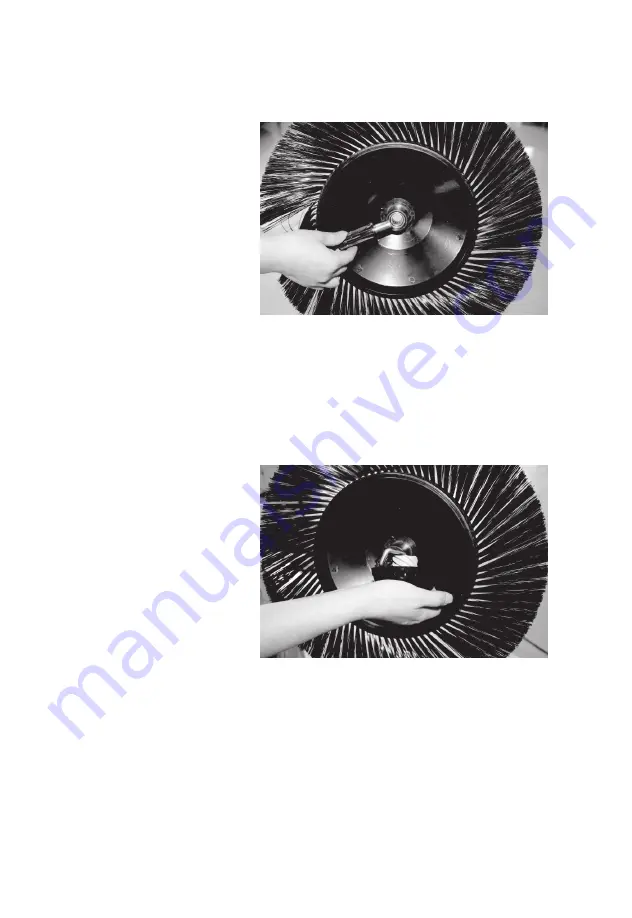
4.  Remove  the  toothed 
sleeve.

5. Insert the toothed sleeve 
into the replacement brush

6.  Reinsert  the  brush  and 
ensure  it  is  completely 
seated into the rod housing.

7. Reinsert the inclined 
wheel and axle into the 
rod. Firmly push until 
the assembly pops into 
position.

MAINTENANCE

The sweeper body and brooms can be cleaned with cool water.  Do not wash
with hot water or use hot air to dry as this may warp the brushes.

Spool cords and threads can be wiped down with a damp cloth and should be 
removed for best cleaning results.

Содержание ECO-SWEEP

Страница 1: ...ECO SWEEP Care and Use Guide Please make sure you read and understand this Care and Use Guide before using this product ...

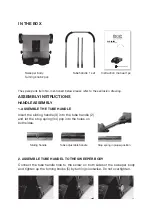
Страница 2: ...w on both sides of the sweeper body and tighten up the turning knobs 5 by turning clockwise Do not overtighten Sliding handle Tube adjustable handle Stop spring in proper position IN THE BOX Sweeper body Turning knob 2pcs Tube handle 1 set Instruction manual 1pc The spare parts item No mentioned below please refer to the explosion drawing ECO SWEEP Care and Use Guide Please make sure you read and ...

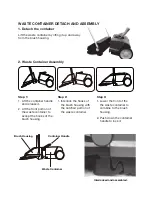
Страница 3: ...t portion of the waste container to accept the hooks of the brush housing Step 2 1 Interlock the hooks of the brush housing with the notched portion of the waste container Step 3 1 Lower the front of the the waste container to combine to the brush housing 2 Push down the container handle to lock it 2 Waste Container Assembly Brush Housing Waste Container Interlocked and assembled Container Handle ...

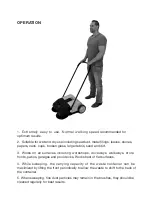
Страница 4: ...s on all surfaces including workshops driveways walkways store fronts patios garages and pool decks Works best of flat surfaces 4 While sweeping the carrying capacity of the waste container can be maximized by lifting the front periodically to allow the waste to shift to the back of the container 5 When sweeping fine dust particles may remain in the brushes they should be cleaned regularly for bes...

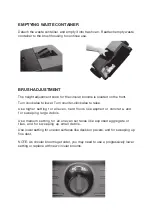
Страница 5: ... sweeping up small debris Use higher setting for all even hard floors like asphalt or concrete and for sweeping large debris Use lower setting for uneven surfaces like decks or pavers and for sweeping up fine dust NOTE As circular brooms get older you may need to use a progressively lower setting or replace with new circular brooms Detach the waste container and empty it into trash can Reattach em...

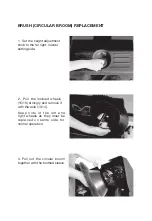
Страница 6: ...the far right lowest setting side 2 Pull the inclined wheels 15 16 strongly and remove it with the axle 13 14 Keep note of the left and right wheels as they must be replaced on same side for normal operation 3 Pull out the circular broom together with the toothed sleeve ...

Страница 7: ...g 7 Reinsert the inclined wheel and axle into the rod Firmly push until the assembly pops into position MAINTENANCE The sweeper body and brooms can be cleaned with cool water Do not wash with hot water or use hot air to dry as this may warp the brushes Spool cords and threads can be wiped down with a damp cloth and should be removed for best cleaning results ...

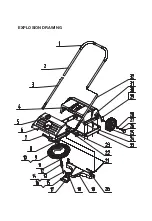
Страница 8: ...EXPLOSION DRAWING 1 2 3 4 5 6 7 8 9 10 11 12 13 14 15 16 17 18 JL550扫地机爆炸图 ...

Страница 9: ...oothed bushing 2 13 Axle left 1 14 Axle right 1 15 Right inclined wheel 1 16 Left inclined wheel 1 17 Holder ground board 1 18 Washer 6 2 19 Collecting plate 1 20 Bolt M8X30 2 21 Screw ST4X8 2 22 PU washer 2 23 Turning knob 2 24 Container 1 25 Wheel complete 2 26 Wheel cap 2 27 Quick fastener 11 5 2 28 Axle cover 4 29 Axle left welding part 1 30 Axle right welding part 1 31 Container cap 1 32 Stop...

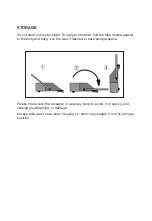
Страница 10: ...be handle parallel to the body and hang it on the wall if desired to save storage space Please make sure the sweeper is securely hung to avoid it dropping and causing possible injury or damage Always take great care when hanging or removing sweeper from the storage position ...

Страница 11: ...weeper is not picking up debris effectively 1 Check the height of the brushes and adjust if needed 2 Clean the unit and remove dirt and or debris stuck from the brushes spools or under machine itself 3 Lubricate the gear parts ...

Страница 12: ...ars SAFETY WARNING 1 Always be aware of your surroundings and take care when sweeping and operating the machine around children and or pets 2 This unit is not a toy 4 Please do not operate the sweeper barefoot or wearing open toed shoes 5 Please do not attempt to sweep burning or smoking materials to avoid fire hazard and personal injury 6 Please do not collect flammable explosive and or poisonous...

Отзывы: