background image

38


39

5.3 Operation / recording / playback

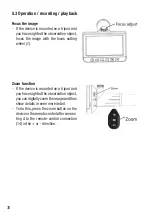
Focus the image

-  If the device is mounted on a tripod and 

you have sighted the observation object, 
focus the image with the focus setting 
wheel (7).

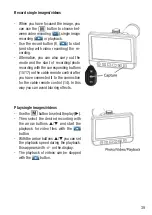
Zoom function

-  If the device is mounted on a tripod and 

you have sighted the observation object, 
you can digitally zoom the image and thus 
show details in even more detail.

-  To do this, press the zoom button on the 

device or the remote control after connec-
ting it to the remote-control connection 
(14) in the + or - direction.

Содержание DigiTele PRO

Страница 1: ...Sie die Bedienungsanleitung f r sp teres Nachlesen auf Wenn Sie das Ger t anderen Personen zur Nutzung berlassen bergeben Sie auch diese Bedienungsanleitung Digitales Teleskop DigiTele PRO Artikelnumm...

Страница 2: ...bilder einstellen 11 Belichtungskorrekturwert einstellen 12 Datumsstempel einstellen Datumsstempel bei Videoaufnahme 12 Loop Aufnahme 13 HDR ein ausschalten 14 TV Norm einstellen 14 Automatische Absch...

Страница 3: ...iertes ausklappbares 12 7 cm Farbdisplay 960 x 540 Pixel Aufnahme von Einzelbildern mit bis zu 15 Megapixel Aufl sung JPEG Format Aufnahme von Videosequenzen in HD Full HD Aufl sung MP4 Format Exakte...

Страница 4: ...Ver nderungen Hinweis Beachten Sie bei Aufnahmen die Pers nlichkeits und Urheberrechte und halten Sie die daf r geltenden gesetzlichen Bestimmungen ein Lieferumfang Digitales Teleskop DigiTele PRO Ka...

Страница 5: ...die Sonne oder andere starke Lichtquellen Linsen und Aufnahmeelektronik k nnten Schaden nehmen Ber hren Sie die Linsen nicht Wenn Sie das Ger t nicht benutzen setzen Sie immer die Schutzkappe auf das...

Страница 6: ...Einstellung 8 Videoausgang FBAS PAL NTSC 9 microSD Kartenslot 10 HDMI Ausgang 11 Zoomtaste 12 USB Port f r Akku Laden 5 V USB und PC Verbindung 13 Ladeanzeige 14 Anschluss f r Kabelfernbedienung 15 W...

Страница 7: ...zeige 13 angezeigt Rot leuchtend Ladevorgang l uft Aus Akku vollgeladen Trennen Sie nach dem Laden das Ladekabel vom Ger t Die Ladezeit betr gt f r eineVollladung ca 3 h Mit einem vollgeladenenAkku si...

Страница 8: ...ezustand 3x blau voll leeres Symbol entladen Die Symbole im Display werden 10 s nach der letztenTastenbet tigung abgeschaltet Ein und Ausschalten Bildschirm ausklappen Dr cken Sie die Ein Aus Taste 1...

Страница 9: ...ausw hlen Gehen Sie mit 2x Dr cken der Taste zur zweiten Men seite Hierw hlenSiemitdenPfeiltasten die Zeile Language an und best tigen die Auswahl mit der Taste Jetztw hlenSiemitdenPfeiltasten die Zei...

Страница 10: ...Einstellmen wechseln Sie nun mit der Taste die jeweils hinterlegte Anzeigestelle und stellen jeweils die Stelle mit den Pfeiltasten ein In der unteren Zeile stellen Sie das Datumsformat ein Mit der Ta...

Страница 11: ...t ein Einzelbild automatisch aufnimmt So kann man Verwacklungen bei der Ausl sung ber die Aufnahmetaste vermeiden W hlen Sie mit der Taste die Einzelbildaufnahme aus W hlen Sie dann das Men des Ger t...

Страница 12: ...tlegen ob eine Uhrzeit eine Datums Uhrzeit einblendung oder keine Einblendung in die Aufnahmen stattfinden soll W hlen Sie mit der Taste die Einzelbildaufnahme aus W hlen Sie dann das Men des Ger ts m...

Страница 13: ...erscheint die erste Men seite das Symbol ist blau hinterlegt Hier w hlen Sie mit den Pfeiltasten die Zeile Loop Aufname an und best tigen die Auswahl mit der Taste Jetzt w hlen Sie mit den Pfeiltasten...

Страница 14: ...che Abschaltung einstellen W hlen Sie die zweite Men seite an Hier w hlen Sie mit den Pfeiltasten die Zeile Auto Aus an und best tigen die Auswahl mit der Taste Im Einstellmen w hlen Sie nun mit den P...

Страница 15: ...15 Im Einstellmen w hlen Sie nun mit den Pfeiltasten die gew nschte Option Abbrechen Abbruch individuelle Einstellungen bleiben erhalten an und best tigen die Auswahl mit der Taste...

Страница 16: ...Einstellrad 7 scharf Zoomfunktion Wenn das Ger t auf einem Stativ montiert ist und Sie das Beobachtungsobjekt an visiert haben k nnen Sie das Bild digital zoomen und so Details noch detaillierter dar...

Страница 17: ...der Kabelfernbedienung ausf hren nach dem Sie diese an den Anschluss f r die Kabelfernbedienung 14 angeschlossen haben So k nnen Sie Verwacklungs effekte vermeiden Einzelbilder Videos abspielen W hlen...

Страница 18: ...t tigen Sie die entsprechende Auswahl mit der Taste Jetzt k nnen Sie den L schdialog mit der Taste verlassen Aufnahmen sch tzen W hlen Sie mit der Taste das Abspiel an W hlen Sie dann mit den Pfeiltas...

Страница 19: ...des Ger ts erscheint Massenspeicher als Hinweis jetzt k nnen keine Aufnahmen get tigt werden und Sie k nnen die Aufnahmen ansehen l schen oder auf den Rechner kopieren 5 5 Monitor Fernsehger t anschli...

Страница 20: ...hen Brennweite muss das Ger t immer ruhig stehen z B auf einem Stativ montiert sein Bei Freihandbetrieb sind keine stabilen Aufnahmen m glich L sen SieAufnahmen mit der Fernbedienung oder Einzelbilder...

Страница 21: ...pezial Reinigungst cher verwenden 7 Pflege und Wartung Vergr erungsfaktor 50fach Display 12 7 cm IPS 960 x 450 Pixel Aufnahmemedium microSD Speicherkarte Aufnahmeformat Video MP4 Einzelbild JPEG Aufna...

Страница 22: ...cher Kundendienst erteilt Ihnen gerne umfassende und qualifizierte Ausk nfte E Mail support dnt de 1 Ausgabe Deutsch 04 2021 Dokumentation 2019 dnt Innovation GmbH Alle Rechte vorbehalten Ohne schrift...

Страница 23: ...ons before installing and commissioning complete and retain the instructions for later use If you leave the device to other persons for use pass these instructions Digital telescope DigiTele PRO Artic...

Страница 24: ...ution 33 Set the self timer for single images 33 Set exposure compensation value 34 Set date stamp date stamp for video recording 34 Loop recording 35 Switch HDR on off 35 Set TV standard 36 Set autom...

Страница 25: ...7 cm color display 960 x 540 pixels Recording of single images with up to 15 megapixel resolution JPEG format Recording of video sequences in HD Full HD resolution MP4 format Exact focusing through m...

Страница 26: ...ability This also applies to conversions and changes Note When recording observe the personal rights and copyrights and comply with the applicable legal provisions Scope of Delivery Digital telescope...

Страница 27: ...at the sun or other strong light sources for a long time Lenses and recording electronics could be damaged Do not touch the lenses When you are not using the device always put the protective cap on th...

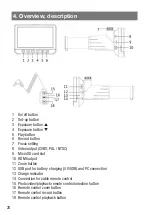
Страница 28: ...deo output CVBS PAL NTSC 9 MicroSD card slot 10 HDMI output 11 Zoom button 12 USB port for battery charging 5 V USB and PC connection 13 Charge indicator 14 Connection for cable remote control 15 Phot...

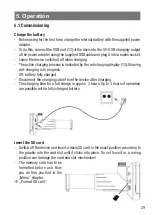
Страница 29: ...arging display 13 Glowing red charging is in progress Off battery fully charged Disconnect the charging cable from the device after charging The charging time for a full charge is approx 3 hours Up to...

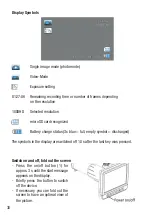
Страница 30: ...gnized Battery charge status 3x blue full empty symbol discharged The symbols in the display are switched off 10 s after the last key was pressed Switch on and off fold out the screen Press the on off...

Страница 31: ...oose a language Go to the second menu page by pressing the button twice Use the arrow buttons to select the Language line and confirm the selection with the button Now use the arrow buttons to select...

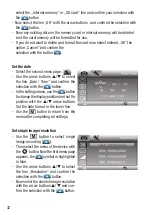
Страница 32: ...ttons to select the line Date Time and confirm the selection with the button In the settings menu use the button to change the display position and set the position with the arrow buttons Set the date...

Страница 33: ...es a single picture This way you can avoid blurring when triggered using the record button Use the button to select single image recording Then select the menu of the device with the button Now the fi...

Страница 34: ...e whether the time date time should be superim posed on the recordings or not Use the button to select single image recording Then select the menu of the device with the button Now the first menu page...

Страница 35: ...he video recording Then select the menu of the device with the button Now the first menu page appears the symbol is highlighted in blue Use the arrow keys to se lect the Loop recording line and confir...

Страница 36: ...button In the settings menu use the arrow buttons to select the desired standard depending on the connected TV monitor and confirm the selection with the button Set automatic shutdown Select the seco...

Страница 37: ...e the arrow buttons to select the line Standard setting and confirm the selection with the button In the settings menu use the arrow buttons to select the desired option cancel cancel individual setti...

Страница 38: ...with the focus setting wheel 7 Zoom function If the device is mounted on a tripod and you have sighted the observation object you can digitally zoom the image and thus show details in even more detai...

Страница 39: ...g with the corresponding buttons 15 17 on the cable remote control after you have connected it to the connection for the cable remote control 14 In this way you can avoid blurring effects Play single...

Страница 40: ...rm the corresponding selection with the button Now you can exit the deletion dialog with the button Protect recordings Use the button to select the play Then use the arrow buttons to select the desire...

Страница 41: ...uter Mass storage appears on the device screen as an indication that no recordings can now be made and you can view delete or copy the recordings to the computer 5 5 Connect monitor TV Connect the dev...

Страница 42: ...um Storage medium defect or not insert correctly No picture blurred picture no details The observation object is not far enough away because of the large focal length a sharp image is only possible a...

Страница 43: ...single images 2 5 10 20 s Clip length video endless 1 3 5 10 min Outputs CVBS 3 5 mm jack HDMI mini USB PC Power supply internal battery Li Ion 3 7 V not chargeable Charger Power supply 5 VDC 1 A USB...

Страница 44: ...nnovation GmbH All rights reserved No part of this user manual may be reproduced or reproduced in any form without the written consent of the publisher It is possible that these operating instructions...

Отзывы: