


Digital Monitoring Products
7760 Keypad Installation Guide
4
Internal Speaker Operation
The Glass keypad emits standard tones for key touches, entry delay, and system alerts. The speaker also provides
distinct burglary, fire, zone monitor, and prewarn cadences. The keypad provides an alternate prewarn entry delay
cadence that occurs when the keypad is displaying a zone alarm.
End-User Options
The 7760 Keypads provide three adjustments the end‑user can make through a User Options Menu. The user can also
view the keypad model number and address in User Options.
To access User Options, touch and hold the center of the logo for two seconds. The 32‑character display changes to
SET BRIGHTNESS. Touch the CMD (COMMAND) key to display the next option or touch the <— (Back Arrow) to exit the
User Options function. See Figure 5.
Note
: The End‑User Options function automatically terminates after approximately 20 seconds of no activity.
Set brightneSS
<
>
Backlighting Brightness
Set the backlight illumination and AC Power/Armed LED brightness level. In the
touchscreen display below SET BRIGHTNESS, touch the left < to lower the backlight
brightness and the right > to raise the backlight brightness. If the brightness level is
lowered, it reverts to maximum intensity whenever the glass is touched during normal
operation. If the glass is not touched, and the speaker has not sounded for 30 seconds,
the user‑selected standby brightness level restores.
Note
: If the brightness level is set to the lowest level, after 30 seconds of no activity,
the screen display turns off and will vanish from sight. Simply touch the glass
anywhere and the display and backlight illuminates.
Set tOne
<
>
Speaker Tone
Set the keypad speaker tone. At the SET TONE display, use the left < to lower the tone
and the right > to raise the tone.
Set VOLUMe LeVeL
<
>
Volume Level
Set the keypad speaker volume level for key touches and entry delay tone conditions.
During alarm and trouble conditions, the volume is always at maximum level. Use the
left < to decrease the keypad volume and the right > to increase the volume.
MOdeL nUMber
7760
V100 030805
Model Number
The LCD displays the keypad model number and the keypad firmware version and date.
The user cannot change this information.
Keypad addreSS
01
Keypad Address
The LCD displays the current keypad address. While in User Options, the user cannot
change the keypad address. Touch the (<— ) Back Arrow key to exit the User Options
function.
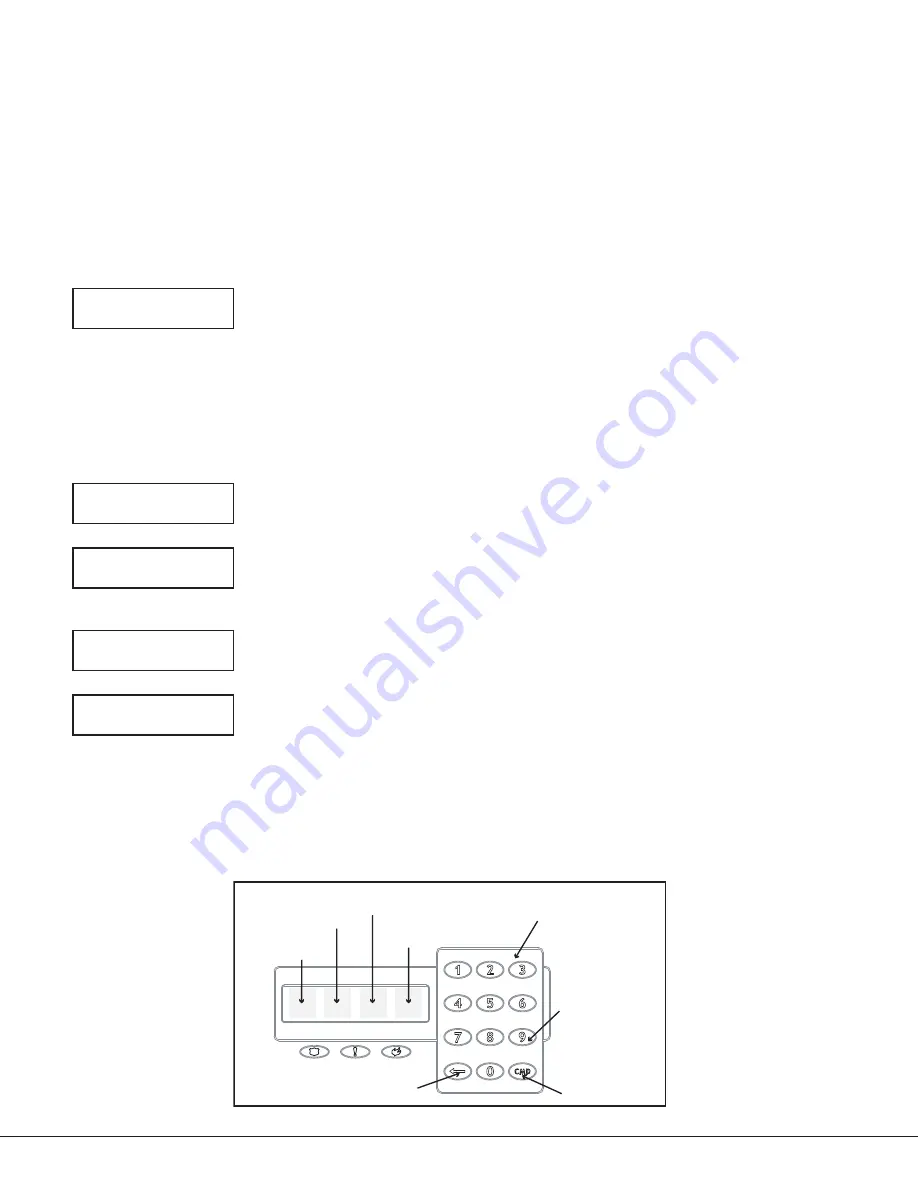
Entering Characters
Figure 6 shows the location of the alpha and non‑alphanumeric characters and the 32‑character display areas to
touch to enter information. The non‑alpha special characters do not display on the keyboard but are listed on
Figure 5 for reference. The special characters available are as follows starting with the 1 digit key to the 9 digit
key: ( ) ! ? / & $ ‚ ’ and ‑ . * # for the 0 key.
32-Character Display
Panic Icons
First Letter
Select area 1
Second Letter
Select area 2
third Letter
Select area 3
Special Character
Select area 4
Keyboard
keys
COMMand
Key
back
arrow Key
abC( deF) ghi!
JKL? MnO/ pQr&
StU$ VWX, yZ
(SpaCe)
'
–.*#
touch 9 Key and
Select area 3 to
enter a blank
space in the text.
Figure 6: Entering Alpha and Non-Alpha Characters


