background image

26

SETUP

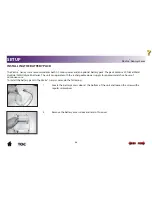
The Vectra® Genisys Laser can be operated while the unit is resting on a flat surface, or mounted on a wall. To mount the unit on a 
wall, do the following:


1. 

Remove the repositional base from the bottom of the unit.


2. 

Using the repositional base


as a guide, mark the 4 wall holes with a pencil or pen.

MOUNTING THE UNIT ON THE WALL

Vectra® Genisys Laser

Содержание Vectra Genisys

Страница 1: ...Leading Therapy In a New Direction User Manual ISO 13485 Certified Model 2784 Vectra Genisys Laser ...

Страница 2: ...ifications 22 23 Laser Protective Eyewear Specifications 24 SETUP 25 31 Installing the Laser Interlock Door Interrupt Switch 25 Mounting the Unit on the Wall 26 28 Installing the Battery Pack 29 30 CHARGING USING THE BATTERY PACK 31 OPERATION 32 60 Entering Changing the PIN 32 34 Preparing the Patient s Skin for Therapy 35 Starting Stopping Interrupting Therapy 36 38 Using Clinical Indications 39 ...

Страница 3: ...aser TREATMENT TIPS 60 ACCESSORIES 61 Standard Accessories 61 Optional Accessories 61 TROUBLESHOOTING 62 Troubleshooting the Display 62 Error Codes and Descriptions 62 MAINTENANCE 63 64 Maintaining the Unit 63 Cleaning 63 Service 64 Warranty Repair Out of Warranty Repair 64 WARRANTY 65 ...

Страница 4: ...ult other resources for additional information regarding the application of therapeutic laser light Users of this device should refer to CAN CSA Z386 92 Laser Safety in Health Care Facilities or ANSI Z 136 3 1996 American National Standard for the Safe Use of Lasers in the Health Care Environment Product Description The Vectra Genisys Laser designed and manufactured by Chattanooga Group offers a n...
Страница 5: ...ectronic Signature Automatically calibrate the system to any Vectra Genisys Laser applicator Ergonomic Applicators A new ergonomic design that offers a 20 degree contour in the applicator hand grip This ergonomic extra will help deliver uniform laser light therapy with greater clinician comfort Clear LCD Guide the operator through the setup process providing continuous feedback about treatment set...

Страница 6: ...autionary and operational decals placed on the unit Do not operate this unit when connected to any unit other than Chattanooga Group devices Do not operate this unit in an environment where other devices are being used that intentionally radiate electromagnetic energy in an unshielded manner Portable and mobile RF communications equipment can affect Medical Electrical Equipment DO NOT use sharp ob...

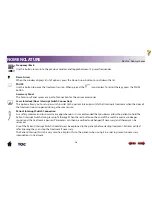
Страница 7: ...equency energy and if not installed and used in accordance with the instructions may cause harmful interference to other devices in the vicinity However there is no guarantee that interference will not occur in a particular installation Harmful interference to other devices can be determined by turning this unit on and off Try to correct the interference using one or more of the following reorient...

Страница 8: ...he unit and applicator Care must be taken when operating this unit adjacent to or stacked with other equipment Potential electromagnetic or other interference could occur to this or other equipment Try to minimize this interference by not using other equipment i e cell phones etc in conjunction with it Use only accessories that are specially designed for this unit Do not use accessories manufactur...

Страница 9: ...ated Laser protective eyewear should be worn by the operator and patient to block infrared light energy from the eyes during treatment DO NOT point the laser light beam directly into human or animal eyes The lens of the eye does not detect the invisible coherent laser light beams potentially resulting in permanent retinal damage This unit is considered to be a Class 3B laser light product and thus...

Страница 10: ...re more than 100 double blind positive studies confirming the clinical effect of LLLT Low Level Laser Therapy More than 2500 research reports are published The book Laser Therapy clinical practice and scientific background by Jan Tunér and Lars Hode is a good reference guide for literary documentation There is no exact limit with respect to the penetration of the light The light gets weaker the fu...

Страница 11: ... in Watts W power wattage is directly proportional to the treatment time and penetration of the laser light energy High powered diodes will reduce patients treatment time and give a higher amount of energy at a deeper depth Power output can be either continuous or pulsed Power Density Ratio of power divided by treatment time Pulsed Mode This is the ratio of the On time to Total time of the cycle e...

Страница 12: ...n nanometers nm wavelength is the key component in obtaining effective therapy as different wavelengths bring about different physiological effects Superficial skin disorders have been found to be most effectively treated at wavelengths 600 700 nm while deeper muscular or ligament lesions and joint conditions are better treated at higher wavelengths of 700 1000 nm ...

Страница 13: ...e analgesia may mask progressive pathology and where the practitioner would normally avoid the use of any other analgesia in order to retain the beneficial aspects of pain for direct aim into the eyes of humans or animals over areas injected with steroids in the past 2 3 weeks over areas that are suspicious or contain potentially cancerous tissue over areas of active hemorrhage over a pregnant ute...

Страница 14: ...f laser light therapy Patient Susceptibility Be sure to inspect the treatment area during and following treatment and discontinue if an adverse reaction does occur Output Power Higher output levels have a greater potential for patient DANGER Patients with an implanted neurostimulation device must not be treated with or be in close proximity to any shortwave diathermy microwave diathermy therapeuti...

Страница 15: ...output or select a pulsed duty cycle to decrease patient discomfort Factors that Affect Treatment The following factors may affect laser light treatment Color of skin light or dark Age of lesion Depth of lesion Sensitivity of patient Type of tissue Medications that increase sensitivity to light ...

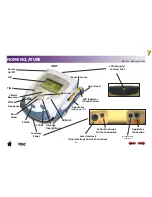
Страница 16: ...inical Resources Frequency Back TIME Intensity Display Enter Laser Head Power On Off LCD LED Indicator Output Power LCD Intensity Contrast Dial Applicator see page 14 Accessory Panel Laser Interlock Door Interrupt Switch Connection Patient Interrupt Switch Connection Applicator Connection Pause Resume Not Applicable in US Market ...

Страница 17: ...14 Vectra Genisys Laser NOMENCLATURE Pause Resume Button LED Indicator Output Power APPLICATOR Lens LED s SLD s Laser Diode Laser Head Laser Head ...

Страница 18: ...g information is displayed on the LCD Frequency Duty Cycle Dosage Treatment Time Clinical Indications Time Press the Up or Down arrow buttons to set total treatment time of therapy Clinical Resources Select this button to access the following functions Clinical Indications Utilities Retrieve User Protocols Save User Protocols Use the Up and Down arrow buttons to navigate through the available opti...

Страница 19: ...when the door of the treatment room is opened during a therapy session Patient Interrupt Switch Connection As a safety measure and to minimize any apprehension it is recommended that you always allow the patient to hold the Patient Interrupt Switch during laser light therapy When the red button on the end of the switch is pressed a beeper sounds and the treatment is paused Parameters can then be v...

Страница 20: ...n arrow to increase or decrease output power dosage Applicator The hand held assembly used to deliver laser light energy The applicator includes the laser head diode and related electronics Up Arrow When the window displays a list of options press the Up Arrow button to scroll up the list Battery Indicator When displayed on the LCD this symbol indicates the battery pack option is present on the Ve...

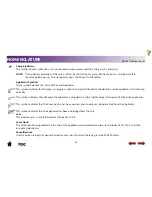
Страница 21: ... the patient and the applicator is functioning normally This symbol indicates that although the applicator is plugged in no laser light energy is being emitted from the applicator This symbol indicates that the Pause button has been pressed and no output is being emitted from the applicator This symbol indicates that the applicator has been unplugged from the unit Lens This clear lens acts as a sh...

Страница 22: ...erent wavelengths of light that allow the user to treat topical or surface symptoms Laser Diode This mechanism generates different wavelengths of light that allow the user to treat various deeper penetrating symptoms LED Indicator Output Power This orange light illuminates when laser light energy is being distributed by the applicator ...

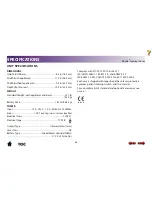
Страница 23: ...Max Fuses 1 0A Time Lag not user serviceable Electrical Class CLASS 1 Electrical Type TYPE B Output Type Infrared Lamp laser Laser Class 3B Battery Type Nickel Metal Hydride NiMH 1 2 V x 20 size AA Complies with 21CFR 1040 10 1040 11 IEC UL EN 60601 1 60601 1 2 and 60601 2 22 IEC 60825 1 2001 CAN CSA C22 2 No 601 1 M90 w A2 Each unit is shipped with repositional base laser protective eyewear patie...

Страница 24: ...tibility One or more of the following markings may appear on the device Standards Classified by Intertek Testing Services NA Inc Complies with 21CFR 1040 10 1040 11 IEC UL EN 60601 1 60601 1 2 and 60601 2 22 CAN CSA C22 2 No 601 1 M90 w A2 Refer to ACCOMPANYING DOCUMENTS Type B Equipment This unit is considered to be a Class 3B laser product and thus emits visible and invisible laser radiation IR ...

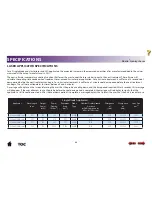
Страница 25: ...he new software incorporates a cooling function that forces the user to cool the laser clusters prior to the next treatment The software will calculate the cooling time needed when treatment times exceed 3 minutes per application For a 3 minute treatment it will force a 15 second cool down period before the next treatment can begin For a 4 minute treatment it will force a 2 minute cool down period...

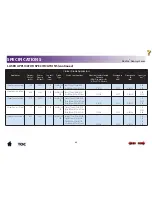
Страница 26: ...eClusterLaser1040mW 1040 0 138 7 55 GaAlAs SLD LED Four 670 nm 10 mW LED Five 850 nm 200 mW Laser 12 4438 0 097 0 54334 0 64 0 188 13DiodeClusterLaser415mW 415 0 055 7 55 GaAlAs SLD LED Seven 670 nm 10 mW LED Three 850 nm 100 mW Laser Three 950 nm 15 mW SLD 6 2218 0 097 0 54334 1 12 0 136 0 48 13DiodeClusterLaser715mW 715 0 095 7 55 GaAlAs SLD LED Seven 670 nm 10 mW LED Three 850 nm 200 mW Laser T...

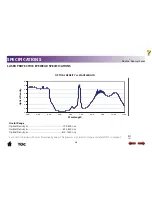
Страница 27: ...cal Density 3 625 830 nm Optical Density 3 815 1050 nm Each unit is shipped with Laser Protective Eyewear The eyewear is L3 rated and approved and EN207 compliant 0 1 2 3 4 5 6 7 8 200 300 400 500 600 700 800 900 1000 1100 OPTICAL DENSITY vs WAVELENGTH Wavelength Optical Density Vectra Genisys Laser 0413 ...

Страница 28: ...r to the wiring diagram below The Laser Interlock kit consists of a switch resistor and a jack You must supply the necessary cable that complies with local and international codes The Laser Interlock must be installed by a professional or qualified electrician Serious eye injury can result if the device is not properly installed Also when installing the device for multiple doors the resistance tot...

Страница 29: ...on a flat surface or mounted on a wall To mount the unit on a wall do the following 1 Remove the repositional base from the bottom of the unit 2 Using the repositional base as a guide mark the 4 wall holes with a pencil or pen MOUNTING THE UNIT ON THE WALL Vectra Genisys Laser ...

Страница 30: ...step 4 Press 4 appropriately sized sheetrock anchors into the wall so that the sheetrock anchor is flush with the wall 5 Screw four 8 flathead wood screws 1 inch or 2 54 cm into the wall anchors Make sure you leave 1 4 of an inch 0 635 cm between the wall and the head of the screw MOUNTING THE UNIT ON THE WALL continued Vectra Genisys Laser ...

Страница 31: ...d 6 Replace the repositional base on the bottom of the unit 7 Line up the screw heads with the holes on the repositional base and slide the unit down slightly until the screw heads are securely fastened to the repositional base Vectra Genisys Laser ...

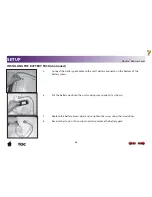
Страница 32: ...batteries The unit can operate with the rechargeable power supply for approximately five hours of continuous use To install the battery pack in the Vectra Genisys Laser do the following 1 Locate the battery access door at the bottom of the unit and loosen the screw with a regular screwdriver 2 Remove the battery access door and retain this cover INSTALLING THE BATTERY PACK Vectra Genisys Laser ...

Страница 33: ...battery recess 4 Put the battery pack into the unit making sure to orient it as shown 5 Replace the battery access door and re tighten the screw using the screwdriver 6 Reverse the steps in this section in order to remove the battery pack INSTALLING THE BATTERY PACK continued Vectra Genisys Laser ...

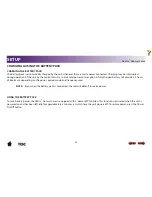
Страница 34: ...l provide 2 5 hours of treatment depending on the power pulsed mode and frequency used NOTE Even when the battery pack is connected the unit will default to mains power USING THE BATTERY PACK To save battery power the Vectra Genisys Laser is equipped with a power off function This function is activated when the unit is powered on and has been left idle for approximately 5 minutes at which time the...

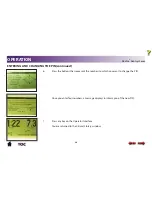
Страница 35: ...ressing the Power On Off button The unit displays the message Initializing System Then the Enter PIN window displays 2 1 1 1 1 is the default PIN Press the button representing the number 1 four times so that displays briefly The main window displays If you enter the wrong PIN the message Incorrect PIN was entered Please try again Press any key to continue displays Press any key on the Operator Int...

Страница 36: ... THE PIN continued 3 Press the Clinical Resources button The Clinical Library window displays 4 Using the Up Arrow and Down Arrow buttons highlight Change PIN 5 Press the Display Enter button to select the highlighted selection The Change PIN window displays Vectra Genisys Laser ...

Страница 37: ... the buttons that represent the numbers to which you want to change the PIN Once you enter four numbers a message displays to inform you of the new PIN 7 Press any key on the Operator Interface You are returned to the Clinical Library window Vectra Genisys Laser ...

Страница 38: ...ent s skin for laser light therapy do the following 1 Thoroughly wash the skin on which you intend to place the laser head with mild soap and water or alcohol wipe 2 Dry the skin thoroughly PREPARING THE PATIENT S SKIN FOR LASER LIGHT THERAPY Before each use clean the plastic lens with NOVUS Polish System www novuspolish com Make certain to apply with a clean cloth Failure to clean the lens betwee...

Страница 39: ...Press the Up Arrow button to increase the frequency in 1 Hz increments Hold the button down to quickly display higher frequencies Press the Down Arrow button to decrease the frequency in 1 Hz increments Hold the button down to quickly display lower frequencies An audible tone will be heard when changes are made 2 Press the TIME button and raise or lower treatment time using the up and down arrows ...

Страница 40: ...reatment After you press the Pause Resume button the orange light will illuminate on the back of the applicator to indicate that laser light output is being distributed NOTE When treatment time has expired a tone will sound The therapy can be interrupted at any time by pressing the Pause Resume button on the back of the applicator the STOP button on the Operator Interface or the PAUSE button on th...

Страница 41: ...ht energy the orange light goes out To resume therapy press the PAUSE button on the Operator Interface the Pause Resume button on the back of the laser applicator or the START button 5 To finish the laser light therapy press the STOP button STARTING STOPPING AND INTERRUPTING THERAPY continued Vectra Genisys Laser ...

Страница 42: ...vidually assessed to determine the appropriateness of the parameter setting prior to use To select an indication for a patient do the following 1 Press the Clinical Resources button The Clinical Library window displays 2 Using the Up Arrow and Down Arrow buttons highlight Clinical Indications and press the DISPLAY Enter button The Clinical Indications menu displays Vectra Genisys Laser ...

Страница 43: ...ppropriate indication The indications displayed depend upon the applicator used 4 Press the DISPLAY Enter button to accept the highlighted selection 5 If available highlight the appropriate laser light tissue depth with the indication you selected using the Up Arrow and Down Arrow buttons Vectra Genisys Laser ...

Страница 44: ...cation you selected displayed 7 Review the final indication parameters for the laser light treatment Make any necessary modifications or corrections 8 Press the DOSAGE button either the up or down arrow to adjust the output to the prescribed dosage NOTE The Dosage and the Treatment Time are directly correlated Whenever Dosage is changed the Treatment Time is automatically changed and reflected on ...

Страница 45: ...AL INDICATIONS continued 9 To begin therapy continue with the instructions outlined in the section entitled Preparing the Patient s Skin for Laser light Therapy on page 35 Then proceed to step 4 on page 37 Vectra Genisys Laser ...

Страница 46: ...otocols do the following 1 Make the desired parameter changes 2 Press the Clinical Resources button The Clinical Library window displays 3 Press the Down Arrow or Up Arrow buttons to highlight the Save Protocol option 4 Press the DISPLAY Enter button to accept the Save Protocol selection The Save Protocol menu displays CREATING A USER PROTOCOL Vectra Genisys Laser ...

Страница 47: ...ess the DISPLAY Enter button to accept the highlighted selection and save your custom protocol The User Protocol Confirmation window displays to indicate that the protocol is now saved as the number you specified 7 Press any button on the Operator Interface The Clinical Library window displays and your new user defined protocol is now saved CREATING A USER PROTOCOL continued Vectra Genisys Laser ...

Страница 48: ...of the unit s language and power up settings However you may want to return the unit to its original settings To restore the original power up default settings on the unit do the following 1 On the main window press the Clinical Resources button The Clinical Library window displays 2 Press the Up Arrow or Down Arrow buttons to highlight the Restore Factory Settings option Vectra Genisys Laser ...

Страница 49: ...ted selection The Restore Factory Settings Confirmation window displays 4 Press any button on the Operator Interface The default power up settings are restored and you are returned to the Clinical Library window RESTORING FACTORY SETTINGS continued Vectra Genisys Laser ...

Страница 50: ...to restore the user defined protocols to the unit s original parameters when it was shipped to you To do this do the following 1 Press the Clinical Resources button The Clinical Library window displays 2 Press the Up Arrow or Down Arrow buttons to highlight the Restore Factory Protocols option Vectra Genisys Laser ...

Страница 51: ...to accept the highlighted selection The Restore Factory Protocols Confirmation window displays 4 Press any button on the Operator Interface The user defined protocols are erased and restored to the original parameters You are returned to the Clinical Library window Vectra Genisys Laser ...

Страница 52: ... Press the Clinical Resources button The Clinical Library window displays 2 Use the Up Arrow and Down Arrow buttons to highlight the Retrieve User Protocol option 3 Press the Display Enter button to accept the highlighted selection A list of user defined protocols displays SELECTING A USER DEFINED PROTOCOL Vectra Genisys Laser ...

Страница 53: ...e parameters of the protocol you selected 6 Verify the parameters of this program and use the appropriate buttons on the Operator Interface to adjust any setting if necessary For example to adjust the time press the up and down arrows on the TIME button 7 To begin therapy perform all the procedures outlined in the section entitled Preparing the Patient s Skin for Laser light Therapy on page 35 The...

Страница 54: ...he rechargeable battery s power is low in which case the Low Battery icon will display Any error message is displayed The therapy time reaches 0 00 The treatment session is paused or resumed Changing Power Up Presets The following power up presets can be changed and stored as new presets Frequency Treatment Time Dosage To change the power up presets do the following Vectra Genisys Laser ...

Страница 55: ... The Clinical Library window displays 3 Press the Up Arrow and Down Arrow buttons to highlight Save Protocol and press the DISPLAY Enter button to accept the highlighted selection The Save Protocol menu displays 4 Press the Up Arrow or Down Arrow buttons to highlight Default Protocol Vectra Genisys Laser ...

Страница 56: ...tion The User Default Protocol confirmation window displays 6 Press any key to confirm the settings You are returned to the Clinical Library window Brightening or Dimming the LCD To brighten or dim the LCD turn the contrast control dial until the display contrast is optimal SYSTEM UTILITIES continued Vectra Genisys Laser ...

Страница 57: ...erify applicator specifications To do this do the following 1 Press the Clinical Resources button The Clinical Library window displays 2 Press Up Arrow and Down Arrow buttons to highlight the View Applicator Info option SYSTEM UTILITIES continued Vectra Genisys Laser ...

Страница 58: ... UTILITIES continued 3 Press the DISPLAY Enter button to accept the highlighted selection The Laser Applicator Information window displays 4 Verify the information on the window and press the Back button to return to the Clinical Library window Vectra Genisys Laser ...

Страница 59: ...ayed by the Vectra Genisys Laser to either English or Spanish To change the language displayed on the LCD do the following 1 Press the Clinical Resources button The Clinical Library window displays 2 Use the Up Arrow and Down Arrow buttons to highlight the Language option Vectra Genisys Laser ...

Страница 60: ...ton to accept the highlighted selection 4 Press the Up Arrow and Down Arrow buttons to highlight the appropriate language 5 Press the DISPLAY Enter button to accept the highlighted selection Your unit now displays the language you selected SYSTEM UTILITIES continued Vectra Genisys Laser ...

Страница 61: ...unit is using the latest software available To do this do the following 1 Press the Clinical Resources button The Clinical Library window displays 2 Use the Up Arrow and Down Arrow buttons to highlight the View Unit Version Info option SYSTEM UTILITIES continued Vectra Genisys Laser ...

Страница 62: ... OF CONTENTS OPERATION SYSTEM UTILITIES continued 3 Press the Display button to accept the highlighted selection The Unit Version Information window displays 4 Press any key to return to the Clinical Library window Vectra Genisys Laser ...

Страница 63: ...t this method if it is uncomfortable to the patient Applicator Selection If the injury you intend to treat is very small pinpoint you should only need to treat the area with a single diode applicator If the area surrounding the treatment area is sensitive it is recommended that you apply therapy with a single diode applicator first then use the cluster applicator for the surrounding area Cold and ...

Страница 64: ... Single Diode 850 nm Laser 150 mW Applicator 26 AWG 68 89 in 174 143 cm Shielded 27841 Single Diode 850 nm Laser 200 mW Applicator 26 AWG 68 89 in 174 143 cm Shielded 27811 9 Diode Applicator 540 mW 26 AWG 68 89 in 174 143 cm Shielded 27812 9 Diode Applicator 1040 mW 26 AWG 68 89 in 174 143 cm Shielded 27814 13 Diode Applicator 415 mW 26 AWG 68 89 in 174 143 cm Shielded 27816 13 Diode Applicator 7...

Страница 65: ...ged in 204 LED output is too low 104 pressed START but treatment time is zero 300 some type of critical laser board error has occurred 105 retrieved a user protocol but no applicator plugged in 301 no laser board is detected in unit 106 retrieved a user protocol not previously saved and no applicator plugged in 302 error reading from laser board 107 retrieved a user protocol for an applicator diff...

Страница 66: ... intact Applicator lens Check to see that there is no build up of oil or foreign material on or behind the applicator lens Cleaning To clean the accessories use only soap and water The Vectra Genisys Laser s case may be cleaned by wiping with a damp cloth or mild cleaning solution Avoid abrasive cleansers Before each use clean the plastic lens with NOVUS Polish System www novuspolish com Make cert...

Страница 67: ...TY REPAIR OUT OF WARRANTY REPAIR 1 Written statement containing the following information Return Authorization RA Number Obtain from Factory Unit Model Number Unit Serial Number Contact person with Phone and Fax Numbers Billing Address for Out of Warranty Repair Shipping Address Where to Ship Unit after Repair Detailed Description of Problem or Symptoms 2 Copy of original invoice issued at purchas...

Страница 68: ...e Company the selling dealer or a certified Company service technician Defects or damage caused by labor furnished by someone other than Company the selling dealer or a certified Company service technician COMPANY SHALL NOT BE LIABLE IN ANY EVENT FOR INCIDENTAL OR CONSEQUENTIAL DAMAGES Some states do not allow the exclusion or limitation of incidental or consequential damages so the above limitati...

Страница 69: ...17 Adams Road P O Box 489 Hixson TN 37343 U S A 800 592 7329 U S A 800 361 3661 Canada 800 242 8329 FAX chattgroup com Leading Therapy In a New Direction 2006 Encore Medical L P ISO 13485 Certified 28050B ...

Отзывы: