background image

8

Nuestros tractores cumplen con los estándares de seguridad del American National Standard Institute.

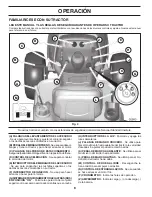
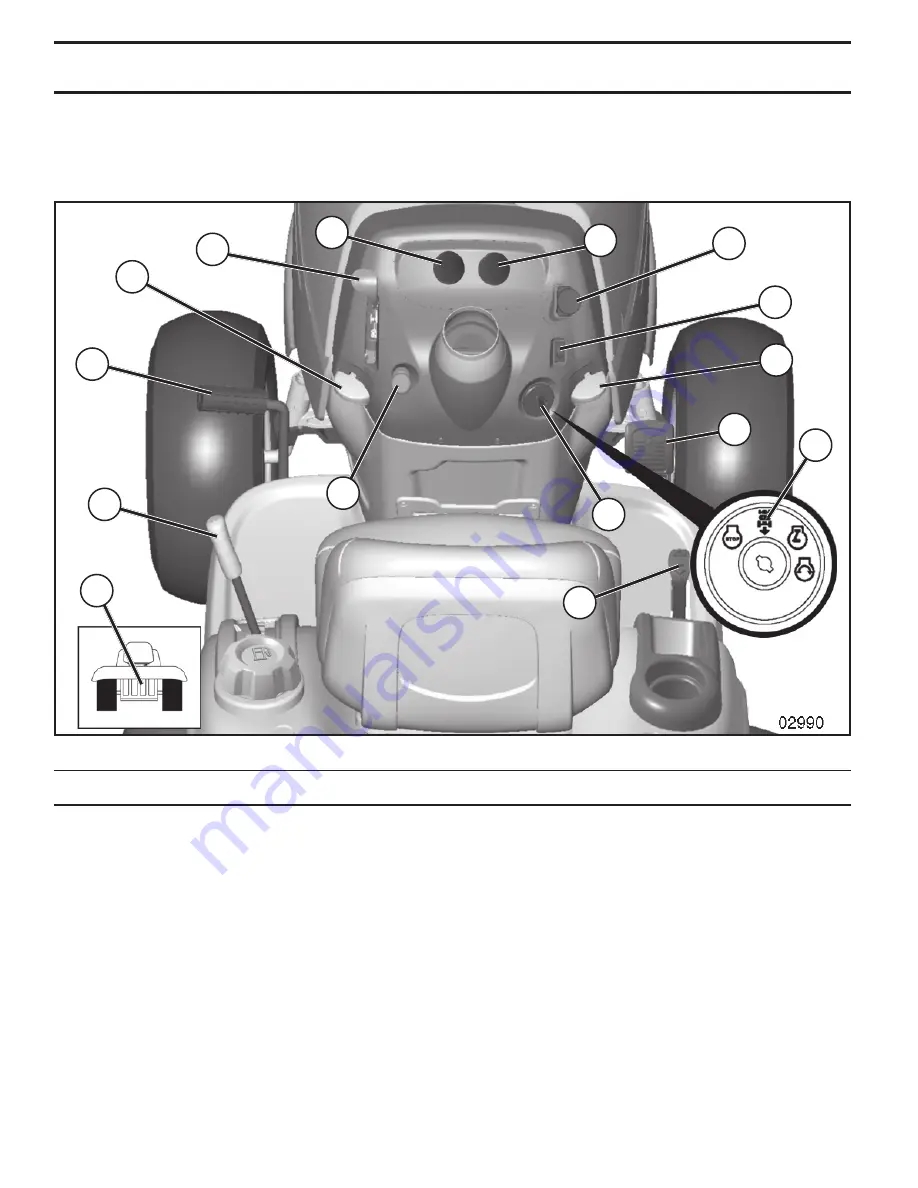
(A) PALANCA DEL LEVANTAMIENTO DEL ACCESORIO


- Se usa para levantar, bajar y ajustar el conjunto segador 

o los demás ac ce so rios montados en su tractor.

(B) PEDAL DEL EMBRAGUE/FRENO

 - Se usa para desem-

bragar y frenar el tractor y para hacer arrancar el motor.

(C) PALANCA DEL FRENO DE ESTACIONAMIENTO

 - 

Ase gu ra el pedal del embrague/freno en la posición del freno.

(D) CONTROL DE ACELERACIÓN 

- Se usa para controlar 

la ve lo ci dad del motor.

(E) INTERRUPTOR DEL EMBRAGUE DEL ACCESORIO


- Se usa para enganchar las cuchillas segadoras o los 

demás ac ce so rios montados en su tractor.

(F) INTERRUPTOR DE IGNICIÓN

 - Se usa para hacer 

arrancar o hacer parar el motor.

(G) SISTEMA DE FUNCIONAMIENTO HACIA ATRÁS (ROS) 

EN POSICIÓN “ON”

 - Permite la operación del conjunto 

segador o otro accesorio accionado mientras que en revés.

(H) INTERRUPTOR DE LA LUZ

 - Enciende y apaga las 

luces de lan te ras.

(J) PALANCA DE MANDO CRUCERO

 - Se utiliza para 

fijar el movimiento hacia adelante del tractor a la velocidad 

deseada sin apretar el pedal de marcha atrás.

(K) PEDAL DE MARCHA ADELANTE

 - Se utiliza para el 

movimiento del tractor hacia adelante.

(L) PEDAL DE MARCHA ATRÁS

 - Se utiliza para el mo-

vimiento del tractor hacia atrás.

(M) CONTROL DE RUEDA LIBRE

 - Desengancha la 

trans-misión para empujar o arrastrar.

(N) CONTROL DE ESTRANGULACIÓN

 - Se usa cuando 

se hace arrancar un motor frío.

(P) CRONÓMETRO

 - Indica las horas de operación.

(Z) AMPERÍMETRO

 - Indica la carga (+) o la descarga (-) 

de la batería.

Fig. 3

E

A

M

F

B

J

Z

N

K

G

C

H

D

P

L

OPERACIÓN

FAMILIARICESE CON SU TRACTOR

LEA ESTE MANUAL Y LAS REGLAS DE SEGURIDAD ANTES DE OPERAR SU TRACTOR

Compare las ilustraciones con su tractor para familiarizarse con las ubicaciones de los diversos controles y ajustes. Guarde este manual 

para referencia en el futuro.

Содержание D22KH46

Страница 1: ...hine The use of any gasoline exceeding 10 ethanol E10 will void the product warranty Operator s Manual D22KH46 13 04 13 CL 586 53 25 96 Printed in the U S A WARNING Read this Manual and follow all Warnings and Safety Instructions Failure to do so can result in serious injury ...

Страница 2: ...lope Keep all movement on the slopes slow and gradual Do not make sudden changes in speed or direction which could cause the machine to roll over Use extra care while operating machine with grass catch ers or other attachments they can affect the stability of the machine Do no use on steep slopes Do not try to stabilize the machine by putting your foot on the ground Do not mow near drop offs ditch...

Страница 3: ...Use extra care when approaching blind corners shrubs trees or other objects that may block your view of a child IV TOWING Tow only with a machine that has a hitch designed for towing Do not attach towed equipment except at the hitch point Follow the manufacturer s recommendation for weight limits for towed equipment and towing on slopes Never allow children or others in or on towed equipment On sl...

Страница 4: ...pment PPE while operating this machine including at a minimum sturdyfootwear eyeprotection andhearingprotection Do not mow in shorts and or open toed footwear Always let someone know you are outside mowing WARNING This tractor is equipped with an internal combustion engine and should not be used on or near any unimproved forest covered brush covered or grass covered land unless the engine s exhaus...

Страница 5: ...aintenance section of this manual for charging instructions For battery and battery cable installation see RE PLACINGBATTERY inthe ServiceandAdjustments section in this manual ADJUST SEAT See Fig 2 Sit in seat Lift up adjustment lever A and slide seat until a com fortable position is reached which allows you to press clutch brake pedal all the way down Release lever to lock seat in position Fig 2 ...

Страница 6: ... USE YOUR TRACTOR PAY EXTRA ATTENTION TO THE FOLLOWING IMPORTANT ITEMS Engine oil is at proper level Fuel tank is filled with fresh clean regular unleaded gasoline Become familiar with all controls their location and function Operate them before you start the engine Be sure brake system is in safe operating condition Be sure Operator Presence System and Reverse Op eration System ROS are working pr...

Страница 7: ...ety inform ation about hazards which can result in death serious injury and or property damage DANGER indicates a hazard which if not avoided will result in death or serious injury WARNING indicates a hazard which if not avoided could result in death or serious injury CAUTION indicates a hazard which if not avoided might result in minor or moderate injury CAUTION when used without the alert symbol...

Страница 8: ... F IGNITION SWITCH Used for starting and stopping the engine G REVERSE OPERATION SYSTEM ROS ON POSITION Allows operation of mower or other powered attachment while in reverse H LIGHT SWITCH Turns the headlights on and off J CRUISE CONTROL LEVER Used to set forward movement of tractor at desired speed without holding the forward drive pedal K FORWARD DRIVE PEDAL Used for forward move ment of tracto...

Страница 9: ...nd full speed fast position before stopping may cause engine to backfire Turnignitionkey F to STOP positionandremovekey Always remove key when leaving tractor to prevent unauthorized use Never use the choke to stop the engine IMPORTANT LEAVING THE IGNITION SWITCH IN ANY POSITION OTHER THAN STOP WILL CAUSE THE BATTERY TO BE DISCHARGED DEAD NOTE Under certain conditions when tractor is standing idle...

Страница 10: ...e pedal OPERATION A Fig 8 TO ADJUST MOWER CUTTING HEIGHT See Fig 8 The position of the attachment lift lever A determines the cutting height Put attachment lift lever in desired cutting height slot The cutting height range is approximately 1 to 4 25 4 to 101 6 mm The heights are measured from the ground to the blade tip with the engine not running These heights are approximate and may vary dependi...

Страница 11: ...ress reverse drive pedal to start movement When use of the ROS is no longer needed turn the ignition key clockwise to engine ON position ROS ON POSITION ENGINE ON POSITION NORMAL OPERATING 02828 TO OPERATE ON HILLS CAUTION Donotdriveupordownhills with slopes greater than 15 and do not drive across any slope Choose the slowest speed before starting up or down hills Avoid stopping or changing speed ...

Страница 12: ...rating position Allow one minute for transmission to warm up This can be done during the engine warm up period The attachments can be used during the engine warm up period after the transmission has been warmed up andmayrequirethechokecontrolbepulledoutslightly BEFORE STARTING THE ENGINE CHECK ENGINE OIL LEVEL The engine in your tractor has been shipped from the fac tory already filled with summer...

Страница 13: ...ntrol to half 1 2 speed Disengage parking brake 8 Drive tractor forward for approximately 5 feet 1 5 m then backwards for 5 feet 1 5 m Repeat this driving procedure three times Your transmission is now purged and now ready for normal operation MOWING TIPS DO NOT use tire chains when the mower housing is attached to tractor Mower should be properly leveled for best mowing performance See TO LEVEL M...

Страница 14: ...OMMENDATIONS The warranty on this tractor does not cover items that have beensubjectedtooperatorabuseornegligence Toreceive full value from the warranty operator must maintain tractor as instructed in this manual Some adjustments will need to be made periodically to properly maintain your tractor At least once a season check to see if you should make any of the adjustments described in the Service...

Страница 15: ...is running with the ignition switch in the ROS ON position and the attachment clutch engaged any attempt by the operator to shift into reverse should NOT shut off the engine BLADE CARE Forbestresultsmowerbladesmustbekeptsharp Replace bent or damaged blades BATTERY Yourtractorhasabatterychargingsystemwhichissufficient for normal use However periodic charging of the battery with an automotive charge...

Страница 16: ...ss screen dirtyorpluggedcoolingfins and orcoolingshroudsremoved will cause engine damage due to overheating Fig 17 MAINTENANCE TO CHANGE ENGINE OIL See Fig 16 17 Determine temperature range expected before oil change All oil must meet API service classification SG SL Be sure tractor is on level surface Oil will drain more freely when warm Catch oil in a suitable container Remove oil fill cap dipst...

Страница 17: ...reach IMPORTANT Make certain the tractor s discharge chute is directed AWAY from your house garage parked cars etc Remove bagger chute or mulch cover if attached 2 Make sure the attachment clutch control is in the DISENGAGED position set the parking brake and stop the engine 3 Threadthenozzleadapter packagedwithyourtractor s Operator s Manual onto the end of your garden hose 4 Pull back the lock c...

Страница 18: ...er and disconnect mower suspension arm A from chassis and rear lift link C from rear mower bracket D remove retainer springs and washers Go to other side of mower and disconnect the suspen sion arm and rear lift link CAUTION After rear lift links are dis connected the attachment lift lever will be spring loaded Have a tight grip on lift lever when changing position of the lever Slide mower out fro...

Страница 19: ...INKS C Lift rear corner of mower and position slot in link assembly over pin on rear mower bracket D and secure with washer and retainer spring M C D A E F B Fig 26 M Fig 25 IMPORTANT CHECK BELT FOR PROPER ROUTING IN ALL MOWER PULLEY GROOVES Raise attachment lift lever to highest position If necessary adjust gauge wheels before operating mowerasshownintheOperationsectionofthismanual D C ATTACH MOW...

Страница 20: ...t your adjustment by mowing some uncut grass and visually checking the appearance Readjust if neces sary until you are satisfied with the results PRECISION SIDE TO SIDE ADJUSTMENT See Fig 28 With all tires properly inflated park tractor on level ground or driveway CAUTION Blades are sharp Protect your hands with gloves and or wrap blade with heavy cloth Raise mower to its highest position At both ...

Страница 21: ...rely 7 Reconnect clutch harness A 8 Make sure belt is in all pulley grooves and inside all belt guides and keepers 9 Install mower See TO INSTALL MOWER section in this manual electric 02953 E A F B J G C H D Fig 32 SERVICE AND ADJUSTMENTS TO REPLACE MOWER BLADE DRIVE BELT See Fig 31 MOWER DRIVE BELT REMOVAL Park tractor on a level surface Engage parking brake Lower attachment lift lever to its low...

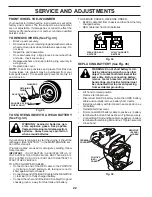
Страница 22: ...ver Disconnect BLACK battery cable then RED battery cable and carefully remove battery from tractor Install new battery with terminals in same position as old battery Reinstall terminal cover First connect RED battery cable to positive battery terminal with bolt and nut as shown Tighten securely ConnectBLACKgroundingcabletonegative battery terminal with remaining bolt and nut Tighten securely Clos...

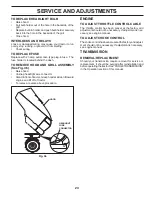
Страница 23: ...Stand in front of tractor Grasp hood at sides tilt toward engine and lift off of tractor To replace reverse above procedure Fig 36 TRANSMISSION REMOVAL REPLACEMENT Should your transmission require removal for service or replacement it should be purged after reinstallation and beforeoperatingthetractor See PURGETRANSMISSION in the Operation section of this manual SERVICE AND ADJUSTMENTS 02491 HEADL...

Страница 24: ...plastic Plastic cannot breathe which allows condensation to form and will cause your tractor to rust IMPORTANT NEVER COVER TRACTOR WHILE ENGINE AND EXHAUST AREAS ARE STILL WARM Immediately prepare your tractor for storage at the end of the season or if the tractor will not be used for 30 days or more WARNING Neverstorethetractorwith gasoline in the tank inside a building where fumes may reach an o...

Страница 25: ...heck replace ignition switch 8 Faulty solenoid or starter 8 Check replace solenoid or starter 9 Faulty operator presence switch es 9 Contact an authorized service center department Engine clicks but will not start 1 Weak or dead battery 1 Recharge or replace battery 2 Corroded battery terminals 2 Clean battery terminals 3 Loose or damaged wiring 3 Check all wiring 4 Faulty solenoid or starter 4 Ch...

Страница 26: ...e mower drive belt 9 Blades improperly installed 9 Reinstall blades sharp edge down 10 Improper blades used 10 Replace with blades listed in parts manual 11 Cloggedmowerdeckventholesfrombuildup of grass leaves trash around mandrels 11 Clean around mandrels to open vent holes Headlight s not working if so equipped 1 Switch is OFF 1 Turn switch ON 2 Bulb s or lamp s burned out 2 Replace bulb s or la...

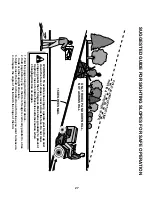
Страница 27: ... never across the face Do not mow slopes greater than 15 degrees Make turns gradually to prevent tipping or loss of control Exercise extreme caution when changing direction on slopes 1 Fold this page along dotted line indicated above 2 Hold page before you so that its left edge is vertically parallel to a tree trunk or other upright structure 3 Sight across the fold in the direction of hill slope ...

Страница 28: ...used for rental or commercial purposes is limited to 90 days from the date of origi nal purchase 5 This Warranty applies only to products which have been properly assembled adjusted operated and maintained in ac cordance with the instructions furnished This Warranty does not apply to any product which has been subjected to altera tion misuse abuse improper assembly or installation delivery damage ...

Страница 29: ...0 de etanol E10 anulará la garantía del producto Manual de Operario D22KH46 12 04 13 CL 586 53 25 96 Impreso en los E E U U ADVERTENCIA Leer entender y seguir todas las instruc ciones sobre la máquina y en el manual antesdeempezar Sinoseobservanlasin struccionesdeseguridadsiguientessepu edenproducirlesionesgravesolamuerte ...

Страница 30: ... otros es combros que pueden tocar el tubo de escape partes del motor calientes y quemarse No permitir que el puente del cortacésped cargue hojas u otros residuos que pu eden causar acumulaciones Limpiar toda salpicadura de aceite o carburante antes de hacer operaciones sobre la máquina o guardarla Dejarla enfriar antes de guardarla II FUNCIONAMIENTO EN PENDIENTES Las pendientes son el mayor facto...

Страница 31: ... del depósito de carburante o la abertura del contenedor durante toda la operación de abastecimiento No utilizar un dispositivo con boquilla cerrada abierta OPERACIONES DE SERVICIO GENERALES Nunca hacer funcionar la máquina en un área cerrada Mantener todas las tuercas y pernos apretados para asegu rarse de que trabaja en condiciones seguras Nunca modificar los dispositivos de seguridad Controlar ...

Страница 32: ...cuadas al manejar la máquina incluidos como mínimo calzado de seguridad gafasprotectorasyprotecciónauditiva Noutilicepantalones cortos y o calzado abierto cuando corte la hierba Informe siempre a alguien de que se dispone a cortar la hierba en el exterior ADVERTENCIA Este tractor viene equipado con un motor de combustión interna y no se debe usar sobre o cerca de un terreno no desarrollado cubiert...

Страница 33: ... BATERÍA del capítulo de Servicio y Ajustes de este manual PARA AJUSTAR EL ASIENTO Vea Fig 2 1 Siéntese sobre el asiento 2 Levante la palanca del ajuste A hacia arriba y mueva el asiento hasta que alcance una posición cómoda que le permita presionar completamente sobre el pedal del freno 3 Desconecte la palanca para trabar el asiento en la posición Fig 2 A Llaves Llaves 1 Tubo de desagüe Hoja de p...

Страница 34: ...O QUE APRENDE A COMO USAR SU TRACTOR PRESTE ATENCIÓN EXTRA A LOS PUNTOS DE IMPORTANCIA QUE SE PRESENTAN A CONTINUACIÓN El aceite del motor tiene que llegar al nivel adecuado Elestanquedecombustibletienequeestarllenocongasolina sin plomo regular nueva y limpia Familiarícese con todos los controles su ubicación y su función Opérelos antes de hacer arrancar el motor Asegúrese que el sistema de frenos...

Страница 35: ...IONESªDEªSEGURIDADª RELATIVASªAªPELIGROSªQUEªPUEDENPROVOCARªLAª MUERTE ªHERIDASªGRAVESªY OªDA OSªAªLAª MÈQUINA 0 2 ªINDICAªUNªPELIGROªQUE ªSIªNOªSEªEVITA ª PROVOCAªMUERTEªOªLESIONESªGRAVES ª 6 24 ªINDICAªUNªPELIGROªQUE ªSIªNOªSEªEVITA ª PUEDEªPROVOCARªMUERTEªOªLESIONESªGRAVES ª 02 5 ªINDICAªUNªPELIGROªQUE ªSIªNOªSEªEVITA ª PUEDEªPROVOCARªLESIONESªLIGERASªOªMODERADAS ª 02 5 ªCUANDOªSEªUTILIZAªSINªE...

Страница 36: ...njunto segador o otro accesorio accionado mientras que en revés H INTERRUPTOR DE LA LUZ Enciende y apaga las luces delanteras J PALANCA DE MANDO CRUCERO Se utiliza para fijar el movimiento hacia adelante del tractor a la velocidad deseada sin apretar el pedal de marcha atrás K PEDAL DE MARCHA ADELANTE Se utiliza para el movimiento del tractor hacia adelante L PEDAL DE MARCHA ATRÁS Se utiliza para ...

Страница 37: ... el motor ande en vacío antes de pararlo puede producir la contraexplosión del motor Gire la llave de ignición F a la posición de apagado STOP y remueva la llave al abandonar el tractor para evitar el uso no autorizado Nunca use la estrangulación para parar el motor IMPORTANTE DEJANDO EL INTERRUPTOR DE LA IGNICIÓN EN CUALQUIERPOSICIÓNOTRAQUE STOP CAUSARIQUELABATERÍA SE DESCARGUE MUERTA AVISO Bajo ...

Страница 38: ...dodecrucero Paradesconectarelcontroldecrucero tirelapalancahaciaatrása laposición OFF oempujecompletamenteelpedaldelfreno A PARA AJUSTAR LA ALTURA DE CORTE DE LA SEGADORA Vea Fig 8 La posición de la palanca elevadora A determina a qué altura se cortará el césped Coloque la palanca elevadora en la ranura de la altura de seada La gama de la altura de corte es de aproximadamente 25 4 a 101 6 mm 1 a 4...

Страница 39: ...reposicionar la máquina con el dispositivo embragado No siegue en revés a menos que sea absolutamente necesario USAR EL SISTEMA DE FUNCIONAMIENTO ATRÁS ROS Utilice el tractor solamente si está seguro de que no ingresarán niños ni otras personas o animales al área donde se va a cortar el césped Presionar el pedal freno hasta el fondo Con el motor en marcha girar la llave del interruptor de la ignic...

Страница 40: ...inuto Estopuedeserechoduranteeltiempodecalentamiento del motor Los accesorios pueden ser utilizados durante el periodo del recalentamiento del motor después que la transmisión halla sido calentada y puede requerir que el control de la estran gulación sea estirado un poco AGREGUE GASOLINA Llene el tanque de combustible hasta la parte inferior del cuello de relleno No lo llene de más Use gasolina no...

Страница 41: ...aciaadelanteduranteaproximadamente cinco pies y entonces hacia marcha atrás cinco pies 150 cm Repita este proceso tres 3 veces Su transmisión esta ahora purgado y dispuesto para la operación normal CONSEJOS PARA SEGAR NO use cadenas de llanta cuando la carcasa de la cortadora de césped esté colocada en el tractor La segadora debe estar nivelada en forma adecuada para obtener el mejor rendimiento a...

Страница 42: ...r servicio más a menudo cuando se opere en condiciones sucias o polvorosas 3 Cambiar las cuchillas más a menudo cuando se siegue en suelo arenoso 4 No requerido si equipado con una batería libre de mantenimiento 5 Vea LIMPIEZA en la sección de Mantenimento de este manual T R A C T O R Inspeccione las correas trapezoidales Limpiar el filtro de aire 2 Limpiar la rejilla de aire 2 Revisar el nivel de...

Страница 43: ... en la posición ON y el embrague del accesorio conectado cualquier tentativa del operador de viajar marcha atrás NO apagará el motor 02828 POSICIÓN ROS ON MOTOR EN POSICIÓN ON OPERACIÓN NORMAL REMOCIÓN DE LA CUCHILLA Vea Fig 15 Levante la segadora a su posición más alta para permitir el acceso a las cuchillas AVISO Proteja sus manos con guantes y o envuelva la cuchilla con una tela gruesa Remueva ...

Страница 44: ...o en el motor debido al calentamiento excesivo MANTENIMIENTO PARA CAMBIAR EL ACEITE DEL MOTOR Vea Fig 16 y 17 Determine la gama de la temperatura esperada antes de cam biar el aceite Todo el aceite debe cumplir con la clasificación de servicio API SG SL Asegúrese que el tractor esté en una superficie nivelada El aceite se drenará más fácilmente cuando esté caliente Recoja el aceite en un envase ad...

Страница 45: ...ave del agua 6 Desde la posición del operador del tractor vuelva a arrancar el motor y ponga la palanca de aceleración en la posición rápido IMPORTANTE Vuelva a revisar el área para asegurar que está despejada Asegúrese de que no haya niños en el área mientras limpia la plataforma 7 Mueva el control del embrague del accesorio a la posición ENGANCHAR Manténgaseenlaposicióndeloperadorcon lacubiertad...

Страница 46: ...e la cortadora retire el resorte de contención y la arandela Por uno de los lados de la cortadora desconecte el brazo de suspensión de la cortadora A del chasis y la pieza de unión posterior C de la barra posterior de la cortadora D retire los resortes de contención y las arandelas CUIDADO UNA VEZ QUE SE DES CONEC TENLASPIEZASDEUNIÓNPOSTERIORES LA PALANCA ELEVADORA FUNCIONARÁ A RESORTE SUJETE CON ...

Страница 47: ...is del tractor y fíjelo con una resorte de contención Realice el mismo procedimiento en el otro lado del tractor FIJE LAS PIEZAS DE PROPULSIÓN POSTERIORES C Levante la parte posterior de la cortadora ubique la ranura de la pieza de unión D por encima de la clavija que hay en la barra posterior de la cortadora y fíjela con una arandela y un resorte de contención Meta el fin de la conexión E en el h...

Страница 48: ... que ambos lados queden iguales AJUSTE DE DELANTE A ATRÁS Vea Fig 29 y 30 IMPORTANTE El piso debe quedar bien nivelado de lado a lado Para que el césped le quede perfectamente cortado las cuchil las de la cortadora deben ajustarse de tal manera que la punta anterior quede 3 1 a 12 7 mm 1 8 a 1 2 más abajo que la punta posteriorcuandolacortadoraseencuentreensuposiciónmásalta CUIDADO Lascuchillasson...

Страница 49: ...e la polea del motor y alrededor del embrague eléctrico G 8 Deslice la correa hacia la parte de atrás del tractor retírela de la placa de dirección H y sáquela del tractor MONTAJE DE LA CORREA 1 Instale la correa nueva pasándola de la parte de atrás a la parte de adelante del tractor por encima de la placa de direc ción H y del vástago del pedal del embrague freno J 2 Jale la correa hacia la parte...

Страница 50: ...ría NEGRO primero y luego el cable de la batería ROJO y remueva la batería del tractor Instale la nueva batería con los términos en misma posición como la batería vieja Reemplazamos cubierta terminal Primero conecte el cable de la batería ROJO con el terminal positivo con el perno hexagonal y la tuerca según se muestra Apriételos en forma segura Conecte el cable de conexión a tierra NEGRO al termi...

Страница 51: ...Párese delante del tractor Agarre el capota en los lados inclínelo un poco hacia el motor y sáquelo del tractor Para volver a instalar el capota asegúrese de volver a conectar el conector del alambre de las luces SERVICIO Y AJUSTES Fig 36 TRANSMISIÓN REMOCIÓN REEMPLAZO DE LA TRANSMISIÓN Si por acaso su transmisión debe ser removida para servicio o reemplazo debe ser purgada después de la reinstala...

Страница 52: ...dor conectado MOTOR SISTEMA DE COMBUSTIBLE IMPORTANTE Es important evitar que se forman depositos de goma en partes fundamentales del sistema de combus tible tales como el carburador el filtro del combustible la manguera del combustiblesmezcladosconalcohol conocidocomogasohol o que tienen etanol o metanol pueden atraer humedad lo que conduce a la separación y a la formación de acudos durante elalm...

Страница 53: ...fallados 8 Revise cambie el solenoide o arrancador 9 Interruptor es que exige n la presencia del operador fallado 9 Póngase en contacto con un centro de servicio cuali ficado El motor suena pero no arranca 1 Batería baja o descargada 1 Vuelva a cargar o cambie la batería 2 Terminales de la batería corroídos 2 Limpie los terminales de la batería 3 Alambrado suelto o dañado 3 Revise todo el alambrad...

Страница 54: ... la cajade la segadora 8 La correa de impulsión de la segadora está des gastada o desajustada 8 Cambie ajuste la correa de impulsión de la segadora 9 Las cuchillas están mal coninstaladas 9 Vuelva a instalar las cuchillas elborde afilado hacia abajo 10 Cuchillas inadecuadas en uso 10 Cambie por las cuchillas enumeradas en este manual 11 Los agujeros de ventilación del conjunto agujeros segador tap...

Страница 55: ...nunca transversalmente con respecto a las pendientes No cortar pendientes mayores de 15 grados Haga los virajes gradualmente para evitar volcarse o la pérdida de control Tenga mucho cuidado cuando cambie de dirección en las pendientes 1 Plegar esta página a lo largo de la línea punteada arriba indicada 2 Tener la página ante de sí mismos de modo que su borde izquierdo sea vertical paralelo al tron...

Страница 56: ...izado con fines comerciales o de alquiler está limitado a 90 días desde la fecha original de compra 5 Esta garantía se aplica solo a productos que han sido ensamblados ajustados operados y conservados correctamente y de acuerdo con las instrucciones provistas Esta garantía no se aplica a ningún producto que haya estado sujeto a alter aciones uso indebido abuso ensamblado o instalación incorrectas ...

Отзывы: