background image

7

6

PC1500LTP

15’’ TFT-LCD TV

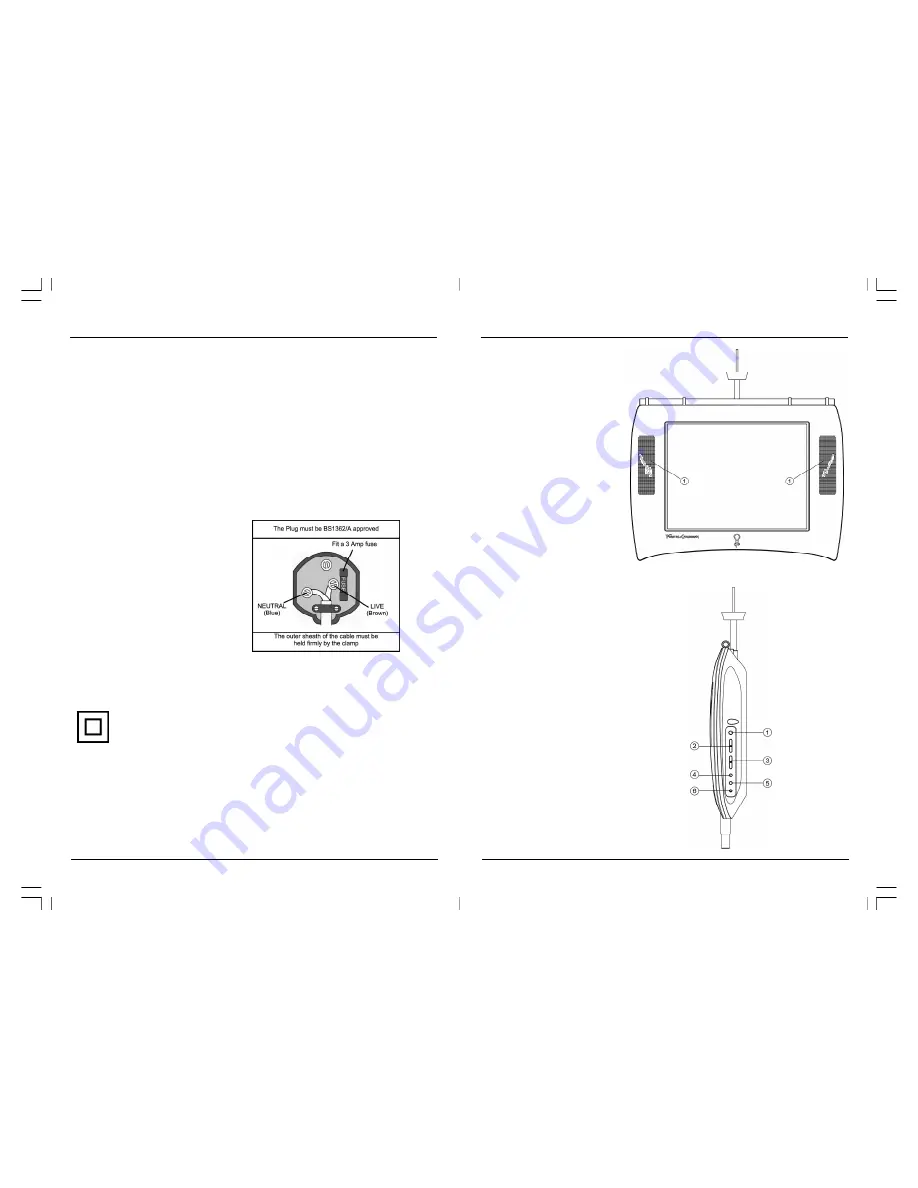
Side View

Location of Controls


Front View

Electrical Information

Make sure that the voltage of your electricity supply is the same as that indicated on the rating

plate. This LCD TV requires AC 220-240V~50Hz mains supply. Do not use any other supply.

This LCD TV may be fitted with a non-rewireable plug. If you need to change the fuse in a non-

rewireable plug, the fuse cover must be refitted. If the fuse cover is lost or damaged, the plug

must not be used until a replacement is obtained.

Important

As the colours of the wires in the mains lead of this LCD TV may not correspond with the

coloured markings identifying the terminals in your plug, proceed as follows:

•     The blue wire must be connected to the

       terminal marked with the letter N or

       coloured black.

•     The brown wire must be connected to

       the terminal marked with the letter L or

       coloured red.

•      No connection is to be made

       to the earth terminal of the plug.

If a 13 Amp (BS1363/A) plug is used, a 3 Amp fuse (BS1362) must be fitted, or if any other type

of plug is used a 3 Amp fuse must be fitted, either in the plug, adapter or in the distribution board.

This symbol indicates that this LCD TV is a Class II double insulated appliance  and

therefore an earth connection is not required.

1.   Speaker

1.   Standby button

2

.   

Channel button

3.   Volume button

4.   Menu button

5.   Input button

6.   Headphone Socket

FOR UK ONLY

PC1500LTP IB UK(ENG) 0211-12133-20AA.p65

2007/9/4, 上午 11:25

6-7

Содержание PC1500LTP

Страница 1: ...1 15 TFT LCDTV PC1500LTP User s Guide 15 LCD TV Manual del Usuario Televisor 15 LCD Guide d utilisation T l vision 15 LCD PC1500LTP IB UK ENG 0211 12133 20AA p65 2007 9 4 11 25 1...

Страница 2: ...within an equilateral triangle is intended to alert the user to the presence of important operating and maintenance servicing instructions in the literature accompanying the appliance WARNING To redu...

Страница 3: ...t possible damage to the cabinet or component failure Connection This LCD TV receiver can be connected to AC 220 240V 50Hz Cleaning Disconnect the LCD TV from the power supply before you clean it Do n...

Страница 4: ...ured markings identifying the terminals in your plug proceed as follows The blue wire must be connected to the terminal marked with the letter N or coloured black The brown wire must be connected to t...

Страница 5: ...ut 7 75 ohm Antenna Socket 8 AC Input 9 Main Power switch 1 Sleep button 2 Mute button 3 Input button 4 Swap button 5 Pref button 6 Menu button 7 Volume button 8 Display button 9 Standby button 10 Num...

Страница 6: ...battery compartment cover Insert two AAA batteries ensuring that you follow the polarity diagram inside the battery compartment Screw the battery compartment cover on the battery compartment Battery...

Страница 7: ...enu please see page 16 SKIPPING CHANNELS Tuning the TV Aerial Plug the external aerial lead not supplied into the aerial socket at the rear of the TV Menu Controls Navigation around the menus is carri...

Страница 8: ...continue the search If you want this station stored under this Program number to press MENU button the station will stored automatically You can then repeat the manual tuning process until all the st...

Страница 9: ...1 and ITV1 is on Channel 3 To exchange Press the MENU button and press the button to select the TUNE then press the to enter to the Menu Press the button to select Program Swap Press the button into...

Страница 10: ...t Colour sharpness and hue The TV has three preset groups of settings for these parameters and one for your personal preferences The Personal option is to individually set the four parameters The pres...

Страница 11: ...e TV speakers is switched off When listening to the TV through headphones the sound is in mono When listening to the AV through headphones the sound is in stereo WARNING USING HEADPHONES AT HIGH VOLUM...

Страница 12: ...60Hz is most recommend If input signal frequency is higher than 60Hz the picture display may be abnormal PC Mode To adjust the picture position 1 Press MENU button and press the button to select the...

Отзывы: