background image

Main Menu - System Configuration - 

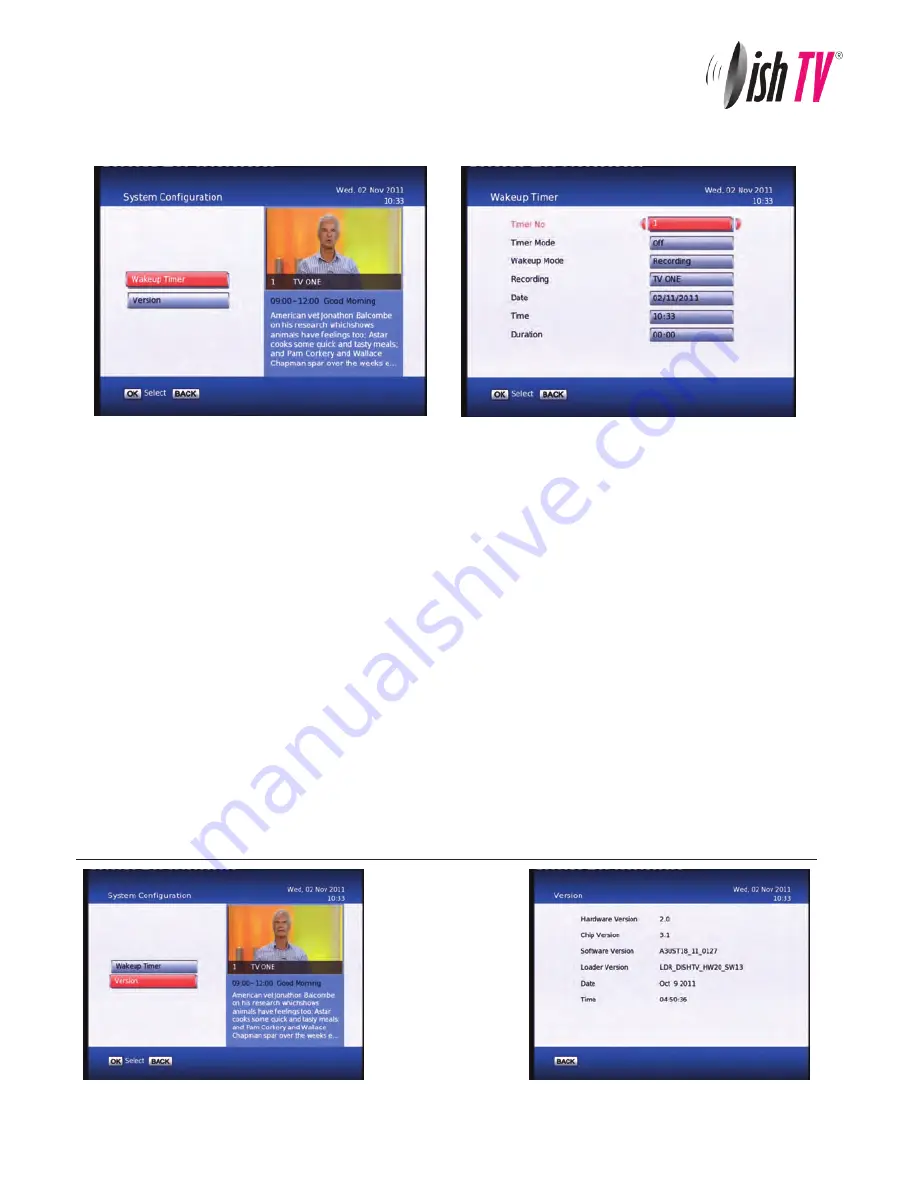
Wakeup Timer/Version

15

Wakeup Timer

You can set a service to be recorded at a specific time. Even if the digital receiver is in standby mode, it will start 

recording at a specified time. When the recording comes to the end, the unit will stay in standby until you press 

the standby button. A maximum of 8 timers can be set at once.

1. Set the Timer Mode to OnceDaily or Weekly to make a recording. If this option is set to Off, the timer will not 

operate.

2. Set the Wakeup Mode to Recording, Services or Message. If you only want the unit to wake up on a channel at 

the set time without recording, set this to Services

3. Set the channel you want to record, or set the message you want to appear at the set day and time.

4. Set the Date option to a desired date, on which the digital receiver will turn on. Use the left, right buttons on 

your remote to navigate and change. The date format is Day/Month/Year. 

5. Set the start Time option to a desired time, at which the recording will be started. Use the left, right and 

number buttons on your remote to navigate and change. The time format is Hour:Minute.

6. Set the Duration option to a desired length of time, in which the recording will be finished. Use the left, right 

and number buttons on your remote to navigate and change.

Version

This is an information 

page only. Here you 

can find your units 

Software/ Firmware 

version.

Содержание Freeview S7090PVR

Страница 1: ...User Manual DishTV S7090PVR 500GB Hard Drive Freeview Recorder Dual Tuner ultra S7090PVR ...

Страница 2: ...ls For more information about Freeview visit www freeviewnz tv A Freeview Digital Set Top Box gives you access to over 15 free to air digital channels without a subscription or contract For more information on Freeview please visit www freeviewnz tv With Warranty Product Registration Please register your product to assist with warranty and product updates To do this please visit www dishtv co nz a...

Страница 3: ... IN LOOP OUT Satellite Dish input 2 Satellite signal output 2 USB Factory upgrade HDD connection SAT IN Satellite Dish input 1 LOOP OUT Satellite signal output 1 DC 12V Connect 230V 12V adaptor DishTV S7090PVR 9 User Manual Loop Cable ...

Страница 4: ...G Media Manager Thumbnail Browser Recorded Book List Media Information File Transfer PVR Playback from USB Common Interface Connectivity eNet Buttons eMail eWeather eMap Recording Timer Recording Instant Recording Wake Up Timer Recordings Library Bookmarking Editing Recordings Firmware Upgrade Frequently Asked Questions Troubleshooting Check Signal Technical Specifications Warranty Page 5 6 7 8 9 ...

Страница 5: ...y LIB Library displays the recorded program list See page 26 for more info Holding the LIB button for 3 sec displays the Record Booking List Interactive Channel MUTE Turns the sound on off CH Changes the channel up or down TV R Switches between TV and Radio channels TIMER Displays the wakeup timer menu JUMP Allows you to enter a time to jump to WIDE Changes the aspect ratio Colour Buttons For inte...

Страница 6: ...the AV input on your TV Connect that cable that comes from your Satellite dish to the SAT IN socket in the back of your set top box Connect the supplied LNB Loop cable between the LNB 1 Loop Out connection on the rear panel and the LNB 2 In connection This links the two tuners together to allow you to record two channels and watch a third ...

Страница 7: ... scan will now start please do not push any buttons until it has finnished Once it has finnished if the signal from your dish is good TV1 will appear and you can start using your satBox Ultra Switch the satBox ultra on and wait for it to boot up If the Country Setup screen does not appear go to the Menu select Installation then Factory Default The default pin password is 0000 Open the battery cove...

Страница 8: ... invoke the main menu by pressing the MENU button This main menu contains several options User Settings Installation System Configuration ESG Media Manager You can toggle between the options by using UP DOWN or LEFT RIGHT arrow keys in the center of the remote To enter a sub menu from the main menu press the OK button Main Menu 08 ...

Страница 9: ...annel number button Delete Deletes a channel off the list Note Due to freeview standards channels cannot be moved around Favourite View To enter this menu you will be prompted for your password Default is 0000 This menu allows you to view your favourite channel list and allows you to classify channels and group them together to be viewed through favourites later These groups can then be accessed v...

Страница 10: ...your remote Recording Start Offset This option will adjust how many minutes before your program the unit will start recording This is very handy when programs are not running on time so you don t miss part of your program Recording Stop Offset This option will adjust how many minutes after your program the unit will stop recording This is very handy when programs are not running on time so you don...

Страница 11: ...itioner details if used need to be set for each satellite Press OK once correct settings are completed You will be returned to the Blind Scan page Blind Scan Allows you to specify what frequency range to scan You can also select the polarity or to scan FTA or scrambled channels To enter this menu you will be prompted for your password Default is 0000 11 Installation Screen Shot To Be Updated ...

Страница 12: ...essing the GREEN button will do a full satellite scan using the existing TPs or Carriers in the list To scan just one transponder view the transponder list by using the left right navigation keys The Carrier list page will display as show in the screenshot below Once in the Carrier list use the up down navigation keys to select the desired TP Then press the GREEN button to perform the scan To add ...

Страница 13: ...tware at 4am When the software is broadcast RF Mode With this setting you can adjust the RF output frequancy if its conflicting with another unit or broadcast Hearing Impaired This option is to turn subtitles on off Digital Video Here you have the option of Auto HDMI and DVI DVI is HDMI video but no sound It is best to keep this setting to HDMI The resolution will always be 576i Why a digital HDMI...

Страница 14: ...t password is 0000 14 S W Upgrade via OTA This option can be used only if an Over The Air software update is broadcasted via satellite The software will only be broadcast for a few weeks when there is a major update needed But if Auto OTA Search in the settings menu is set to on you won t need to use this option S W Upgrade via USB This option can be used only when you have a software update on a ...

Страница 15: ...he set time without recording set this to Services 3 Set the channel you want to record or set the message you want to appear at the set day and time 4 Set the Date option to a desired date on which the digital receiver will turn on Use the left right buttons on your remote to navigate and change The date format is Day Month Year 5 Set the start Time option to a desired time at which the recording...

Страница 16: ...en selecting the ESG option from the Main Menu It will list the available services and when focus is set to the current service then its corresponding current and next events are displayed When your in the ESG schedule dialog and the Info button is pressed on the selected event a short description is shown above pressing the Info button again will give an extended description of the selected event...

Страница 17: ...or the selected thumbnail recording The information displayed includes the duration of your recording the size the age rating eg G PGR AO the recordings created date and also the access date The access date is the date and time the recording was last viewed If the access date is blank this means the recording has not yet been viewed The thumbnail browser can be accessed from the library by pushing...

Страница 18: ...library A max of 16 bookings can be made This limit may be increased in the future Media Information This window provides your storage device information In this window you can select which Hard Drive you wish to format Internal External and just press the RED button to format your storage device Formatting will remove all your recordings To view the Record Booked List Hold down the LIB button for...

Страница 19: ...USB If already copied to the removable external USB Hard Drive it can be transferred back to the internal Hard Drive at a later date USB to SATA By pressing the GREEN button you will have the choice to copy files over this will leave the recording on the Drive you are copying from and duplicate it at the new location By pressing the YELLOW button you will have the choice to move files over this wi...

Страница 20: ...USB device Once PVR Playback from USB is selected you will see a list which will show your external USB device Press OK to select it and access your videos MENU to go back you will then see a screen like the one directly below When a Video is selected you will be asked Resume Playback or Play From Beginning Shown Below selecting one will then start playback of the recorded content Press Stop or Me...

Страница 21: ...ccess module may be inserted To watch a pay service you should take the following steps 1 Purchase a conditional access module and a subscription card for the pay service you want to watch 2 Insert the subscription card into the conditional access module 3 Insert the conditional access module into the common interface on the front of the digital receiver Make sure the unit is turned off when doing...

Страница 22: ...perature etc eMap Allows you to browse and search maps on the internet eMail Allows you to log in to your email address to send recieve messages and view attached files eNet Buttons eMap Type in the area you wish to search and press OK for the map to start loading To check your email on your TV choose eMail from the eNet Buttons menu Use Up Down to navigate between eNet buttons Use SMS type keyboa...

Страница 23: ...om other users of this receiver Follow the help bar information for further navigation short cut keys available for quick navigation to create mail forward mail reply address book etc Press Up Down button to navigate the different mail headers If the number of mails is more than 20 mails are split by pages one page contains 20 messages eNet Buttons eMail 23 eNet Buttons eWeather Type in the Countr...

Страница 24: ...cted for recording and press the Red button this will ask you whether you want to cancel the recording or not Once you have a recording set you will see a small R or S to the righthand side of your program The R indicates the program will only be recorded once the S indicates the program will be recorded every time it appears on TV Please note This unit has a dual tuner so this means there will be...

Страница 25: ...anually enter a duration by pressing the left right navigation keys If you press the stop button you will then have the options of renaming and continuing to record just saving or discarding it Recording Wakeup Timer Recording From here you can manually set timer recordings This is done through Main Menu System Configuration Wakeup Timer By going down to the Wakeup Mode and scrolling across to Rec...

Страница 26: ...ion To delete mutiple recordings you need to select the recordings you want to remove using the Yellow button then push the Red button to delete By pressing the Library button LIB a second time the Thumbnail browser menu of your video recordings will be opened To view booked recordings Hold down the LIB button for 3 seconds while viewing a channel Or if you are in the library press the Options but...

Страница 27: ...se them again afterwards To enter the bookmarking window select your recording from the Library or Thumbnail Browser then push the Green button on your remote then the OK button You can also set bookmarks when playing back a recording or while watching the programme live at the same time you record it To do this all you have to do is press the FAV button when you wish to set a book mark nd when yo...

Страница 28: ...u want to edit To select an area to delete push the Red button to start the selection and then the Red button again to end If the selection you have made is not quite in the right place you can press the Yellow button to edit move the start of your selection A or the end B The Blue button on your remote will remove the selected section but will not delete that part of your recording To move betwee...

Страница 29: ...s below Note The USB drive must be formatted to FAT32 1 Download updated firmware from www dishtv co nz follow the instructions provided on the website 2 Turn off power to satBox insert the flashdrive 3 Press and hold the Menu button on the front of your S7090PVR while powering on the unit Keep the menu button held down until the unit says USB on the front panel The receiver will first display Loa...

Страница 30: ...not be fitted between tuners at the back Connect loop cable from LNB 1 Loop Out to LNB 2 Sat In Refer to page 6 of this user manual Q What does LCN mean A LCN stands for Logical Channel Numbering This keeps all the channels in the correct order Q Why is the Lock light on A This is a good thing and indicates your unit is locked to the correct signal Q Why is my unit not responding to remote receive...

Страница 31: ...es as shown on page 7 Batteries are flat Insert new batteries as shown on page 7 Infrared receiver on S7090PVR is obstructed Check that there is a clear line of sight from the remote to the sensor on the front panel Picture is distorted too wide or narrow Wrong TV shape is set Go to Main Menu Installation System Setting Aspect Ratio make sure it is set to match the shape of your display Please mak...

Страница 32: ...lator QPSK 8PSK FEC 1 2 2 3 3 4 5 6 7 8 8 9 9 10 Connections LNB IN F connector LOOP OUT F connector YPbPr Connect to your TV component Input terminals L R Analog audio L R signal Optical SPDIF digital audio output HDMI Connects to HDMI in device Power Input 12v DC or 100 240V 50 60Hz Via adapter Consumption Max 20W Display Decoder Module PAL NTSC Resolution 720X576 PAL 720X480 NTSC 720P 1080i 480...

Страница 33: ...contact your supplier and have your receipt This warranty is subject to the following provisions This is only valid within New Zealand The product must be correctly assembled and operated in accordance with the instructions contained in the manual This product must be used solely for domestic purposes The warranty does not cover accidental damage The warranty will be rendered invalid if the produc...

Отзывы: