background image

Receiver Customization


63

Using Dolby® Surround Sound

1

2

3

4

5

6

7

8

9

10

11

R

1

2

3

4

5

6

7

8

9

R

11

U

SING

 D

OLBY

® S

URROUND

 S

OUND

Dolby Digital gives you the capability to enjoy programs in surround sound. An external 
decoder is required to enjoy this feature. Refer to your decoder user’s guide.

Note

: Not all programs contain a Dolby Digital sound track.

The receiver uses an optical port for outputting digital audio. The optical output can 
provide two audio data types: Dolby Digital and Linear PCM (only Dolby Digital can 
provide full 5.1-channel sound).

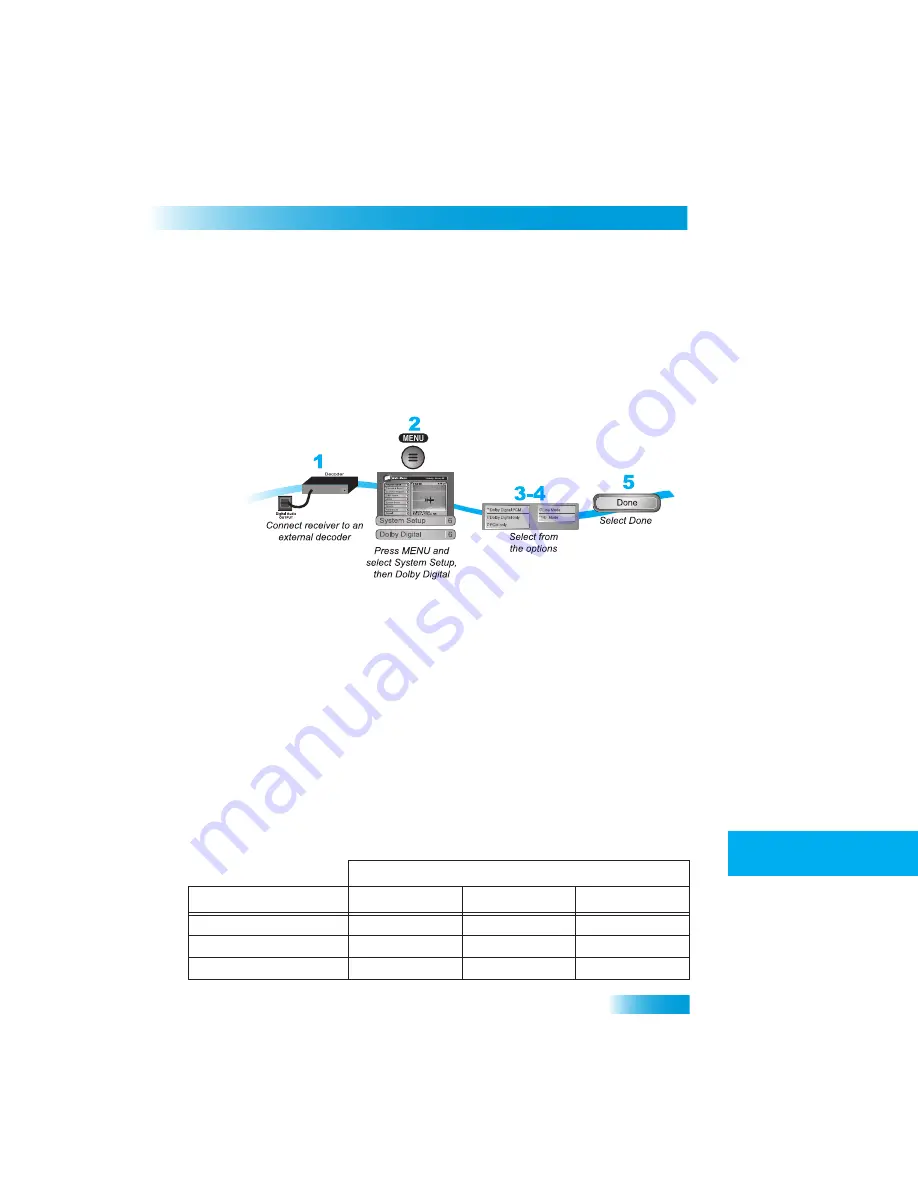
1

Connect an external Dolby Digital decoder to the receiver's back panel Digital Audio 
Output using an optical cable (available at consumer electronics stores).

2

Press MENU, select System Setup (6), and then Dolby Digital (6) to open the Dolby Digital 
Setup screen.

3

Select one of the following optical output options:

Dolby Digital Only

 - Select this option if the stereo system or amplifier can decode 

only Dolby Digital and will not process Linear PCM signals. See your amplifier's 
owner's manual for more details on the amplifier (and see the following table).

PCM Only

 - Select this option only if the stereo system or amplifier cannot decode 

Dolby Digital signals.

Dolby Digital/PCM

 - Select this option only if the stereo system or amplifier can 

decode both Dolby Digital and Linear PCM signals.

The audio output is also dependent on what is present in the program you are watching. 
The table below shows what type of output you will hear:   

Signal Present in Program

Optical Output Setting

Dolby Digital

PCM

Both

Dolby Digital Only

Dolby Digital

PCM

Dolby Digital

PCM Only

PCM (downmix)

PCM

PCM

Dolby Digital/PCM

Dolby Digital

PCM

Dolby Digital

Содержание DISH411

Страница 1: ...to make it just the way you like it As an added bonus if you find out that you don t like how it turned out you can reset the receiver to the way it was when you got it Here s what s in this chapter...

Страница 2: ...e a phone line connected to the receiver and that the Caller ID feature is enabled Caller ID Screens When you receive a call you will see a Caller ID popup screen You can select OK to eliminate the me...

Страница 3: ...ot be available for all programs Some programs such as movies indicate at the beginning whether an alternate language or descriptive video is available An alternate language applies only to the audio...

Страница 4: ...work Therefore while best efforts are made to provide the most accurate information DISH Network is not ultimately responsible for the accuracy of Program Guide and Closed Captioning information provi...

Страница 5: ...up 6 and then Dolby Digital 6 to open the Dolby Digital Setup screen 3 Select one of the following optical output options Dolby Digital Only Select this option if the stereo system or amplifier can de...

Страница 6: ...ider which makes the music and loud noises louder but voices quieter RF Mode When you use this setting in comparison with Line Mode the dynamic range is narrower which makes music and loud noises quie...

Страница 7: ...Partial Guide with Video Choose this option if you d like larger text on your Program Guide The Program Guide displays video in the upper right corner and one hour of schedule per page Extended Parti...

Страница 8: ...receiver is unlocked your locks will be lost You cannot reset the receiver to default settings to discard a password you have forgotten No one but a Customer Service Representative can reset the recei...

Страница 9: ...ller ID feature on this receiver QUESTIONS How can I see who has called me recently Open your Caller ID History by pressing MENU select System Setup 6 and then Caller ID History 3 on your remote contr...

Страница 10: ...Chapter 10 68 Questions Notes...

Отзывы: