6
SETTINGS AND TEST
DINUY S.A.
c/Auzolan Nº2
20303 Irun (Spain)
www.dinuy.com
LUX
TIME
SETTINGS
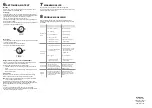
"Lux" and "Time" values can be adjusted via the control knobs or via an
optional IR remote control (EM MAN DM0).
Lux Settings:
· This setting allows to select the minimum level of natural light in wich the
detector would detect movement. In case it detects movement and natural
light is below the indicated level, the device will not respond.
· The user can set this value between 3 and 100 Lux.
· If the detector is expected to work despite of surrounding natural light, set
the potentiometer in " ".
· On the contrary, if you want the detector to work at night only (without any
natural light), set the potentiometer on “ ”.
Time Settings:
· This setting allows to select the span of time during which lamps will remain
on, after movement detection.
· Timing starts whenever movement is detected.
· This time can be set between 6sec and 12min.
Settings carried out using Remote Control (EM MAN DM0):
· The Time, Lux and Sensitivity settings can be adjusted via this remote
control, without need to access to the potentiometers.
· Detector’s LED function when using the remote control:
- It will flicker twice as soon as it receives a telegram from the remote
control.
- It will be 1s ON and 5s OFF after receiving a “Permanent ON or OFF”
from the remote control.
Testing process
The purpose of the test procedure is to check and adjust the coverage
pattern of the motion sensor when it is connected for the first time.
Note: Once it is powered, the detector needs ~2 minutes for initialization.
Then it will start operating normally.
The red LED which is within the lens can be used as an indicator when
performing the testing process without any load. This LED lights whenever
motion is detected and stays on until the time delay expires.
Process:
· Set the “Lux” potentometer on “ ” and “Time” in the minimum.
· Walk towards the coverage area. Once it detects movement, the LED as
well as the lamps will be lit for 6 seconds.
8
PROBLEM SOLVING
Lamp does not
light up
1. Power is not turned on
2. Wrong wiring
3. Incorrect setting of Lux
4. Lamp may be defect
1. Supply the detector
2. Check connections
3. Check this setting
4. Replace lamp
Lamp stays on
continuously
1. Time delay setting too high
1. Decrease the timing
2. Heat activity detected within
detection area
2. Keep away from the coverage
area and remove movement
sources (animals, fans,
airstream, etc)
3. Wrong wiring
3. Check connections
Lamp is switched
on/off cyclically
The load (fluorescence,
contactor,...) is continuously
generating harmonics triggering
the detector in each switching
Keep away the detector from
the load or connect a RC
harmonic suppression filter
between L’ and N
5. “Permanent OFF” set via
remote control (if used)
5. Press OFF key to return to
automatic mode
4. “Permanent ON” set via
remote control (if used)
4. Press ON key to return to
automatic mode
Nuisance
triggering
Heat sources, highly reflective
objects or any object which may
be swayed by the wind is within
the detection range
Avoid aiming the detector
towards any heat source, any
reflective surface or swaying
objects
7
MASKING CLIPS
When the detector stops working, check the possible failures and the
solutions suggested in the following table that maybe will help you to solve
the problem:
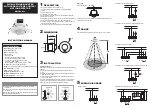
There are three covers available to restrict the coverage area.
To fix the restriction covers, the decorative frame has a slot on its rear side,
where the projection of the cover fits.
Problem
Possible cause
Suggested solution


