


10 www.dimplex.com
stallation should be entrusted
to duly qualified personnel
where required by law.
!
NOTE:
If the desired fireplace
location is on the interior of an
exterior wall the unit should
only be surface mounted. If a
in-wall or flush mount look is
desired build the interior wall
out into the room.
1. Leave the frame uninstalled
from the fireplace chassis un-
til step 13.
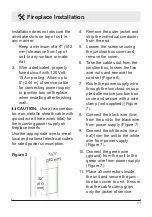
2. Prepare a wall opening fol-
lowing the dimensions shown
in Figure 5. Note that a 4"
(102 mm) minimum depth
Fireplace Installation
including the thickness of dry
wall is required. Make sure
there is enough clearance for
the cable coming out from the
bottom of the fireplace.
!
NOTE:
Where there are close
tolerances involved in wall build-
ing or applications which require
a great degree of precision, we
recommend that the product itself
be used to make the actual mea-
surements for the wall opening.
Dimplex North America will not
be responsible for inaccuracies
in the design or manufacture of
enclosures.
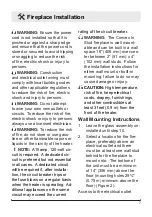
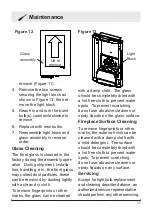
WARNING:
Ensure method of
Ensure Glass
Assembly
brackets engage
hooks on fireplace
by sliding Glass
Assembly towards
fireplace and then
down
Secure Glass
Assembly with the
four (4) supplied
self-tapping screws
Figure 4


