Dimplex LAGUNA LAGFB2 Скачать руководство пользователя страница 5

NOTE 

A 13amp, 230VAC circuit is required.  A dedicated circuit is preferred but not essential in all cases.  A 
dedicated circuit will be required if, after installation, the circuit breaker trips or the fuse blows on a regular 
basis when the heater is operating.  Additional appliances on the same circuit may exceed the current 
rating of the circuit breaker.

WARNING

Ensure the power cord is not installed so that it is pinched or against a sharp edge and ensure that the 
power cord is stored or secured to avoid tripping or snagging to reduce the risk of fi re, electric shock or 
injury to persons.
Construction and electrical outlet wiring must comply with local building codes and other applicable 
regulations to reduce the risk of fi re, electric shock and injury to persons.
Do not attempt to wire your own new outlets or circuits.  To reduce the risk of fi re, electric shock or injury 
to persons, always use a qualifi ed electrician.

SITE SELECTION AND PREPARATION

This section provides instructions for selecting a location and preparing the site to install the fi rebox into 
your Dimplex mantel surround.
 

1.  Select a suitable location that is not susceptible to moisture and is away from drapes, furniture  


  and 

high 

traffi c.


2.  For ease of electrical hook up you may wish to locate the fi rebox near an existing outlet (refer 

  to 

NOTE).

 3. 

Store 

the 

fi rebox in a safe dry and dust free location.
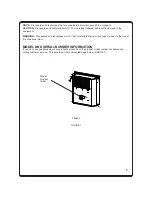
NOTE

The dimensions of the fi rebox are 768mm wide X 648mm high X 267mm deep.  The viewing area is 
765mm wide and 511mm high.  The fi rebox does not require any additional venting.

FIREBOX INSTALLATION


1.  INSTALL THE FIREBOX ASSEMBLY INTO A MANTEL 

(refer to mantel assembly instructions).


Please take care when placing fi rebox in mantel (2 person lift)
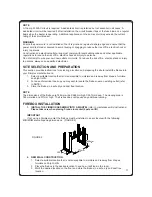
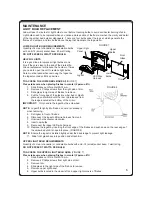
 IMPORTANT


If not using a Dimplex mantel, the fi rebox must be installed in an enclosure with the following   


MINIMUM internal/opening dimensions.  (FIGURE 2)

3

FIGURE 2

658mm

775mm

300mm


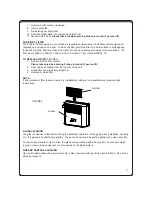
2.  NEW WALL CONSTRUCTION


1.  Select a suitable location that is not susceptible to moisture and is away from drapes, 

   furniture 

and 

high 

traffi c.

  2. 

Place 

the 

fi rebox in the desired location to see how it will look in the room.


3.  Mark the desired location on the fl oor and store the fi rebox in a safe, dry and dust free 

   location.

Содержание LAGUNA LAGFB2

Страница 1: ...LAGUNA FIREBOX LAGFB2 08 51849 0 ISS1 UK ...

Страница 2: ...not work switch the unit off for 5 minutes and try again Consult the Operation section of your practical users guide for further information 4 The information regarding the model of your firebox can be found on the rating plate located on the side adjacent to the supply cord 5 If you have any technical questions regarding the operation of your fireplace or require service for your fireplace please...

Страница 3: ...ce facility for examination electrical or mechanical adjustment or repair 10 Do not use outdoors 11 Do not use this firebox in the immediate surroundings of a bath a shower or a swimming pool 12 Do not install the firebox directly on carpet or a similar surface which may restrict air circulation beneath the unit 13 Do not run the cord under carpeting DO NOT COVER cord with throw rugs runners or th...

Страница 4: ...equipment WARNING Procedures and techniques which if not carefully followed will expose the user to the risk of fire or serious injury MODEL AND SERIAL NUMBER INFORMATION If you have any questions about our products please have the product model number available upon calling customer service To locate the model number label see below FIGURE 1 FIGURE 1 Firebox Model Number Label ...

Страница 5: ...cation and preparing the site to install the firebox into your Dimplex mantel surround 1 Select a suitable location that is not susceptible to moisture and is away from drapes furniture and high traffic 2 For ease of electrical hook up you may wish to locate the firebox near an existing outlet refer to NOTE 3 Store the firebox in a safe dry and dust free location NOTE The dimensions of the firebox...

Страница 6: ... power to the remote control in the firebox i e power failure breaker tripped main power switch is turned off remote battery failure or if a new remote is used 1 Ensure that power is supplied through main service panel 2 Locate manual controls FIGURE 4 3 Activate main power switch 4 Press ON button located on the Manual Selection Control for 3 seconds FIGURE 5 All 3 indicators will flash 5 Press t...

Страница 7: ...sing this button has the same effect as the OFF button on the remote control Pressing once will shut the unit off FIGURE 6 B OFF Switch A ON Switch Level 2 Indicator Level 3 Indicator Level 1 Indicator HEATER THERMOSTAT CONTROL To adjust the temperature to your individual requirements turn the thermostat control clockwise all the way to turn on the heater When the room reaches the desired temperat...

Страница 8: ... of the plastic ember bed or plastic grate up and forward until the rear tab releases from the ledge located at the bottom of the mirror IMPORTANT Only handle the logset by the emberbed NOTE Logset fits tightly into firebox so care is necessary when removing 5 Set logset in front of firebox 6 Disconnect the logset LED wire harness from unit 7 Unscrew bulbs counter clockwise 8 Insert new bulbs 9 Re...

Страница 9: ...tel Please take care when placing firebox in mantel 2 person lift 2 Filter can be accessed from the top rear of the unit 3 Grasp filter and slide filter straight up 4 Replace or clean filter NOTE If after market air filter is used ensure it is installed according to the manufacturers recommended instructions FIGURE 9 Air Filter Firebox GLASS CLEANING The glass is cleaned in the factory during the ...

Страница 10: ...le to advise you should you need to purchase any spares Please do not return any faullty product to us in the first instance as this may result in loss or damge and delay in providing you with a staisfactory service Please retain your receipt as proof of purchase Light bulbs and batteries are not covered in the warranty SERVICE Contact your local dealer for service or warranty information RECYCLIN...

Страница 11: ...5 Stamp Signature of retailer 6 Fault Defect 7 Contact Number Address Dimplex A Division of GDC Group Ltd Millbrook House Grange Drive Hedge End Southampton Hampshire SO30 2DF 9 TEL 0844 879 3588 Fax 0844 879 3582 WEBSITE www dimplex co uk Republic of Ireland TEL 01 8424833 ...

Отзывы: