background image

Operation

When the power is connected, flick the power switch at the back of the unit to turn 

the device on. You can select different modes by pressing the keys/buttons on the 

control panel and/or remote control.

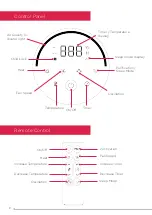
1.  After the power switch is turned on, press the 


ON/OFF


button to start the de-

vice and begin using the functions. When this button is first pressed, the unit will 

automatically begin to work in the low fan speed setting. To turn off the device, 

simply press the 

ON/OFF

 button again, and this will bring the unit back to stand-

by state. This unit has an automatic memory function, so after the first use of the 

device, when you click the 

ON/OFF

 button to switch on the fan, it will remember 

the state it was in when switched off. 

2.  Press the 

HEAT

 button to allow the device to start producing warm air.  There 

are three heat settings, being low, medium and high. Press this button to rotate 

between the heat settings to find your desired level. The display screen will show 

'H1' for low heat, 'H2' for medium heat and 'H3' for high heat. In this state, the in-

dicator light will display red colouration. 

3.  Press the 

FAN SPEED 

button to allow the device to start producing cool air. 

There are five fan speeds within this unit. Press this button to rotate between the 

speeds. The display will show 'C1' for the first setting, 'C2' for the second setting, 

'C3' for the third setting, 'C4' for the fourth setting and 'C5' for the fifth setting. 

'C1' is the slowest fan speed, ranging up to 'C5' being the fastest. In this state, the 

indicator light will display blue colouration. 

4.  Press the 

OSCILLATION

 button to enable the fan to swing 90° left to right whilst 

working in 

HEAT

 or 

FAN SPEED

 modes. Press this button again to turn this func-

tion off. Press and hold this button for three seconds to turn on/off the 

CHILD 

LOCK

 function. In this function, buttons will be invalid until the child lock is 

turned off again. 

5.  Press the 

TIMER

 button to set a timer for the running time of your desired 

FAN 

SPEED

 or 

HEAT

 setting. This button is used to set the timer and also can be used 

to check the remaining time left when already set. You are able to set a timer 

between 1-12 hours. To cancel the timer before the allocated time has ended, hold 

this button for five seconds. Once the timer is complete, the device will automati-

cally go into standby mode.

6.  Press the 

TEMPERATURE

 button to set your desired temperature when in any of 

the 

HEAT

 settings. This button can be used to set desired temperature and also 

check the currently set temperature when already using this function. The tem-

perature can be set between 15°C and 35°C, with the nine options being 15°C, 

20°C, 22°C, 24°C, 26°C, 28°C, 30°C and 35°C. Press this button to rotate between 

the temperature settings. To cancel this setting, press the button for five seconds, 

and the temperature will turn off. The device will show the ambient temperature 

on the display when no temperature setting is chosen. When the ambient tem-

perature is higher than the set temperature, the heat setting will suspend itself 

until the ambient temperature is lower than the set by 2°C. It will then be turned 

on again. 

10

Содержание DCTF3HCP

Страница 1: ...For domestic household use only INSTRUCTION MANUAL Heat Cool Purifier Tower Fan Model DCTF3HCP ...

Страница 2: ... and cause burns Particular attention has to be given where children and vulnerable people are present If the supply cord is damaged it must only be replaced by the manufacturers service agent or a similarly qualified person in order to avoid a hazard This appliance is not intended for use by persons including children with reduced physical sensory or mental capabilities or lack of experience and ...

Страница 3: ...e are visible signs of damage to the heater The heater must not be located immediately below a power outlet WARNING To avoid danger of suffocation please remove all packaging materials particularly plastic and EPS and keep these away from vulnerable people children and babies NEVER drop or insert any object or fingers into any openings Do not use the appliance in locations where paint petrol or ot...

Страница 4: ... and potential perforation of the oesophagus If you suspect your child has swallowed or inserted a button battery immediately call the 24 hour Poisons Information Centre on 13 11 26 in Australia or 0800 764 766 in New Zealand for fast expert advice Examine devices and make sure the battery compartment is correctly secured e g that the screw or other mechanical fastener is tightened Do not use if t...

Страница 5: ...extension leads or power boards Where there is risk of fire or close to a naked flame Where the power cable may be damaged On a slope or uneven surface Where it may be damaged by chemicals If there is a risk of water falling on the unit Where there is a risk of interference by foreign objects This product is not made for DIY repair 5 ...

Страница 6: ...ettings 3 Timer 12 hours Air Purifier 3 Stage Purification Adjustable temperature 15 35 C CADR 130 Oscillation 90 Noise level MAX 55dB A Weight net 5 2kg Filter HEPA 13 Dimensions w x d x h 232 x 292 x 966mm Specification For greater precision please always refer to the rating label placed on the product 6 ...

Страница 7: ...Parts Base Air Inlet Screen Indicator Light Front Grille Remote Housing back Control Panel 7 ...

Страница 8: ...cation Sleep Mode Temperature Sleep mode display Timer Temperature display Fan Speed Heat Child Lock Air Quality In dicator light On Off Heat Increase Temperature Decrease Temperature Oscillation Purification Fan Speed Increase Timer Decrease Timer Sleep Mode 8 ...

Страница 9: ...nlet screen 2 Unpack the HEPA filter in the package and place it into the slot Ensure to install in the correctly fitted space 3 Push the air inlet screen back into position and fasten with the screws 4 Install the HEPA filter on the other side as well by following the above steps 9 ...

Страница 10: ...up to C5 being the fastest In this state the indicator light will display blue colouration 4 Press the OSCILLATION button to enable the fan to swing 90 left to right whilst working in HEAT or FAN SPEED modes Press this button again to turn this func tion off Press and hold this button for three seconds to turn on off the CHILD LOCK function In this function buttons will be invalid until the child ...

Страница 11: ...o enable SLEEP MODE press and hold this button for three seconds The display will show the moon and star logo when this function is switched on In this setting the device will work quietly in low speed To turn off the PURIFICATION function simply press this button again and to turn off the SLEEP MODE function press this button again for three seconds Note When you switch the device off it will tak...

Страница 12: ...on swab to clean It is suggested to replace the HEPA filter after 6 7 months of usage To replace unfasten the fixed screws of the air inlet screen draw out the screen and then take out the HEPA filter Next place the new HEPA filter into the slot and ensure it is installed properly Push the wind inlet mesh into the position and fix with the screws Follow the above to install the HEPA filter in the ...

Страница 13: ...formation regarding the collection systems available If electrical appliances are disposed of in landfills or dumps hazardous substances can leak into the ground water polluting the food chain and damaging health and well being Warranty Please refer to the warranty card in the box for warranty information For any troubleshooting advice please contact the relative Customer Care Centre below Glen Di...

Страница 14: ...14 ...

Страница 15: ...15 ...

Страница 16: ...au Supplied by Glen Dimplex Australia 8 Lakeview Drive Scoresby Victoria 3179 Glen Dimplex Australia All rights reserved Material contained in this publication may not be reproduced in whole or in part without prior permission in writing of Glen Dimplex Australia DCTF3HCP v1 16 ...

Отзывы: