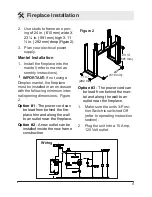
Dimplex 6901740259 Скачать руководство пользователя страница 9


9

2. 

Use studs to frame an open-

ing 

of 24 in. (610 mm) wide X 

23 ¼ in. (591 mm) high X 11 

½ in. (292 mm) deep (Figure 2)

.

3.  Plan your electrical power 

supply.

Mantel Installation

1.  Install the fireplace into the 

mantel (refer to mantel as-

sembly instructions).

!


IMPORTANT:

 If not using a 

Dimplex mantel, the fireplace 

must be installed in an enclosure 

with the following minimum inter-

nal/opening dimensions - Figure 

2.

Option #1 

- The power cord can 

be lead from behind the fire

-

place trim and along the wall 

to an outlet near the fireplace. 

Option #2 

- A new outlet can be 

installed inside the new frame 

construction. 

Option #3 

- The power cord can 

be lead from behind the man-

tel and along the wall to an 

outlet near the fireplace.

1. 

Make sure the units 3-Posi-

tion Switch is switched Off 

(refer to operating instruction 

section).

2.  Plug the unit into a 15 Amp, 

120 Volt outlet.


Fireplace Installation

23 ¼"

(591 mm)

11 ½"

(292 mm)

Figure 2

24"

(610 mm)

Wiring

Содержание 6901740259

Страница 1: ...RMATION Always read this manual first before attempting to install or use this fireplace For your safety always comply with all warnings and safety instructions contained in this manual to prevent per...

Страница 2: ...emphasize CAUTION Procedures and techniques which if not carefully followed will result in damage to the equipment WARNING Procedures and techniques which if not carefully followed will expose the us...

Страница 3: ...y Please record your model and serial numbers below for future reference model and serial numbers can be found on the Model and Serial Number Label of your fireplace NO NEED TO RETURN TO THE STORE Que...

Страница 4: ...ions Disconnect power at the service panel and have the heater inspected by a reputable electrician before reus ing Do not operate any unit with a damaged cord or plug or if the heater has malfunction...

Страница 5: ...the plug does not fit fully in the outlet reverse the plug If it still does not fit contact a qualified electrician to install the proper outlet Always plug heaters directly into a wall outlet recepta...

Страница 6: ...na Increase the separation between the equipment and the receiver Connect the equipment into an outlet on a circuit different from that to which the receiver is connected Consult the dealer or an expe...

Страница 7: ...flammable vapors or liquids in the vicinity of the heater NOTE A 15amp 120 volt cir cuit is required A dedicated cir cuit is preferred but not essential in all cases A dedicated circuit will be requi...

Страница 8: ...he front of the hearth to an outlet near the fireplace WARNING To prevent per sonal injury you should hire a professional to cap the chim ney flue or cut a hole in the existing fireplace for wiring If...

Страница 9: ...inter nal opening dimensions Figure 2 Option 1 The power cord can be lead from behind the fire place trim and along the wall to an outlet near the fireplace Option 2 A new outlet can be installed ins...

Страница 10: ...O position the unit is off B Heat Switch The Heat On Off Switch supplies Figure 3 power to the heater fan and the heater element When the switch is in the On position the heater operates if the thermo...

Страница 11: ...tch to OFF O Figure 3A 2 Wait a minimum of five 5 seconds and set the 3 Posi tion Switch to the Remote position II 3 Within 10 seconds of re ac quiring power press the ON button located on the remote...

Страница 12: ...Battery must be recycled or disposed of properly Check with your Local Authority or Retailer for recycling advice in your area Maintenance WARNING Disconnect power before attempting any main tenance...

Страница 13: ...60 Watt rat ing Example GE 60BC or Philips 60CTC Do not exceed 60 Watts per bulb Replacement CAUTION Allow at least 10 minutes for light bulbs and heater to cool off before touching bulbs to avoid ac...

Страница 14: ...cles these can be removed by dusting lightly with a clean dry cloth To remove fingerprints or other marks the clear door can be cleaned with a damp cloth The clear door should be completely dried with...

Страница 15: ...ve been tested and inspected prior to shipment and subject to the provisions of this warranty Dimplex warrants such products to be free from defects in mate rial and workmanship for a period of 12 mon...

Страница 16: ...WILL DIMPLEX OR ITS DIRECTORS OFFICERS OR AGENTS BE LIABLE TO THE PURCHASER OR ANY THIRD PARTY WHETHER IN CON TRACT IN TORT OR ON ANY OTHER BASIS FOR ANY INDIRECT SPECIAL PUNITIVE EXEMPLARY CONSEQUEN...

Страница 17: ...trol Knob 8800000300RP Cutout 2300270100RP Thermostat 2300150100RP Cord Set 4100090101RP Front Glass 5900380100RP Partially Reflective Glass 5900350100RP Lampholder Assembly 4200121000RP Remote Contro...

Отзывы: