


7
Fireplace Installation
This section provides easy step
by step instructions for selecting a
location and preparing the site to
install the fireplace into:
• Existing fireplace
• New wall construction
• Dimplex mantel surround
kit or custom made mantel
surround
WARNING:
Ensure the power
cord is not installed so that it is
pinched or against a sharp edge
and ensure that the power cord is
stored or secured to avoid tripping
or snagging to reduce the risk
of fire, electric shock or injury to
persons.
WARNING:
Construction
and electrical outlet wiring must
comply with local building codes
and other applicable regulations
to reduce the risk of fire, electric
shock and injury to persons.
WARNING:
Do not attempt
to wire your own new outlets or
circuits. To reduce the risk of fire,
electric shock or injury to persons,
always use a licensed electrician.
WARNING:
To reduce the risk
of fire, do not store or use gaso
-
line or other flammable vapors or
liquids in the vicinity of the heater.
!
NOTE:
A 15amp, 120-volt cir
-
cuit is required. A dedicated cir
-
cuit is preferred but not essential
in all cases. A dedicated circuit
will be required if, after installa
-
tion, the circuit breaker trips or
the fuse blows on a regular basis
when the heater is operating. Ad
-
ditional appliances on the same
circuit may exceed the current
rating of the circuit breaker.
CAUTION:
High temperature,
risk of fire, keep electrical cords,
drapery, furnishings, and other
combustibles at least 3 ft (0.9 m)
from the front of the heater.
!
NOTE:
The fireplace insert is
to be installed in an opening with
minimum dimensions: 24 in. (610
mm) wide by 23 in. (585 mm) high
and 11 ½ in. (292 mm) deep
.
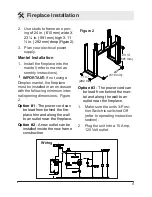
CAUTION:
Clearance for air
circulation beneath the fireplace
insert is provided by four (4) rub-
ber feet (F
igure 1). Do not install
the fireplace insert directly on
carpet or similar surfaces which
may restrict air circulation. If in
-
stalling the fireplace in a carpeted
area, place a one-piece, solid, flat
surface under the fireplace insert.
Ensure that all 4 of the insert’s
feet rest securely on this surface
.


