


DIGIWAY PLUS
INSTALLATION MANUAL
EN
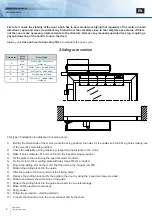
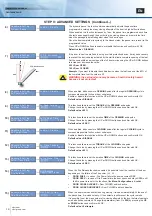
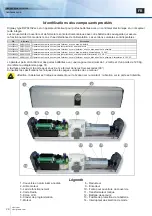
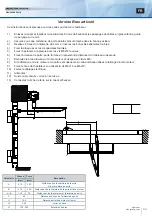
3. Motor fi xing
3. Motor fi xing
Fix each motor with the 6 screws M6x14 provided.
Fix each motor with the 6 screws M6x14 provided.
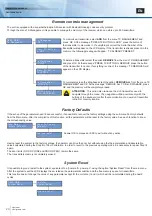
5. Articulated arm fi xing ( outward opening )
5. Articulated arm fi xing ( outward opening )
•
•
Fix the 2 articulated arms to the motor shafts with the screws M6x12 provided;
Fix the 2 articulated arms to the motor shafts with the screws M6x12 provided;
•
•
Offer the door plate to the door;
Offer the door plate to the door;
•
•
Fix the plate with the 2 screws provided.
Fix the plate with the 2 screws provided.
6. Mechanical check
6. Mechanical check
•
•
Move the side switches in position 0 and check the fl uency of the motion both in opening and in closing.
Move the side switches in position 0 and check the fl uency of the motion both in opening and in closing.
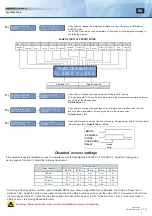
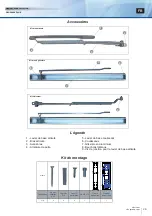
4. Door guides fi xing ( inward opening )
4. Door guides fi xing ( inward opening )
•
•
Fix the 2 arms on the motor shafts with the screws M6x12 provided;
Fix the 2 arms on the motor shafts with the screws M6x12 provided;
•
•
Insert the guide on the sliding blocks;
Insert the guide on the sliding blocks;
•
•
Set the external switch to position 0 and move the door to fi nd the best position for the door guide;
Set the external switch to position 0 and move the door to fi nd the best position for the door guide;
•
•
Fix the guides on the doors with the 4 screws provided ;
Fix the guides on the doors with the 4 screws provided ;
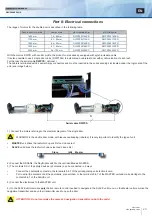
Left Motor
Left Motor
Right Motor
Right Motor
6 x M6x14 screws for fi xing to the back-plate
6 x M6x14 screws for fi xing to the back-plate
22
cdvi.com
cdvigroup.com


