background image

 22

Manual Setup 

Manual Setup is a configuration program designed for more experienced users of NetWare. 
To setup the print server by using Manual Setup follow the steps: 
 
1. 

Run PCONSOLE in NetWare 3.x or NetWare 4.x and create the necessary 
parameters (Refer to your Novell NetWare print server/Services manual for details).  

 
2. 

Log into your NetWare file server as a Supervisor (Admin.) or equivalent. From your 
Windows 95/98/Me, run PSAdmin. 

 
3. 

Select the print server that you wish to configure. 

 
4. Click 

Properties

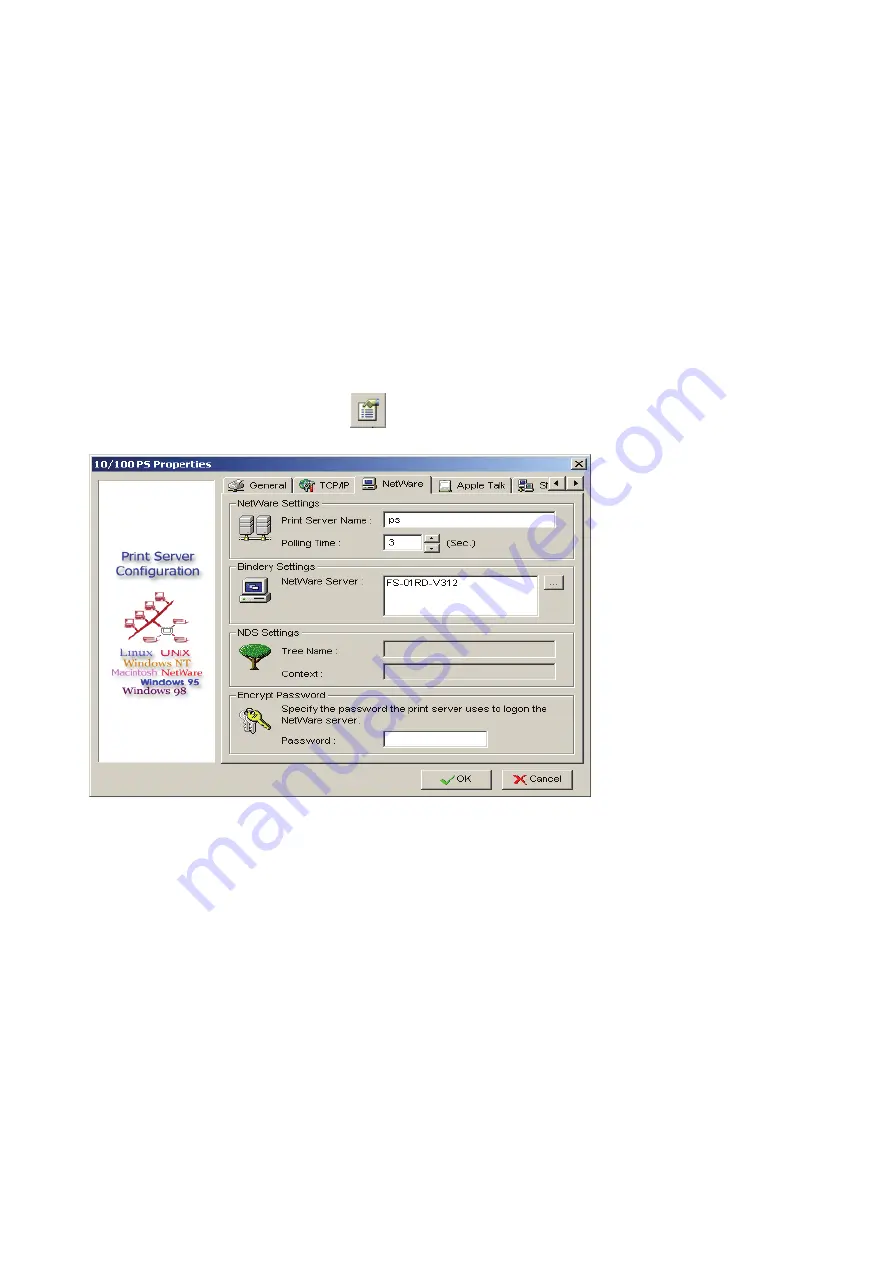
 in the tool bar and the following screen will appear, 

Properties


 button just like a picture 

, as follow picture. 


5. Select 

NetWare

 and type in the Print server that created during PCONSOLE. 

 
6. 

(

Optional

)

 In 

Bindery Settings

, Select NetWare file server(s) that print server can do 

Bindery mode. 

 
7. 

(

Optional

)

 In 

NDS Settings

, Select NetWare file server(s), NetWare 4.x or later that 

print server can do NDS mode. 
 

8. Click 

OK

. From your NetWare client computer, such as Windows 95/98/Me, create a 

printer that is connected (redirected) to one of the NetWare print queues serviced by 
the print server. 


Содержание DN-13003-1

Страница 1: ...USB 2 0 FAST ETHERNET PRINTSERVER User Manual DN 13003 1 ...

Страница 2: ...SETUP MENU 38 INSTALLING PRINT SERVER ON NETWARE 4 X 5 X 43 SETTING UP A MACINTOSH COMPUTER 45 6 NETWORK PRINT MONITOR 49 PREPARATION 49 TCP IP PROTOCOL INSTALLATION 50 IPX SPX COMPATIBLE PROTOCOL INSTALLATION 50 NETBEUI PROTOCOL INSTALLATION 51 WINDOWS 95 98 ME NT 2000 XP 2003 MANUAL INSTALLATION PROCEDURE 51 UNINSTALLING NETWORK PRINT PORT ON WINDOWS 95 98 ME NT 2000 XP 2003 53 7 TCP IP LPR PORT...

Страница 3: ...OBLEMS 66 WINDOWS 2000 XP 2003 VISTA 7 TROUBLESHOOTING 67 MOVING THE PRINT SERVER TO A NEW SEGMENT 68 MOVING YOUR COMPUTER TO A NEW SEGMENT 69 NOVELL NETWARE TROUBLESHOOTING 69 TCP IP TROUBLESHOOTING 70 APPENDIX 72 FREQUENTLY ASKED QUESTIONS 77 ADDITIONAL INSTALLATION INSTRUCTIONS 79 ...

Страница 4: ...Warning This equipment has been tested and found to comply with the limits for a Class B digital device pursuant to subpart J of Part 15 of the FCC Rules These limits are designed to provide reasonable protection against harmful interference when the equipment is operated in a commercial environment This equipment generates uses and can radiate radio frequency energy and if not installed and used ...

Страница 5: ...andard SNMP based application can be used to access and manage these print servers Network configuration The print servers provide an embedded web server that can be accessed via a proper web browser We also subsidiary Windows based PSAdmin utility which help administrator to setup print server environment Components and Features 1 USB Port Print Server 1 USB2 0 port Fast Ethernet network port RJ ...

Страница 6: ...able Hardware Installation To install the print servers you need to complete these steps Confirm that your printer USB port works well Connect the print server to the network and printer and plug in the print server Follow these instructions to install the print servers please refer to any peripheral you are connecting to the print server 1 Turn off the printer s power 2 Connect the print server t...

Страница 7: ... mount Information Note We are not responsible for damages incurred by insecure wall mounting hardware Network Environment Wired Network with Print Server Printer Print Server Computer Computer Computer HUB ...

Страница 8: ...g NetWare Windows 2000 XP 2003 Vista 7 UNIX systems and Macintosh computer As such there might be several ways to deploy the print server on your network Supported Networks Print server supports a variety of network protocols including TCP IP IPX SPX NetBEUI and AppleTalk In addition we provide software for network configuration on the following networks Novell NetWare 3 12 4 x 5 x Bindery and NDS...

Страница 9: ...000 XP 2003 Remote management of print server include alert and consumables Print server solution for continual management of multiple printers anywhere on your LAN Internet Printing Protocol Windows NT 2000 XP 2003 Vista 7 Printing via the internet to Internet Printing Protocol enabled print server Allows saving distribution of HQ hardcopy document over Internet replacing fax mail Comment Configu...

Страница 10: ...CD of print server Installing the PSAdmin and Print Server s Driver 1 To enable network communication with print server your computer must have a proper IP address e g 192 168 0 100 the print server s default IP is 192 168 0 10 2 Insert the setup CD into your CD drive and the following message appears Note For setup wizard under Windows Vista 7 you have to choose the Run as administrator by right ...

Страница 11: ...ected printer Note The setup CD will install the print server s driver PSAdmin and Setup Wizard into your computer The default installation directory will be C Program files Network Print Monitor 4 Click Next the wizard will automatically discover the print server ...

Страница 12: ...12 5 From the Select A Print Sever screen select the print server that you want to configure and click Next ...

Страница 13: ...ss 192 168 0 10 Subnet Mask 255 255 255 0 Click Yes if you want change IP address of the print server and then click Next Note 1 The IP address of print server must be within the same subnet as your network adapter 2 After you save the new IP address the print server will automatic reboot once to make ready for the new IP address It may take a couple of seconds ...

Страница 14: ...lready configured printer from the list click Next Next and then Finish to complete the installation Or Select Add New Printer if the print server is connected to a printer that hasn t been installed before and does not appear in the list ...

Страница 15: ...ck Add New Printer to launch Windows Add Printer Wizard 9 Click Next and select Local Printer make sure the Automatically detect and install my Plug and Play printer check box is NOT checked Then click Next ...

Страница 16: ...the Use the following port radio button is clicked and select LPT1 recommended Printer Port from the pull down list Then click Next 11 Select Manufacturer and Printer from the lists of printer s driver Then click Next ...

Страница 17: ... want to make it your default printer Then click Next 13 Then choose whether you want to share the printer with other network user print a test page please select No etc Select the appropriate radio button and click Next and Finish 14 In the setup wizard finish the installation by highlighting the installed printer in the Select a Printer list and click Next NEXT Finish ...

Страница 18: ...18 15 From Windows system go to start Printers and Faxes and highlight your newly installed printer 16 Right click select Properties Ports and verify that the print server s port appears ...

Страница 19: ...rograms Network Print Server PSAdmin The screen will then appear as follow picture All print server s feature Novell NetWare function on the LAN will be displayed along with their respective device name MAC Address print server name firmware version and status The terms are defined as follows Device Name The name of the print server hardware used for identification purposes MAC Address The Etherne...

Страница 20: ...lect Obtain an IP address from DHCP server If there is a DHCP server on your network This option allows the print server to obtain IP related settings automatically from your DHCP server This setting by default is disabled If you would like to manually specify an IP address to the device please skip to the following step 3 In the IP Address option type an IP address for the print server The IP add...

Страница 21: ...rver as a Supervisor Admin or equivalent 2 Click Wizard button just like a picture and select NetWare Wizard as follow picture 3 Select the NetWare File Server to which the print server device will be attached 4 Type in a Print server 5 Type in a Print Queue Names Note Each print queue corresponds to each print port of the print server 6 Click OK 7 Done 8 From your NetWare client computer such as ...

Страница 22: ...ct the print server that you wish to configure 4 Click Properties in the tool bar and the following screen will appear Properties button just like a picture as follow picture 5 Select NetWare and type in the Print server that created during PCONSOLE 6 Optional In Bindery Settings Select NetWare file server s that print server can do Bindery mode 7 Optional In NDS Settings Select NetWare file serve...

Страница 23: ...IP address to the print server Specify an IP address IP Address This option shows the print server s current IP address maybe obtained from your DHCP server or manually specified This option also allows you to manually specify an IP address to the print server if DHCP option is disabled Subnet Mask This option shows the print server s current subnet mask maybe obtained from the DHCP server or manu...

Страница 24: ...ctory as PSAdmin Reset 1 Click Reset button just like a picture 2 Reset allows the user to reset the print server device in order to establish a new connection or for new settings to take effect Refresh 1 Click Reset button just like a picture 2 Refresh searches the network for all attached print server s Note Configure the print speed in the Advanced label must match the printer s speed which con...

Страница 25: ...in this chapter 6 Run the NetWare s PCONSOLE and create additional print queues 7 Select the Print server name you specify in Step 5 8 Select the Print server Configuration option and select the Queue Serviced by Printer option For NetWare 4 x s PCONSOLE please select Printers option and select Printer 0 instead 9 Select the Printer 0 and press the Insert key to add the print queues you create in ...

Страница 26: ...llation procedure After the PSAdmin is removed the print server is no longer accessible via the PSAdmin You have to re install the PSAdmin on your system in order to access the print server again Procedure 1 Click Start point to Settings and select Control Panel 2 Double click the Add Remove Programs icon 3 Click Change or Remove Programs tab 4 Select Network Print Monitor for Windows 95 98 NT 200...

Страница 27: ...P 2003 you can use a supported Web Browser for example Netscape or IE to view the embedded web server on the print server Contact your administrator to get the IP address or URL of the printer and browse to the print server s web page For example to install Windows 2000 by IPP service you must follow below information 1 Click Start button 2 Select Settings and then select Printers option 3 Click A...

Страница 28: ... check print server to connect to HP printer if not it will appear as follow picture Then Click OK 8 Select the appropriate printer manufacturer and printer type and click Next appear as follow picture 9 If you want your Windows based programs to use this printer as the default printer please select Yes and Click Next It will appear as follow picture ...

Страница 29: ...ms and browser versions we recommend IE or Netscape version 4 or higher Please access HP Customer Care Online at http www hp com go webjetadmin Note When installed on a supported host server HP Web JetAdmin can be accessed from any client through a supported Web browser by browsing to the HP Web JetAdmin host Installing HP Web JetAdmin Before installing the HP Web JetAdmin software you must have d...

Страница 30: ... software by adding a link to your web server s home page that is addressed to HP Web JetAdmin s URL For example http server domain port Configuring and Modifying a Device Using your browser navigate to HP Web JetAdmin s URL For example http server domain port Follow the instructions on the appropriate home page to configure or modify your printer Note You can also substitute the server domain wit...

Страница 31: ... Windows based of PSAdmin utility can easily set an IP address with the print server please see the Properties TCP IP options of chapter 3 After an IP address is established on the print server perform the following step Status Menu Once you have finished the IP address configuration with print server You should be use web browser to view and management the print server The status menu of the prin...

Страница 32: ...ion name of the print server To confirm the print server s location name where the print server is located in the office s LAN System Up Time This option allows you to view uptime of the print server When you start the print server it will compute the print server from start time to power off time Firmware Version This option allows you to view firmware version of the print server To verify the pr...

Страница 33: ...to view manufacturer of the printer When the printer connected with the print server it will be show in the manufacture box Model Number This option allows you to view model of the printer When the printer connected with the print server it will be show in the model box Printing Language Supported This option allows you to view command to set the printer When the printer connected with the print s...

Страница 34: ...ure Use DHCP BOOTP This option allows you to view DHCP BOOTP status If there is a DHCP BOOTP server on your network this option allows the print server to obtain IP related settings automatically from your DHCP server IP Address This option allows you to view IP address from the print server The IP address must meet the IP addressing requirements of the network segment default 192 168 0 10 Subnet ...

Страница 35: ...is option allows you to view print server s name would be configured by PSAdmin utility Polling Time This option allows you to view polling time from the print server This function is search for NetWare Server by per time NetWare NDS Settings Use NDS Mode Enable or Disable Name of the NDS Tree Name of the NDS Content Current Status Connect or Disconnect ...

Страница 36: ...then appears the sub menu 2 Click AppleTalk it then as shown in the following picture AppleTalk Settings If no any zone exists the print server itself displays the zone name as an asterisk in the current AppleTalk Status of the print server in the web browser Port Name ATALK_PS xxxxxx 1 where xxxxxx represents the last six digits of the print server s Node ID ...

Страница 37: ... are using a PostScript printer you can select ASCII TBCP or BCP format from web configuration SNMP Status 1 Click Status it then appears the sub menu 2 Click SNMP it then as shown in the following picture SNMP Communities This option allows you to view SNMP communities from the print server There are two communities that control message from the network management of the print server SNMP Traps T...

Страница 38: ...me from the print server Setup Menu Meanwhile you have finished the IP address configuration with print server You should use web browser to configure the print server The setup menu of the print server helps administrator to setup the print server s System Printer NetWare TCP IP SNMP and AppleTalk Preparation Enter the IP address of the print server as the URL default 192 168 0 10 Then the print ...

Страница 39: ...you to input your Email address that you want to receive the notification by Email Print Server Name This option allows you to input device name of the print server To correct the print server s device name System Contact This option allows you to input contact name of the print server To check the print server s contact name who in charge of this device System Location This option allows you to i...

Страница 40: ...configuration from the print server it then as shown in the following picture Re type Password User Name You must be input the default administration user name admin as login user name Password The default password is empty After setup password is completed from the print server you shouldn t forget this password ...

Страница 41: ...ows you to input IP address from the print server The IP address must meet the IP addressing requirements of the network segment Note On the TCP IP Setup screen specify a fixed IP address is highly recommended Subnet Mask This option allows you to input subnet mask from the print server The IP address must meet the IP addressing requirements of the network segment Default Router This option allows...

Страница 42: ...tWare it then as shown in the following picture Print Server Name This option allows you to input print server name which configured by PSAdmin utility or PCOMSOLE program Polling Time The time interval in which the print server unit polls the file server for servicing of print queues Logon Password This option allows you to input encrypted password from the print server The print server login to ...

Страница 43: ...ed this line or if you have ever added any organization units OU to your NDS tree after the NetWare system was installed please read the following section before you install the print server For the purpose of illustration we assume the NDS tress structure is as follows ROOT O ABC OU ABC USA OU Sales Admin FileServer 1 OU Tech Installation Procedure 1 At your file server console type load install ...

Страница 44: ...basic configuration is for the print server in an AppleTalk environment is performed simply by opening the Chooser window and selecting a printer that is connected to the print server 1 Click Setup it appears the sub menu 2 Click AppleTalk it as shown in the following picture 3 AppleTalk Zone In this option type an AppleTalk Zone name that you want the print server to belong to or leave it in defa...

Страница 45: ...the PRINT SERVER Note If you select a Zone that the PRINT SERVER doesn t belong to as you specified in the previous section no print server will be displayed in the Step 4 3 You have to use a PostScript printer that you can select the LaserWriter 8 icon 4 The Chooser window then displays PRINT SERVER s featuring the support for AppleTalk protocol along with its default Chooser Name in the right ha...

Страница 46: ...ver supports up to two community names The default community name is public case sensitive with Read Only access right in default When an unusual condition or activity occurs the SNMP agent alerts the SNMP manager through SNMP traps Following list summaries SNMP trap messages that the print server will send out Activities SNMP Trap Messages Description Link Up or Link Down When the network interfa...

Страница 47: ...s the sub menu 2 Click SNMP it then as shown in the following picture SNMP Community The print server supports up to two community names The default community name is public case sensitive with Read Only access right in default Support HP WebJetAdmin This option allows user determine to disable enable the Support HP WebJetAdmin SNMP Traps Enable the function of sending SNMP Authentication Failure ...

Страница 48: ...oes not support the SMB printing on Microsoft Windows Vista 7 1 Click Setup it appears the sub menu 2 Click SMB it as shown in the following picture 3 Workgroup Name This option allows you to assign a workgroup name to print server on the Network Neighborhood Windows uses it to identify the print server on the Network 4 Shared Name This option allows you to assign a name to print server s port ...

Страница 49: ... further information please read TCP IP Protocol Installation section in this chapter Note If TCP IP protocol is chosen please refer to Assigning an IP Address to the print server section later in this chapter IPX SPX The IPX SPX compatible Protocol must be installed For further information please read IPX SPX compatible Protocol Installation section in this chapter NetBEUI The NetBEUI protocol mu...

Страница 50: ...8 Restart the computer 9 Done Note Using TCP IP protocol to access the print server requires well configured TCP IP settings If you are not familiar with these settings please consult your network administrator for details or ask for help IPX SPX compatible Protocol Installation 1 Click Start point to Settings and select Control Panel 2 Double click the Network icon 3 If the IPX SPX compatible Pro...

Страница 51: ...ows 9X ME NT 2000 manuals Windows 95 98 Me NT 2000 XP 2003 manual Installation Procedure Please perform the steps as follows to ensure a smooth installation 1 Run Setup from the print server s Setup CD 2 The Network Print Monitor for Windows 95 98 Me Setup will then appear Click Next 3 A message reading Setup is complete You may add the Network Print Port by using the PSAdmin will appear Click OK ...

Страница 52: ...rties 13 Click Details tab and select Add Port 14 In the Add Port dialog box select Other as shown in the following picture 15 Select the Network Print Port and click OK 16 The Add Port box will then appear along with the print server s Node ID The last 6 digits of the Node ID located on the back of the print server unit Select one printer server port from the list which is now connected to one of...

Страница 53: ...ng Network Print Port on Windows 95 98 Me NT 2000 XP 2003 To provide users an easiest way to remove all of the Network Print Port components from Windows 95 98 Me the Network Print Port software comes with un installation wizard program to help users remove the software components from their Windows 95 98 Me NT 2000 XP 2003 systems in minutes Please follow the directions listed below to proceed wi...

Страница 54: ...the PSAdmin utility 2 Manually specify using DOS commands or UNIX text mode commands This applies to Windows NT 2000 XP 2003 and UNIX systems Note The Network Print Monitor can only search for the print server s over the same network segment the Windows NT 2000 XP 2003 UNIX computer is located You would like to install a print server on a different network segment DHCP The print server supports DH...

Страница 55: ... printer or print queue on that server box type in a printer name for example lp1 Click OK 8 In the Printer Ports box select Close 9 Click Next 10 Select the appropriate printer manufacturer and printer type list and click Next 11 Select Shared Type in a new Share Name or leave it in default and click Next 12 A message reading After your printer is installed Windows can print a test page so you ca...

Страница 56: ...creen will appear Select Local Printer and click Next 4 From the type of Create a new port box as shown in the following picture select the Standard TCP IP Port Click Next and Next 5 The Add Standard TCP IP Printer Port Wizard box will then appear as shown the picture as below and type in the IP address assigned to the print server in the Printer Name or IP Address box Click Next ...

Страница 57: ...ture Select Custom Click Settings button and click Next 7 In the Configure Standard TCP IP Port Monitor box as shown in the following picture select LPR form Protocol type in a queue name for example lp1 8 Click OK and Next Note Please DO NOT type any other name than lp1 in this step ...

Страница 58: ...urer and printer type list and click Next 11 Type in a new Printer name or leave it in default and click Next button 12 A message reading To confirm that the printer is installed properly you can print a test page Select Yes Recommended and click Finish 13 Done ...

Страница 59: ...e Choose lpd BSD Make Model Select the printer model For example EPSON LQ570 Printer Connection Type Choose On Remote Server Remote System Input the IP address of the printer server For example 192 168 1 250 Remote Printer lp1 or lp2 or lp3 fixed If the printer connected to the first print server port please choose lp1 If the printer connected to the second print server port please choose lp2 If t...

Страница 60: ...7 3 or later with X Window system installed 1 Make sure that the TCP IP is well configured on your RedHat system including network interface card s driver and IP related settings say IP address subnet mask and gateway IP 2 Log in root 3 Assign Print Server an IP address At shell mode c 1 arp s the IP address you want to assign to the Print Server Print Server s Node ID c 2 Execute tftp Print Serve...

Страница 61: ...6 Click New button 7 Click Forward button 8 In the Name field type a user defined name click Forward ...

Страница 62: ...ield type the IP address of print server 11 In the Queue field type a print server s port name which connect to the printer For example lp1 12 Click Forward button 13 In the Printer field choose Postscript Printer 14 Choose the model of printer and click Forward 15 Done ...

Страница 63: ...is located on your current working directory 2 Before upgrading the print server ensure that it is not printing jobs You have to wait until the print job is finished before you can proceed 3 Be careful not to interrupt the file transfer If the transfer is interrupted the print server may have to be re initialized by your dealer Upgrading the print server from PSAdmin 1 Log into your NetWare file s...

Страница 64: ... root 2 Ensure binary file is located in your current working directory 3 Type tftp print server s IP address 4 At tftp prompt type get upgrade 5 Change to binary mode 6 At tftp prompt type put mpsXX bin 7 Wait for the file transfer to complete 8 Quit from tftp 9 Done ...

Страница 65: ...file is located in your current working directory 2 Enter the IP address of the print server as the URL 3 Click Misc and then choose Firmware Upgrade it then as shown in the following picture 4 Click Browse and select the firmware file 5 Click Upgrade 6 Done ...

Страница 66: ...e power If the unit does not flash five times contact your dealer for a replacement or repair LAN Green 100Mbps Orange 10Mbps USB Green USB2 0 Orange USB1 1 Print server is being connected with USB printer Power Related Problems The print server requires an external AC power adapter in order for it to function If you have a power problem check to see whether the power cord or its connectors are da...

Страница 67: ...pe 802 2 Installation later in this section RIP for NWLink IPX SPX compatible transport Installation Procedure 1 From your Windows NT server that is used as a router select Start from the bottom left hand corner of the screen 2 Select Settings 3 Select Control Panel 4 Double click the Network icon 5 Select Services 6 Select Add 7 In the Select Network Service box select the RIP for NWLink IPX SPX ...

Страница 68: ...l Windows NT server or on each Windows 95 98 computer using this print server in order for the print server s driver on each computer to re establish a new connection Print Server Reconfiguration Procedure on Windows 95 98 Me 1 Click Start on the bottom left hand corner of the screen 2 Select Settings and select Printers 3 Select your printer connected to the print server and right click the print...

Страница 69: ...ng the print server through the Network Print Port on your NT or Windows 95 98 Me computer and your computer is going to be moved onto another segment you have to reconfigure the print server on your computer to use your print server However this situation is like moving the print server to a new segment Please refer to the Moving the print server to a new segment section for more detailed reconfi...

Страница 70: ...arp a If the Node ID shown on the screen doesn t match the print server s Node ID please follow the instructions below to reset the entry 1 At NT s DOS prompt type arp d print server s IP address to delete the current entry 2 Type arp s print server s IP print server s Node ID to specify a new ARP entry 3 Refer to Chapter 7 for the detailed instructions to complete the installation B The print ser...

Страница 71: ...nstalled on Segment B with IP address for example 192 72 214 100 1 Find an unused IP address on Segment A for temporary use in the following steps for example 192 72 214 68 2 Connect your print server to Segment A as a networked node 3 On your NT server type for example arp s 192 72 214 68 00 40 01 3F 02 AB Please note in this arp command you have to type 192 72 214 68 on purpose Do not type this ...

Страница 72: ... Assume your computers use the WORKGROUP as the SMB workgroup name in Windows Please assign the same SMB name to your print server If print server uses the different SMB name from computers the SMB printing won t active 2 Now you can find the print server from the SMB workgroup of Windows Then double click it ...

Страница 73: ...3 Double click it again ...

Страница 74: ...74 4 Now you have to install the printer s driver 5 Choose it from the Add Printer Wizard ...

Страница 75: ...6 Install printer successfully 7 Now you can find your printer s icon and you can use the SMB printing mode ...

Страница 76: ...tton 5 The print server will restart WARNING This will erase all settings of print server to default and should be performed with caution Print Self test Page 1 Verify the power of print server is turned on 2 Press the reset button for 5 seconds and then release it 3 Then the self test page including the factory default settings will be printed Note 1 It is strongly recommended to use Laser Printe...

Страница 77: ... 3 Check to see that if the network cabling and power adapter are properly connected 4 Recheck the print server connection by running the PSAdmin It should read Connected Question B Print jobs start printing but print very slowly or print unknown characters Possible explanation and solution A printer driver is missing or is incompatible with that printer Using a print driver that is not specific f...

Страница 78: ...int server name the printer name or the print queue name you specified in the Auto Setup dialogue box contains a space Solution Check to see if there is a space in the print server name the printer name or the queue name Type in a new name without a space between two characters or replace a space by a dash or an underscore _ Question F The PSAdmin reports Print server Already Exists Printer Alread...

Страница 79: ...rint server through the Network Print Port under Windows 95 98 please redirect the printer named Panasonic KX P6100 PCL or Panasonic KX P6300 PCL or Panasonic KX P6500 PCL to the print server through the Network Print Port DO NOT redirect the printer named Panasonic KX P6100 GDI Panasonic KX P6300 GDI or Panasonic KX P6500 GDI to the print server Please note that the print server doesn t support p...

Отзывы: