background image


35 


  Notice:   

For more information, please refer to User

s Manual Chapter 4 DDNS Service. 


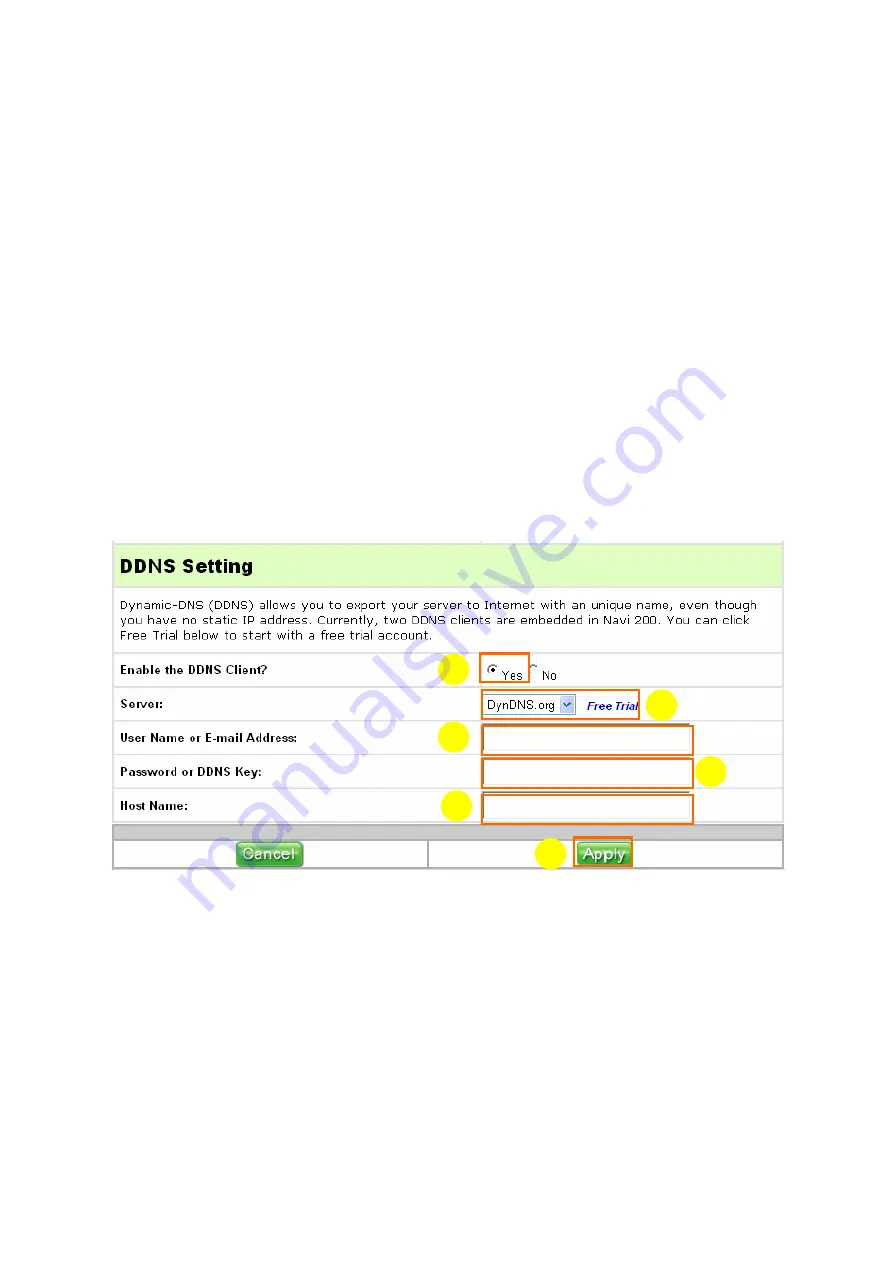
1.  Enable the DDNS Client? 

Select

 Ye

s or 

No

 to enable or disable the DDNS Client. 

2.  Server: 

Select 

DynDNS.org

  or 

TWNIC

  embedded  in  DN-11007-N.  You  also  can  click 

Free Trial

 behind this field to link up a free trial address. 

3.  User Name or E-mail Address: 

User Name

 or 

E-mail  Address

 is used as an identity to login Dynamic-DNS or 

TWNIC service. 

4.  Password or DDNS key: 

Password

 or 

DDNS Key

 is applied to login Dynamic-DNS or TWNIC service. 

5.  Host Name: 

Input your 

Host Name

 you had registered from Dynamic-DNS website. 

6.  Apply & Cancel 

Click 

Apply

  to  save  the  settings.  If  you  want  to  clean  the  settings,  please  click 

Cancel


Содержание DN-11007-N

Страница 1: ......

Страница 2: ...2 DN 11007 N Internet USB Multi Function Router User s Manual ...

Страница 3: ...y form or by any means except some documents or public software without the copy permission of our company ACCORDING TO THE AMERICA COPYRIGHT RULES IN 1976 PEOPLE CANNOT PUBLISH ANY UNAUTHORIZED CREATION IN ANY FORM OR BY ANY MEANS IN DETAIL WHOLE CREATION EVEN PART OF CREATION CANNOT BE PUBLISHTED VIA THE MENTIONED METHODS BY OTHERS FOR INSTANCE DOCUMENTATION OF TRANSLATION OR MODIFICATION IS PRO...

Страница 4: ...to accident abuse mishandling improper installation alteration improper usage or problems with electrical power The Product must be used with devices that conform to the recommended industry standards We will not be liable for damages resulting from a third party device that causes the Product to fail We shall in no event be liable for any consequential indirect or incidental damages lost profits ...

Страница 5: ...nce will not occur in a particular installation If this device causes harmful interference to home electric equipment which can be determined by turning the equipment off and on users are reminded of correcting the interference by the part of the following instruction Change to connect another outlet Adjust or replace the receiving antenna Keep a distance between interference maker and receiver Co...

Страница 6: ...5 THE PRODUCT PACKAGE 11 1 6 FRONT PANEL LED INDICATORS 12 1 7 HARDWARE CONNECTIONS 13 1 8 GET YOUR IP AUTOMATICALLY MANUALLY 16 Chapter 2 DN 11007 N Home page 18 2 1 HOW TO LINK DN 11007 N HOME PAGE 18 2 2 HOW TO ENTER DN 11007 N S SETTING ITEMS 19 Chapter 3 DN 11007 N Settings 20 3 1 HOME 20 3 2 QUICK SETUP 21 3 2 1 ADSL Dialup PPPoE 21 3 2 2 ADSL Static IP 22 3 2 3 Automatic IP 23 3 2 4 Cable M...

Страница 7: ...erver 46 3 6 2 Web Camera 49 3 6 3 Print Server 58 3 7 SYSTEM SETUP 78 3 7 1 Change User Setting 78 3 7 2 Router Time Setup 79 3 7 3 Firmware Upgrade 81 3 7 4 Setting Management 82 3 7 5 Factory Default 83 3 7 6 Wake on LAN 84 3 8 STATUS LOG 85 3 8 1 Status 85 3 8 2 DHCP Leases 88 3 8 3 System Log 89 3 9 LOGOUT 90 Chapter 4 DDNS Service 91 Chapter 5 Q A 94 Chapter 6 Glossary 97 ...

Страница 8: ...irewall and IP sharing functions but also contains several unique features for instance webcam monitor print server FTP server The installations of Internet via WAN with XDSL or Cable Modem and local network via LAN with computers are shown as below 1 1 1 The installation of WAN with XDSL Modem 1 1 2 The installation of WAN with Cable Modem ...

Страница 9: ...1 2 2 Print Server DN 11007 N supports an USB printer It allows all the computers sharing one USB printer on your network With LPR protocol users can share a printer from both WAN and LAN 1 2 3 FTP Server DN 11007 N supports FAT 16 FAT 32 file system format Plug with USB hard drive or thumb drive DN 11007 N becomes a FTP server and users can share files from both WAN and LAN 1 2 4 IP Sharing DN 11...

Страница 10: ...tocol TCP IP Transmission encoding method Ethernet 100 BASE TX 4B5B MLT 3 and 10 BASE T Manchester coding port connector RJ45 Access method CSMA CD Transmission rate 10 100 Mbps auto sensing Switching data transmitting method Store Forward Buffer capacity 8 MB MAC address learning table 1024 address self learning method Communication distance 100 m IP obtaining method Manual DHCP Number of ports 4...

Страница 11: ... browser software installed E g Internet Explorer or Netscape 1 5 The Product Package Your product package should contents the following items A One DN 11007 N router unit B One DN 11007 N Quick Start Guide C One Power Adapter 5 Volts DC 2 Amp D One DN 11007 N CD Quick Start Guide User s Manual and Adobe Reader E One Web Camera able to support PC usage and one Driver CD Optional Notice It can be p...

Страница 12: ...act with your product provider C LAN LED color GREEN On Connector computer switch hub is plugged in Off LAN port can t work Please check the LAN cable whether it is plugged firmly or try to connect another port for testing Flashing Connector is transmitting receiving data D WAN LED color GREEN On XDSL or Cable Modem is connected Off Your WAN port can work Please check the networking cable whether ...

Страница 13: ...DN 11007 N B USB Port For USB 1 1 2 0 devices REF Chapter5 C LAN Port RJ 45 For computer switch and hub D WAN Port RJ 45 XDSL Cable Modem 1 7 Hardware Connections Connect the hardware you want to the proper positions 1 If you want to connect a web cam please follow the figure below ...

Страница 14: ...14 2 If you want to connect a printer please follow the figure below 3 If you want to connect a USB hard disk please follow the figure below ...

Страница 15: ...15 4 If you want to put all devices mentioned above and connect PCs together please follow the figure below ...

Страница 16: ...ke sure your IP is in the automatic IP position or you want it manually If you don t know how to enter the settings please follow the steps below Step1 Click Start Settings Network and Dial up Connections then Local Area Connection Step2 Click Properties Step3 Double click Internet Protocol TCP IP ...

Страница 17: ...rk segment For example 1 IP Address 192 168 1 xxx xxx can be any number between 2 and 254 but it can t repeat we use 10 to be the example Notice IP address and Default gateway couldn t be the same 2 Subnet Mask 255 255 255 0 same as the DN 11007 N 3 Gateway 192 168 1 1 this is the IP address of DN 11007 N 4 DNS 192 168 1 1 use the DN 11007 N IP address or your own choice Step4 1 Get IP Automatical...

Страница 18: ...The second part is How to enter DN 11007 N s setting items It lists all the setting functions of the Main Menu 2 1 How to link DN 11007 N Home page Please follow the steps below to link DN 11007 N s Home page Step1 1 Open Internet browser as an example 2 Enter 192 168 1 1 in the address field Then press Enter admin Step2 DN 11007 N s Login Screen appears 1 Enter admin in both User Name and Passwor...

Страница 19: ...tal 9 functional items as showed below Select a specific item you want in the left panel and it will reveal its sub menu items Follow the instructions of Chapter 3 to setup DN 11007 N Step3 Select the functional items you want under the Main Menu bar to do related settings ...

Страница 20: ...us Log are selected from Main Menu for your convenience Of course your can set what you want from the Main Menu bar Warning If you leave DN 11007 N s setting screen unused over 5 minutes after clicking it will appear the following screen to ask you to login again Home The Home page lists all functional items for your quick link Click this item will also help you to back to DN 11007 N s Main Menu ...

Страница 21: ...tion Type The setting fields will differ depending on what kind of connection type you select Follow the instructions to setup DN 11007 N Tips are given when you move your cursor over each item Step2 1 Input your User Name and Password supplied by your ISP 2 Click Next 1 Step3 If you don t want to do any block setting please ignore the item 1 and 2 1 Select the services you want to block 2 Set a t...

Страница 22: ...supplied by your ISP 4 Input your DNS Server1 and Server2 If you don t know yours please check on your ISP 5 Click Next Step4 It will take you 15 seconds to save your settings and restart the device Step1 1 Select ADSL Static IP 2 Then click Next 1 2 1 2 3 5 4 1 2 3 Step3 If you don t want to do any block setting please ignore the item 1 and 2 1 Select the services you want to block 2 Set a time p...

Страница 23: ...save your settings and restart the device Step1 1 Choose Automatic IP 2 Click Next Step2 If you don t want to do any block setting please ignore the item 1 and 2 1 Select the services you want to block 2 Set a time period you want to block the services you set above 3 Click Apply Step3 It will take you 15 seconds to save your settings and restart the device 1 2 3 1 2 ...

Страница 24: ...n Step1 1 Choose Cable Modem DHCP 2 Then click Next 1 2 3 Step2 If you don t want to do any block setting please ignore the item 1 and 2 1 Select the services you want to block 2 Set a time period you want to block the services you set above 3 Click Apply Step3 It will take you 15 seconds to save your settings and restart the device 1 2 ...

Страница 25: ...n type that you have chosen Select WAN LAN in the IP Config menu DN 11007 N supports four WAN connection types as listed below 1 ADSL Dialup PPPoE 2 ADSL Static IP 3 Automatic IP 4 Cable Modem DHCP Follow the instructions to enter the WAN LAN page Tips are given when you move your cursor over each item IP Config IP Config contains four functional items includes WAN LAN DHCP Server Routing Table an...

Страница 26: ...otice that means you have to login DN 11007 N s setting screen with the same LAN IP address 192 168 2 X 192 168 1 1 255 255 255 0 1 2 4 3 5 1 WAN Connection Type Select ADSL Dialup PPPoE from the menu of WAN Connection Type first 2 WAN DNS Setting Select Yes to get DNS Server automatically 3 PPPoE Account Input User Name 1 and Password supplied by your ISP 4 WAN MAC Address Setting The original de...

Страница 27: ...If you don t know please check with your ISP 3 WAN DNS Setting Select No it means do not get DNS Server automatically and input your WAN DNS Setting If you don t know check with your ISP 4 WAN MAC Address Setting The original default is supplied by producer We recommend you don t change it 5 LAN IP Setting The default value of LAN IP address is 192 168 1 1 3 Subnet Mask is 255 255 255 0 6 Apply Ca...

Страница 28: ...e 192 168 2 X Please notice that means you have to login DN 11007 N s setting screen with the same LAN IP address 192 168 2 X 1 WAN Connection Type Select Automatic IP from the menu of WAN Connection Type first 2 WAN DNS Setting Select Yes to get DNS Server automatically 3 WAN MAC Address Setting The original default is supplied by producer We recommend you don t change it 4 LAN IP Setting The def...

Страница 29: ...me LAN IP address 192 168 2 X 1 WAN Connection Type Select Cable Modem DHCP from the menu of WAN Connection Type first 2 WAN DNS Setting Select Yes to get DNS Server automatically 3 WAN MAC Address Setting The original default is supplied by producer We recommend you don t change it 4 LAN IP Setting The default value of LAN IP address is 192 168 1 1 5 Subnet Mask is 255 255 255 0 5 Apply Calcel Cl...

Страница 30: ...iven when you move your cursor over each item 1 Enable the DHCP Server Click Yes or No to enable or disable the DHCP Server DHCP server supports 253 IP addresses at most for your local network If the DHCP server is enabled managers can assign them or let them be obtained automatically 2 Domain Name Domain Name is the name which you had registered from NIC Network Information Center If managers don...

Страница 31: ...g device is called a DHCP Server and the receiving device is a DHCP client Without DHCP you would have to configure each computer separately with IP address and related information 6 The WINS Windows Internet Naming Service manages interaction of each PC with the Internet If you use a WINS Server input the IP address of the WINS Server in the fields 1 2 4 3 5 ...

Страница 32: ...ork or host of a route rule So it could be a host address 192 168 123 11 or a network address such as 192 168 0 0 2 Netmask It stands for the netmask of an added network route If the destination is a host its netmask should be 255 255 255 255 3 Gateway It stands for the IP address of gateway where packets are routed to The specified gateway must be reachable first It means you have to set up a sta...

Страница 33: ...oute 1 RIP Setup The default RIP Setup is in the Rip2 position Enable this function Your DN 11007 N will build a routing table automatically and get a path to the destination 2 Apply Cancel Click Apply to save the settings If you want to clean the settings please click Cancel 6 5 4 3 2 1 1 2 ...

Страница 34: ... as USB Web Camera USB Printer USB HD you can make choice if open rights to allow clients to access from WAN 1 Web Server Port The default port 80 is reserved for http protocol 2 Enable Ping from WAN Select Yes or No to enable or disable ping from WAN 3 Enable Web Access from WAN Select Yes or No to enable or disable Web Access from WAN 4 Enable Printer Server Access from WAN Select Yes or No to e...

Страница 35: ... behind this field to link up a free trial address 3 User Name or E mail Address User Name or E mail Address is used as an identity to login Dynamic DNS or TWNIC service 4 Password or DDNS key Password or DDNS Key is applied to login Dynamic DNS or TWNIC service 5 Host Name Input your Host Name you had registered from Dynamic DNS website 6 Apply Cancel Click Apply to save the settings If you want ...

Страница 36: ...e one port to send information and another to receive information can be set up here Please follow the steps NAT Setting It contains three functional items under NAT Setting such as Port Trigger Virtual Server and Virtual DMZ Follow the instructions to configure your settings Tips are given when you move your cursor over each item Select Port Trigger in the NAT Setting menu Follow the steps below ...

Страница 37: ...Input outgoing outbound trigger port 3 Incoming Ports Enter the incoming inbound port or port range for this particular of application e g 2300 2400 47624 4 Protocol Select the inbound port protocol type TCP UDP or BOTH 5 Description Description for recording what this rule is used for 6 Add Input data into first row of table then press Add to insert it System will remind you if the table is full ...

Страница 38: ...sible for outside users you should specify a local IP address to the server Then add the IP address and network protocol type port number and name of the service in the following list Based on the list the gateway will forward service request from outside users to the corresponding local server Select Virtual Server in the NAT Setting menu Follow the instructions to enter the Virtual Server page t...

Страница 39: ...rt and Server Port Input the Local and Server Ports you knew 5 Protocol Give your virtual server a protocol you knew or if you are not sure adjust it in a BOTH position 6 Description Description for recording what this rule is used for 7 Add Input data into first row of table then press Add to insert it System will remind you if the table is full or required fields are not filled ok 8 Del Select o...

Страница 40: ...ution Enabling this function might expose the virtual DMZ host as well as your entire network to increase security risk Select Virtual DMZ in the NAT Setting menu Follow the instructions to enter the Virtual Server page to configure the settings you want Tips are given when you move your cursor over each item Steps 1 IP Address of Exposed Station Input the IP address of the computer that you want ...

Страница 41: ... given when you move your cursor over each item Select WAN LAN Filter in the Internet Firewall menu Follow the instructions to enter the WAN LAN Filter page to configure the settings you want Tips are given when you move your cursor over each item Step1 Only enable the following two items Internet firewall will work to block all the unauthorized accesses from outside 1 Enable Firewall Select Yes t...

Страница 42: ...Destination IP and Port Range 4 Time Period Set a period of time to accept or drop user access 5 Type Defining your rule will drop or accept the packet 6 Priority Specify one of the settings on the list table and click Higher The one will be more prior than the low one By contrary click Lower to level down the priority 7 Add Del Help Click Add to list your settings on the list On the contrary clic...

Страница 43: ...assigned passing DN 11007 N during a specific time 1 4 2 5 3 8 6 7 2 Step1 1 DHCP Leases Before setting the MAC Address Filter you should follow the steps to know if MAC addresses have been linked Click DHCP Leases in the Status Log 2 Mac Address The Mac Addresses will be shown in the Leases Table Please note down the Mac addresses you want to drop or accept 3 Refresh Click Refresh to renew the in...

Страница 44: ...ss you will assign in drop or accept position 3 Mac Address Input the Mac address at a time 4 Time Period Set a period of time or skip this area 5 Add Del Click Add to list your settings If you don t satisfy with your settings select the address you have added Then click Del 6 Apply Cancel Click Apply to save your settings If you want to clean the settings you have set except the information on th...

Страница 45: ...ips are given when you move your cursor over each item Steps 1 Enable URL Filter Select Yes to enable URL filter function 2 URL Keywords Time Period Input the keyword that you want to block and period of time in the blank fields 3 Add Del Click Add to list an URL Keywords on the table Click Del to erase one you like on the list 4 Apply Cancel Click Apply to save the settings Click Cancel to clean ...

Страница 46: ...he settings to share FTP Server from both WAN and LAN Tips are given when you move your cursor over each item USB Application The USB application contains three functional items FTP Server Web Camera and Print Server Through the FTP Server settings clients can share data from both WAN and LAN and through the Web Camera settings users can monitor office or home security remotely Moreover through th...

Страница 47: ...og in user number at most 12 users can access FTP Server at the same time 4 FTP Port The FTP Port default value is 21 but it can be changed as long as it does not conflict with other applications 5 User Name Password Max Login Input a user name a password and a number of maximum access clients in the blank fields at the same time 6 Rights Give the user specific rights such as read write and erase ...

Страница 48: ...1 Address Open Internet browser and input ftp 192 168 1 1 in the web address field then press Enter 2 User Name Password Login Input User Name and Password you have set before then click Login The data folders will appear 1 1 2 ...

Страница 49: ...k on Apply Notice If you select Yes users can access your FTP Server from WAN On the contrary users only can access your FTP Server from LAN 3 6 2 Web Camera WARNING Before connecting with your USB Web Camera to DN 11007 N please make sure that DN 11007 N is in Power Off condition Select Web Camera in the USB Application menu Follow the instructions to enter the Web Camera page and finish the sett...

Страница 50: ...50 3 6 2 1 IE Browser s Settings Step1 Open Internet browser and click Tools tab and Internet Options Step2 1 Click Security 2 Click Custom Level 3 Click OK 2 3 1 ...

Страница 51: ...51 3 6 2 2 Configure and Use Web Camera Step4 Click Yes Step1 1 Open Internet browser 2 Input 192 168 1 1 in the address field Step3 1 Select Enable in the items 2 Click OK 2 1 1 2 192 168 1 1 ...

Страница 52: ...Preview The following video screen will appear immediately After finishing the settings above you can access the video screen directly follow the steps 1 From outside WAN Input DN 11007 N s WAN IP webcam htm in the address field when you access from outside 2 From your local network LAN Input DN 11007 N s LAN IP webcam htm in the address field when you access from your local network for example 19...

Страница 53: ...load JAVA software from http www java com en download manual jsp http www java com en download manual jsp 1 USB Application Web Camera Click Web Camera in the USB Application menu 2 Web Camera Mode Select Java Preview and click Preview The following video screen will appear immediately 1 2 ...

Страница 54: ...t DN 11007 N s LAN IP showwebcam htm in the address field when you access from your local network for example 192 168 1 1 webcam htm Step4 1 IP Config Miscellaneous Select Miscellaneous in the IP Config menu 2 Enable Webcam Access from WAN Select Yes to enable Webcam Access from WAN 3 Apply Cancel Click Apply to save the settings If you want to clean the settings please click Cancel The functional...

Страница 55: ...tes Click OK 4 DN 11007 N ACTIVEX Web Camera Click DN 11007 N ACTIVEX Web Camera then the monitor screen will appear 3 6 2 4 Webcam Application from WAN with DDNS For more DDNS information please check on Chapter 4 DDNS Service 1 Open Internet browser Input your hostname webcam htm from WAN DN 11007 N webcam htm for example You will enter the DN 11007 N settings 2 USB Application Web Camera Click ...

Страница 56: ...se move your cursor on the active window and click the right or left buttons DN 11007 N webcam htm 2 One Right click to start recording and record as a avi file One more click to stop it 1 One Left click to get a picture and save as a bmp file SAVE Record 2 3 1 ...

Страница 57: ...am 4 Send to This field indicates the email address you like the alert email to send to 5 Email Server This field indicates the email server where you like to deliver your email to If you don t know we advise you to check with your email service provider 6 Subject When you get warning mails the field is shown as email subject 7 Attach Image File Select Yes to attach an image file to email at a tim...

Страница 58: ...el can take effect after click on Apply Notice If you select Yes users can use Printer from WAN On the contrary users only can use Printer from LAN WARNING Before connecting with your USB Printer to DN 11007 N please make sure that DN 11007 N is in Power Off condition Print Server Setup Select Print Server in the USB Application menu Follow the instructions to enter the Print Server page and finis...

Страница 59: ... will appear Please follow the instructions to configure this function 2 USB Printer Input the USB Printer Name 111 for example Description and Model in the blank fields 3 Apply Click Apply to save the settings If you want to clean the settings please click Cancel The functional button Cancel can take effect after click on Apply 3 6 3 2 The configuration on Windows platforms Please follow these st...

Страница 60: ...below to complete the printer configuration for Windows XP platform Step1 Go to desktop and click Start Printer and Faxes Step2 Double click Add a printer Step3 1 Select Create a new port 2 Select the Type of port Standard TCP IP Port 3 Click Next 1 2 3 ...

Страница 61: ...61 Step4 Click Next Step5 1 Input 192 168 1 1 in the IP Address field 2 Give this port a name Printer1 for example 3 Click Next Step6 1 Select Custom 2 Click Settings Printer1 1 3 2 1 2 ...

Страница 62: ...me as the USB Printer Name you set on Print Server setting page 4 Click OK Step8 Click Finish Step9 1 Select your printer s manufacturer HP for example 2 Select your printer s model HP LaserJet 2100 for example 3 If yours is not on the list please click Have Disk to get yours from CD or floppy disc 4 Click Next Printer1 1 2 4 3 111 2 3 4 1 ...

Страница 63: ...ly a name for this printer automatically or you can change it 2 Click Next Step11 1 Select Yes or No to print a test page or not 2 Click Next Step12 It shows you the printer settings that you have specified and then click Finish 1 2 1 2 ...

Страница 64: ...ollow the steps below to complete the printer configuration on Windows 2000 platform Step1 Go to desktop and click Start Settings Printers Step2 Double click Add Printer Step13 Click OK If the test page isn t printed out click Troubleshoot ...

Страница 65: ...65 Step3 Click Next Step4 Click Next Step5 1 Select Create a new port 2 Select the Type Standard TCP IP Port 3 Click Next Step6 Click Next 1 2 3 ...

Страница 66: ...e 3 Click Next Step8 1 Select Custom 2 Click Settings Step9 1 The information you had input will be shown on this screen 2 Select LPR 3 Input Queue Name 111 for example which must be the same as the USB Printer Name that you set on Print Server setting page Printer1 Printer1 1 2 1 2 4 3 1 2 1 3 1 ...

Страница 67: ...h Step12 1 Select your printer s manufacturer Hewlett Packard for example 2 Select your printer s model HP deskjet 3500 for example 3 If yours is not on the list please click Have Disk to get yours from CD or floppy disc 4 Click Next 4 3 2 1 ...

Страница 68: ...isting driver for example 2 Click Next Step14 1 Your computer will supply a name for this printer automatically or you can change it 2 Select Yes or No to use this printer as the default printer 3 Click Next Step15 1 Select Share as and Input a share name hpdeskje for example if you want to share this printer to other users 2 1 1 2 3 1 2 ...

Страница 69: ...o print a test page or not 2 Click Next Step16 1 You can describe the location and capabilities of this printer or ignore it 2 Click Next Step18 It shows you the printer settings that you have specified and then click Finish 1 2 1 2 ...

Страница 70: ...rinter to the client computer with windows98 or 98SE This Setting is separated into two parts The first part is Printer Settings on Windows 2000 The other part is Printer Settings on Windows 98 or 98SE 3 6 3 2 3 1 Printer Settings on Windows 2000 We suppose that the printer device has been installed and set on Windows 2000 Step19 Click OK If the test page isn t printed out click Troubleshoot Step1...

Страница 71: ... pull down menu Select Sharing Step5 1 Select an operation system platform you want to share 2 Click OK Step4 1 In Shared as field The default printer model HP3535 for example will appear 2 Click Additional Drivers 1 2 2 1 2 2 ...

Страница 72: ...lick Browse to find the path where the file is located 2 Click OK Step7 Click Apply to finish the settings Step8 Go to desktop and click Start Settings Control Panel Step9 Double click Administrative Tools 1 2 2 2 ...

Страница 73: ... Move your cursor on the item Users 2 Click the right button of your mouse Select New User Step12 1 Input your client computer s name 111 for example 2 Select Password never expires 3 Click Create to save Windows 2000 printer settings 1 2 2 2 111 1 2 3 ...

Страница 74: ...74 3 6 3 2 3 2 Printer Settings on Windows 98 or 98SE Step1 Go to desktop and click Start Settings Printers Step2 Double click Add Printer Step3 Click Next ...

Страница 75: ...75 Step4 1 Select Network printer 2 Click Next Step5 1 Click Browse Step6 1 Find the printer that is attached to the computer hp3535 for example 2 Click OK 1 2 2 1 ...

Страница 76: ...ample will appear automatically 2 Click Next Step8 1 The Printer name hp deskjet 3500 series for example will be showed automatically 2 Click Next Step9 1 Select Yes to print a test page 2 Click Finish to complete Windows 98 or 98SE printer settings 2 1 2 1 2 1 ...

Страница 77: ...as USB Web Camera USB Printer or USB HDD corresponds with DN 11007 N please check with your product provider Step10 The client computer with Windows 98 or 98SE will copy the print driver from the print server computer with Windows 2000 Step11 The client computer with Windows 98 or 98SE will appear a test page screen and then the sharing printer will print a test page It means that the client compu...

Страница 78: ... the settings you want Tips are given when you move your cursor over each item System Setup The System Setup contains 6 functional items Change User Setting Router Time Setup Firmware Upgrade Setting Management Factory Default and Wake On LAN Configuring these settings will give you much more control over DN 11007 N Tips are given when you move your cursor over each item ...

Страница 79: ...pply Cancel Click Apply to Confirm above settings and save your username and password If you forget the username and password please reset DN 11007 N to its factory settings If you want to clean the settings please click Cancel The functional button Cancel can take effect after click on Apply Select Router Time Setup in the System Setup menu Follow the instructions to enter the Router Time Setup p...

Страница 80: ...lect Enable the summer and winter time will be adjusted automatically If you select Disable DN 11007 N won t do anything 5 User Setup If you prefer getting time manually please select User Setup and input time information in the blank fields or click Get Time From Local Computer to get time from your computer 6 Apply Cancel Click Apply to save the settings If you want to clean the settings please ...

Страница 81: ...u selected Firmware Upgrade 2 Firmware Version Your Firmware Version 2 00 for example will be shown automatically 3 New Firmware File Click Browse to get the New Firmware File 4 Upload Click Upload to upgrade your DN 11007 N s Firmware to a new version 1 2 4 Select Firmware Upgrade in the System Setup menu Follow the instructions to enter the Firmware Upgrade page to configure the settings you wan...

Страница 82: ...tings are missing 2 New Setting File If you want to get your original settings back please click Browse to find out the path and the file you saved 3 Upload Click Upload to restore the original setting value It will take a few seconds The system will reboot automatically Select Setting Management in the System Setup menu Follow the instructions to enter the Setting Management page to configure the...

Страница 83: ...gs from the Factory Default page Click Restore and it takes about 15 seconds to restore When it s done the DN 11007 N s Login Screen page will appear Select Factory Default in the System Setup menu Follow the instructions to enter the Factory Default page to configure the settings you want Tips are given when you move your cursor over each item ...

Страница 84: ...ddress Input a computer s MAC address that you want to wake up 2 Wake Up Cancel Click Wake up to wake up a remote computer Click Cancel to clear the above settings and restore the settings in effect Select Wake On LAN in the System Setup menu Follow the instructions to enter the Wake On LAN page to configure the settings you want Tips are given when you move your cursor over each item 2 1 ...

Страница 85: ...Status page to configure the settings you want Tips are given when you move your cursor over each item Status Log It contains three functional items Status DHCP Leases and System Log This section displays a summary of Internet settings If you can t go online please check with the WAN IP address information here Follow the instructions to configure your settings Tips are given when you move your cu...

Страница 86: ...rrent WAN IP 3 Subnet Mask It means the current subnet mask 4 Default Gateway It means the current default gateway 5 DNS Servers It means the current DNS Server 6 Mac Address It means the current Mac Address of WAN interface 7 Connection Status It means the current connection status 1 2 3 2 2 4 2 6 2 7 2 5 2 ...

Страница 87: ...Mac Address It means the current Mac Address of LAN Interface 4 Printer Model It means the default printer model 5 Printer Name It means the default printer name 6 Status It means the current status of the printer 7 Refresh Click Refresh to renew the information of this setting page 1 2 2 3 4 3 5 6 7 ...

Страница 88: ...ow to configure Steps 1 Leases Table It means the DHCP Leases of LAN Interface 2 Refresh Click Refresh to renew the information of this setting page Select DHCP in the Status Log menu Follow the instructions to enter the DHCP Leases page to configure the settings you want Tips are given when you move your cursor over each item 1 2 2 ...

Страница 89: ...e table is full of logs 3 Email Address Input an email address where you would like to send the log 4 Email Server Input your mail server address 5 Save Mail Now Refresh Click Save to store your setting or click Refresh to renew the logs You can click Mail Now to send the log to the address you set Select System Log in the Status Log menu Follow the instructions to enter the System Log page to con...

Страница 90: ...Menu Tips are given when you move your cursor over each item Logout When you click Logout the DN 11007 N setting page will change to the Login Screen page Follow the instructions Step2 After selecting logout you will return to the Login Screen page ...

Страница 91: ...After setting the Router your hostname would correspond to your dynamic IP You just use the hostname instead of your static IP Moreover via the hostname application it could be easier to use your webcam remotely Please follow the steps to complete your settings Step2 Click Sign Up Now http www dyndns org Step1 Make sure you can access Internet and input http www dyndns org ...

Страница 92: ...click Create Account Step4 When you got this account created message close it and check your mailbox You would get a mail from DynDNS website Step5 1 Click the mail 2 Click the address https www dyndns org account confirm XDyXaZ24vQi hhcd Wx0230 2 1 ...

Страница 93: ...93 Step6 Click login Step7 Click the Add Host of Dynamic DNS Step8 1 Input the name created in step2 2 Select one of the tails you like 3 Then click Add Host Step9 Your hostname have been created 2 3 1 ...

Страница 94: ... Access From WAN Note If you select JAVA mode preview please download JAVA software from http www java com en download manual jsp 4 Q I don t know my WAN IP A There are two ways to know Way 1 Check with your Internet Service Provider Way 2 Check the setting screen of DN 11007 N Click Status Log to select Status in the Main Menu WAN IP is shown on the WAN interface 5 Q Why can t my printer work A F...

Страница 95: ...1007 N A It s possible that your Internet protocol TCP IP was set to use the follow IP address Please do as the following steps Start Settings Network and Dial up Connections double click Internet Protocol TCP IP select obtain IP address automatically click OK Then open Internet browser for testing If you still can t go online please test something else below l Verify network configuration by ensu...

Страница 96: ...o purchase a bridge to place it in the middle of the rout in order to keep the quality of transmitting signal Out of this condition you would better test something else l Verify network traffic does not exceed 37 of bandwidth l Check to see that the network does not exceed 10 broadcast messages per second l Verify network topology and configuration 15 Q How do I upgrade the firmware of DN 11007 N ...

Страница 97: ...ult gateway s IP address When the device sends out an IP packet if the destination is not on the same network the device has to send the packet to its default gateway which will then send it out towards the destination Device name Also known as DHCP client ID or network name Sometimes it s provided by an ISP when it uses DHCP to assign addresses DHCP Dynamic Host Configuration Protocol Dynamic Hos...

Страница 98: ... Hybrid fiber coaxial cable network Older CATV systems were provisioned using only coaxial cable Modern systems use fiber transport from the head end to an optical node located in the neighborhood to reduce system noise Coaxial cable runs from the node to the subscriber The fiber plant is generally a star configuration with all optical node fibers terminating at a head end The coaxial cable part o...

Страница 99: ...ce Provider ISPs can server IP addresses dynamically or assign static fixed IP addresses to individual computers ISP Gateway Address The ISP Gateway Address is an IP address for the Internet router This address is only required when using a cable or DSL modem LAN Local Area Network A LAN is a group of computers and devices connected together in a relatively small area such as a house or an office ...

Страница 100: ...device Protocol A set of rules governing the transmission of data In order for a data transmission to work both ends of the connection have to follow the rules of the protocol RIP Routing Information Protocol The original TCP IP routing protocol There are two versions of RIP Version I and version II TCP IP Transmission Control Protocol Internet Protocol This is the standard protocol for data trans...

Отзывы: