DIGITAL YACHT
WL40
You should now plug the WL400 in to a spare USB port on the PC and the driver should automatically install. Proceed to
the “Operating WL400 on Windows XP” section.
Operating WL400 on Windows Vista and Windows 7
It is always best to turn off (disable) the internal wireless adaptor on your laptop before using the WL400. The exact
method to do this, varies from PC to PC, but some laptops have a dedicated button in or around the keyboard area or a
special keyboard combination e.g. pressing the Fn + F8 keys.
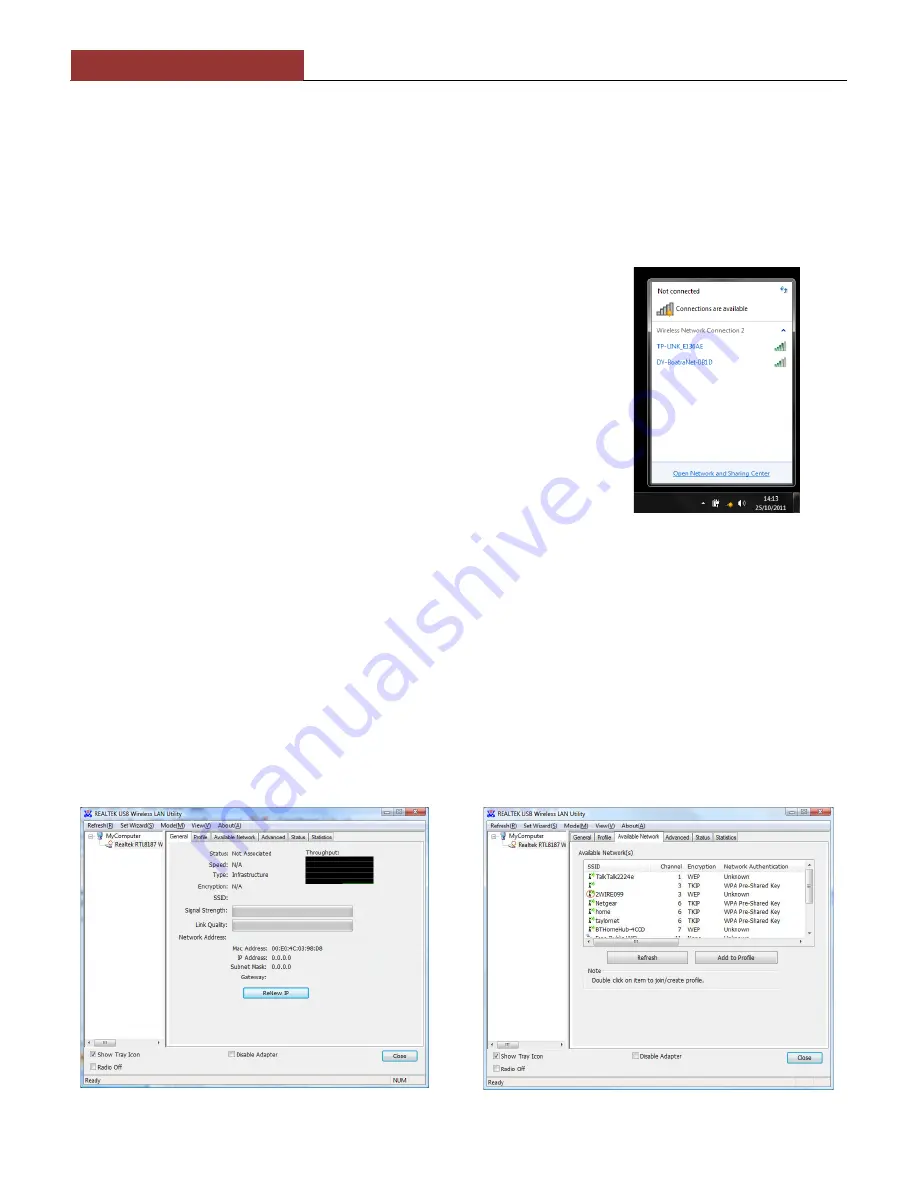
Click on the Wireless Networks icon in the task bar (lower right hand
side of the screen) and a list of the availab
(hotspots) will be displayed. Your laptops internal wireless adaptor is
usually named “Wireless Network Connection” and the WL400 will
automatically be named “Wireless Network Connect
shown in Figure 17. This shows that the WL400 is working correctly. It
is possible to rename this connection to something more meaningful
by going in to the “Network and Sharing Center” and renaming the
Network Adaptor to “WL400” or similar, so that you can be certain of
which wireless adaptor you are using.
Click on the wireless network you wish to connect to and click the
“Connect” button that will appear. You may be asked to enter a
password or confirm if the network is a Public, Work or Private
network (to set security levels) and then the wireless connection
should be made and you will be able to connect to the internet.
Operating WL400 on Windows XP
It is always best to turn off (disable) the internal wireless adaptor on your laptop before using the WL400. The exact
method to do this, varies from PC to PC, but some laptops have a dedicated button in or around the keyboard area or a
special keyboard combination e.g. pressing the Fn + F8 keys.
To connect to a wireless network, you must run the “Realtek USB Wireless LAN Utili
programs listed in the Start>All Programs menu. The first time you run this program, you will see t
Figure 18 which shows that you are not connected to a wireless network.
Click on the “Available Network” tab and the window shown in Figure 19
networks that the WL400 can detect. Select the wireless network that you wish to connect to and click the “Add to Profile”
button.
Figure 18
WL400 Quick Start Guide
You should now plug the WL400 in to a spare USB port on the PC and the driver should automatically install. Proceed to
the “Operating WL400 on Windows XP” section.
Operating WL400 on Windows Vista and Windows 7
It is always best to turn off (disable) the internal wireless adaptor on your laptop before using the WL400. The exact
but some laptops have a dedicated button in or around the keyboard area or a
special keyboard combination e.g. pressing the Fn + F8 keys.
Click on the Wireless Networks icon in the task bar (lower right hand
side of the screen) and a list of the available wireless networks
(hotspots) will be displayed. Your laptops internal wireless adaptor is
usually named “Wireless Network Connection” and the WL400 will
automatically be named “Wireless Network Connection 2”, as is
e WL400 is working correctly. It
is possible to rename this connection to something more meaningful
by going in to the “Network and Sharing Center” and renaming the
Network Adaptor to “WL400” or similar, so that you can be certain of
Click on the wireless network you wish to connect to and click the
“Connect” button that will appear. You may be asked to enter a
password or confirm if the network is a Public, Work or Private
and then the wireless connection
should be made and you will be able to connect to the internet.
Operating WL400 on Windows XP
It is always best to turn off (disable) the internal wireless adaptor on your laptop before using the WL400. The exact
to do this, varies from PC to PC, but some laptops have a dedicated button in or around the keyboard area or a
special keyboard combination e.g. pressing the Fn + F8 keys.
To connect to a wireless network, you must run the “Realtek USB Wireless LAN Utility” which will now be one of the
programs listed in the Start>All Programs menu. The first time you run this program, you will see t
which shows that you are not connected to a wireless network.
nd the window shown in Figure 19 will appear which lists all of the available wireless
networks that the WL400 can detect. Select the wireless network that you wish to connect to and click the “Add to Profile”
Figure 19
You should now plug the WL400 in to a spare USB port on the PC and the driver should automatically install. Proceed to
It is always best to turn off (disable) the internal wireless adaptor on your laptop before using the WL400. The exact
but some laptops have a dedicated button in or around the keyboard area or a
It is always best to turn off (disable) the internal wireless adaptor on your laptop before using the WL400. The exact
to do this, varies from PC to PC, but some laptops have a dedicated button in or around the keyboard area or a
ty” which will now be one of the
programs listed in the Start>All Programs menu. The first time you run this program, you will see the window displayed in
will appear which lists all of the available wireless
networks that the WL400 can detect. Select the wireless network that you wish to connect to and click the “Add to Profile”
Figure 19
Figure 17


