DIGITAL YACHT iKConnect Скачать руководство пользователя страница 6

The password to login is 

“ikconnect” and we 

recommend that you do not change this

 in the Administration page. Once 

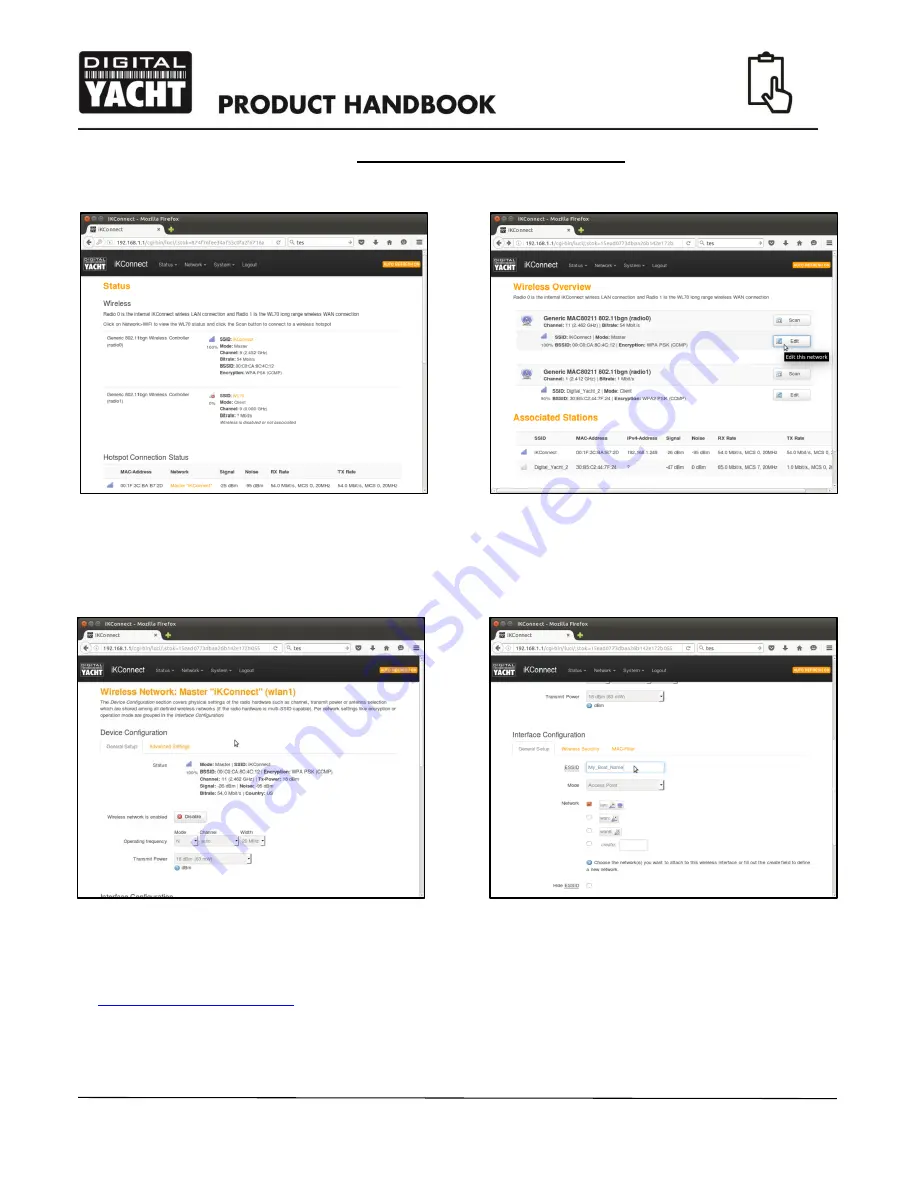
logged in you should see the Status page as shown in Fig 2. To change the SSID and wireless Password of the 
iKConnect wireless network, 

go to the “WiFi” page shown in Fig 3, by selecting the “

Network>WiFi

 menu option. 

In the Wireless Overview screen you will either see just a single wireless network (Radio 0) or two wireless networks if 
you have a WL70 plugged in to the iKConnect USB port. The internal iKConnect wireless network is always listed first and 
this is the one that you want to change, so click the “Edit” button for the iKConnect network. You should now be taken to 
the iKConnect network setting page shown in Fig 4. 

Scroll down the page to the Interface Configuration section and change the SSID from “iKConnect” to the name of your 
boat or some other suitable wireless network name. Please avoid the use of spaces (use _ symbol) and any other special 
characters that might cause problems with some operating systems. For more information on SSID selection, please read 
an 

article about SSIDs on our blog

Once you have changed the SSID, click on the “Wireless Security” tab in the Interface Configuration section and change 
the password. You can click on the two green arrow icon to the right of the password box, to display the actual characters 
rather than the hidden asterisks. 

Figure 2


Figure 3


Figure 4


Figure 5

Содержание iKConnect

Страница 1: ...iKConnect Wireless Router...

Страница 2: ...at 5 cable to connect between the iKConnect and your Ethernet network A connection to the boat s 12v DC supply where the unit is to be installed Two suitable pan head screws for fixing the iKConnect i...

Страница 3: ...om the boat s supply Power is connected to the iKConnect via the supplied 2 1mm DC Jack Plug cable assembly The cable has two wires the Red wire is the positive connection and the Black wire is the ne...

Страница 4: ...ween the network device s Ethernet socket and the iKConnect s RJ 45 LAN Port socket Installation Step 5 Now that we have all of the connections made we can apply power to the iKConnect As the iKConnec...

Страница 5: ...arina hotspots and we do not recommend changing them unless you are experienced with configuring PC networks and wireless routers We do however recommend that you change the default wireless Password...

Страница 6: ...k the Edit button for the iKConnect network You should now be taken to the iKConnect network setting page shown in Fig 4 Scroll down the page to the Interface Configuration section and change the SSID...

Страница 7: ...ablet or Computer that is connected to the iKConnect by opening the browser on the device and typing the iKConnect IP address 192 168 1 1 in to the browser s address bar You will then see the iKConnec...

Страница 8: ...URL in to your browser s address bar You may find that you are redirected to the Welcome Register Login type page of the marina hotspot where you will need to follow the instructions register type in...

Страница 9: ...Connect to its factory defaults Apply power to iKConnect and allow 30 seconds for it to fully boot up Now turn the unit over and locate the Reset switch see Fig 13 With the end of a pencil ball point...

Отзывы: