background image

Cabling

Installa

tion -

Power

Two Options

Use 

a

 PoE-e

na

bled swtich to connect data and power through a single cable and begin viewing and recording images instantly.

A non-PoE switch will require an adaptor for power transmission.

Ethernet cable

Ethernet cable

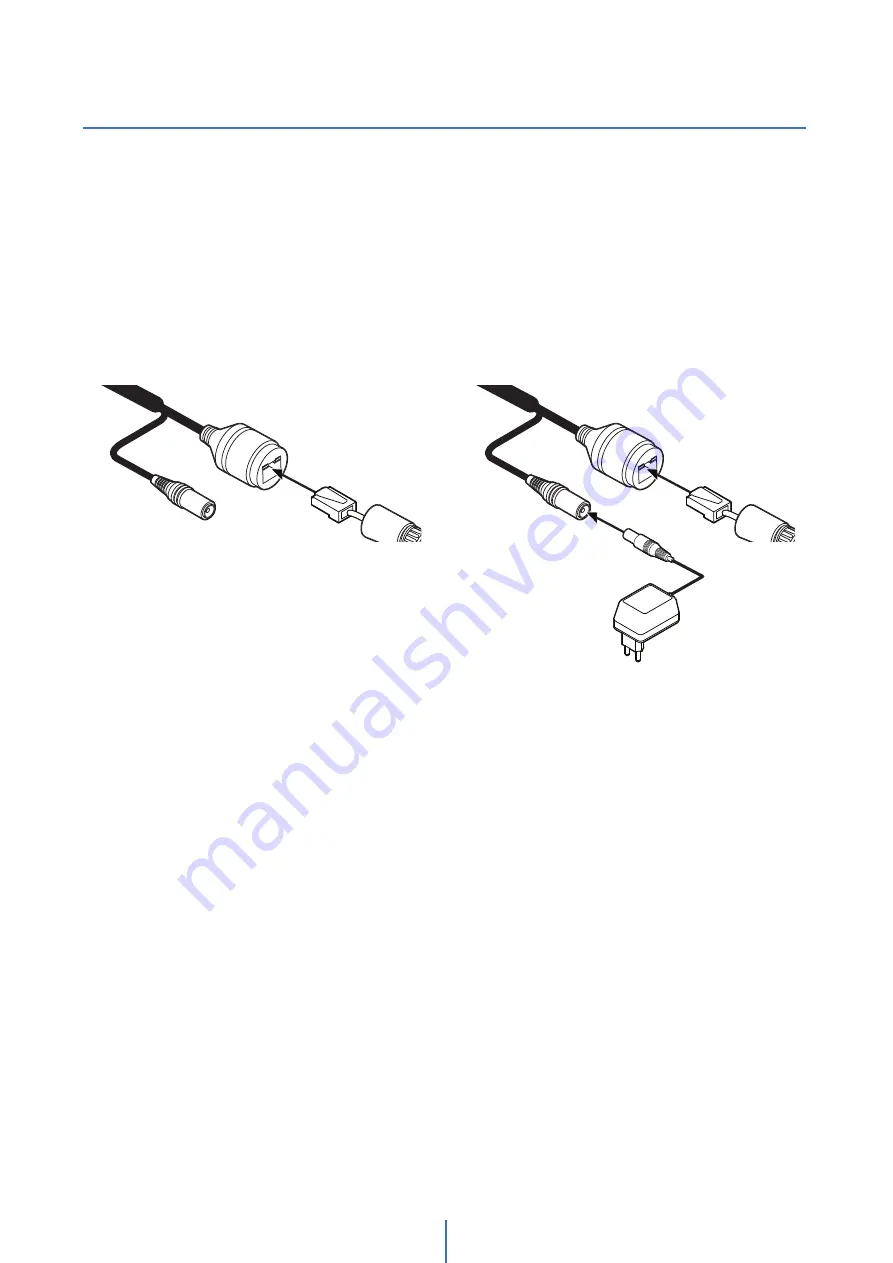
2. Using a Non-PoE Switch

1. Using a PoE-Enabled Switch

The Camera is PoE-compliant, allowing transmission of

power and data via a single Ethernet cable.

PoE eliminates the need for the different cables used to

power, record, or control the camera. Follow the illustration

below to connect the camera to a PoE-enabled switch using

an Ethernet cable.

If a PoE-enabled switch is not used, use a power adaptor

for power transmission and non-PoE switch for data

transmission.

Follow the illustrations below to connect the camera

without a PoE-enabled Switch.

11

Содержание MEGApix FLEX DWC-PVX16W

Страница 1: ...Before installing and using the camera please read this manual carefully Be sure to keep it handy for future reference MEGApix Flex 16MP user configurable multi sensor vandal dome IP camera DWC PVX16W DWC PVX16W2 DWC PVX16W4 ...

Страница 2: ...mera Doing so may cause personal injury due to fire electric shock or falling objects Do not install the unit in humid dusty or sooty locations Doing so may cause fire or electric shock If any unusual smells or smoke come from the unit stop using the product Immediately disconnect the power sorce and contact the service center Continued use in such a condition may cause fire or electric shock If t...

Страница 3: ...aundry tub in a wet basement near a swimming pool etc 6 Clean only with dry cloth Unplug this product from the wall outlet before cleaning Do not use liquid cleaners 7 Do not block any ventilation openings Install in accordance with the manufacturer s instructions Slots and openings in the cabinet are provided for ventilation to ensure reliable operation of the product and to protect it from over ...

Страница 4: ...mera 21 Web Viewer Basic Screen 22 Disassembling the Camera 8 Camera Settings VIDEO AUDIO SETUP Video Configuration 23 OSD Configuration 27 Region of Interest Configuration 28 Audio Configuration 29 Privacy Mask Configuration 30 CAMERA SETUP Camera Image Adjustment 31 Camera Exposure Settings 32 Camera Day Night Settings 33 Camera Backlight Settings 34 Camera White Balance 35 Camera Image Enhancem...

Страница 5: ...SETUP Event Rules Configuration 52 Motion Detection Configuration 54 Temperature 55 Alarm Configuration 56 RECORD SETUP Record Configuration 57 Recording List 59 Recording Video 60 Storage Configuration 61 SECURTY SETUP IP Address Filter Configuration 63 RTSP Authentication Configuration 64 IEEE 802 1X Configuration 65 HTTPS Configuration 66 Certificates Configuration 67 Service Configuration 68 S...

Страница 6: ...oduction Camera Body Camera sensor module block 4ea Screws and plastic anchors 4pcs Mounting template Hex Allen wrench Waterproof cap and gasket Moisture absorber 2pcs and absorber guide Quick set up guide Test monitor cable 6 ...

Страница 7: ...RJ 45 Connector Alarm in out Audio in out Video Select 2nd Video Factory Reset SD card slot DC power jack Reset button Test monitor select switch Test monitor cable slot Safety wire Magnetic track Sensor module block Base guide Dome cover 7 ...

Страница 8: ...ge to the right c Assembling the sensor module to the base guide upside down is impossible due to the interface socket locations d Tighten the 4 bolts to the sensor module block Sensor module block Before installing the camera detach the dome cover from the bottom case by using the hex Allen wrench provided Remove camera module s protective PEfoam Assemble the sensor module block with a lens to th...

Страница 9: ... maximum customization and fully adjustable views Template Sheet 1 2 3 4 Put the Lan cable into a then b will be assembled to a tightly As a final step c need to be assembled to b without making any space Before mounting camera to mounting surface remove the screw rubber stopper a b c Secure the dome cover to the camera s bottom case using the torx wrench Remove the protective film from the camera s...

Страница 10: ... of monitoring After attacing the camera to the magnetic board adjust the pan angle considering the direction to monitor Adjust the horizontal angle so that the image does not appear reversed during rotation Adjust the tilt angle to point in the direction you want to monitor How to adjust 1 180º configuration 3 Random configuration 2 Random configuration Please note that the camera module is made ...

Страница 11: ...ed Switch The Camera is PoE compliant allowing transmission of power and data via a single Ethernet cable PoE eliminates the need for the different cables used to power record or control the camera Follow the illustration below to connect the camera to a PoE enabled switch using an Ethernet cable If a PoE enabled switch is not used use a power adaptor for power transmission and non PoE switch for d...

Страница 12: ... 802 3at PoE 1 2 3 4 Audio Out supports only RTSP Back channel function It plans to make it available on the web later Alarm Output Alarm Input 5 6 DI DI DO DO WHITE YELLOW SKY BLUE GRAY DOT Audio Input Audio Output Power Network Alarm In Out 1 2 3 4 5 6 Alarm Output It connects to the alarm lights siren or lamps and it is activated according to the Setup menu setting Cable of the relay output dev...

Страница 13: ...t insert the SD memory card while it s upside down by force Otherwise it may damage the SD memory card Use the tweezers when inserting or picking out the SD card 2 Removing a SD Memory Card Gently press down on the exposed end of the memory card as shown in the diagram to eject the memory card from the slot Pressing too hard on the SD memory card can cause the card to shoot out uncontrollably from...

Страница 14: ...ork for all supported cameras and display the results in the tabel Allow up to 5 seconds for the IP Installer to find the camera on the network 4 You can press the Refresh List to search the network again or filter the search results by entering a value in the filter box 5 Check the box next to Display Camera Thumbnail to view a JPEG image of the camera s view next to the camera name on supported ...

Страница 15: ...ase install VLC to display live video 8 The IP setting can be set to STATIC at IP Installer or web viewer followed by Setup Network Network Settings 9 If the IP Camera is connected to a network which utilizes a router you must have Port Forwarding configured on your personal router to forward all ports to the IP address you have assigned the IP Camera 10 After configuring Port Forwarding on your rou...

Страница 16: ...r your IP Video Server on our DDNS website before you configure setup or install the IP Camera Even though your IP is not dynamic you will get benefit if you register to DDNS In this case just remember hostname dyndns com gate1 instead of complicated series of numbers like http 201 23 4 76 8078 For more details contact our Support Center To use a public DDNS called dyndns or no ip refer to the detai...

Страница 17: ...ettings received from your Internet Service Provider ISP Youmay need to refer to these IP addresses at a later time during the configuration Current TCP IP Settings IP Address Subnet Mask Default Gateway Primary DNS Server Secondary DNS Server Option Static Dynamic 2 You must determine whether the IP address is STATIC or DYNAMIC At this moment you are only concerned about the ISP Did they provide y...

Страница 18: ...you do with PC The IP address you assign must be unique to your network and match your network as well For information on how to choose a unique IP and match your network read the FAQ The IP address you assign must be a private IP For information on how to choose a private IP please read the FAQ This IP address must be the IP address of your router private or LAN side Use the same Default Gateway ...

Страница 19: ...er Use the assigned default gateway from your ISP Case C Static Fixed IP Dedicated line directly to the IP Camera Camera Phone Line or CATV Cable xDSL Modem ISP Provided Internet This is the same site you will register later to utilize our DDNS service You may select any number between 1025 60000 Case D Dynamic IP DSL Cable Modem Connected directly to the IP Camera Camera Public Line Gateway or Ro...

Страница 20: ...After 50 seconds close the configuration screen The view will display Trying to Reconnect If the ACTIVE light on the IP Camera has gone off and is now back on again flashing the IP Camera has rebooted After the system reboots completely remove the power supply from the unit and close Internet Explorer 3 Return your PC Laptop TCP IP properties to their original settings 4 Before installing the IP Came...

Страница 21: ...ng Internet Explorer and specifying the IP address and Web Port assigned to the IP Camera 6 Access your IP Camera via the Internet If you use Case B C 1 Open Internet Explorer 2 Type the IP of the IP Camera If you use Case A D 1 Open InternetExplorer 2 Visit the DDNSwebsite 3 Register the IP Camera 4 Give the DDNS server 10 minutes MAX to locate your IP Camera s IP information You may reboot the s...

Страница 22: ...ge on the live view screen User will see the delayed images as much as setup time Channel Select button Select a stream produced from the camera between Stream 1 3 to display it in the live view screen Refer the Setup Video Audio Video to setup the Video Stream If you select Viewer 1 to Viewer 4 Channel Select button is activated Below Menu is supported in accordance with models PTZ Control This c...

Страница 23: ...HT WHITE BALANCE IMAGE VIDEO Network STATUS NETWORK SETTING AUTO IP ONVIF UPNP DDNS FTP SMTP SNMP RTSP INFORMATION Trigger Action ACTION RULES IMAGE TRANSFER RELAY OUT Events EVENT RULES MOTION TEMPERATURE ALARM Record MANAGEMENT RECORD LIST STORAGE Security IP ADDRESS FILTER RTSP AUTHENTICATION IEEE 802 1x HTTPS CERTIFICATES SERVICE System INFORMATION FIRMWARE UPDATE DATE TIME DST USER MANAGEMENT...

Страница 24: ... Input the additional description about the selected channel Max 30 alphabets are allowed Including space For the description English Alphabets numbers and special characters _ can beused Resolution Select the video resolution Available resolution can be depends on the codec setup between the channels 4M 3M 1080p i 720p i SVGA VGA 4CIF CIF NTSC 2560 x 1440 2304 x 1296 1920 x 1080 1280 x 720 800 x ...

Страница 25: ... reproduction and additional video compression Baseline A simple profile with a low compression ratio The Baseline profile supports I frames and P frames Main An intermediate profile with a medium compression ratio The main profile supports I frames P frames and B frames High A complex profile with a high compression ratio The high profile supports I frames P frames and B frames Smart Bitrate Control Off...

Страница 26: ...f video stream is changed in this mode Therefore the frame rate of video is likely to be varying when network traffic is changing This category won t be appear if you select the codec Target Bitrate If Bitrate Control is set to be CBR you can set the Target Bitrate Extension Option Off You can not use the Extension Option SVC T On The H 264 SVC Scalable Video Coding is a video compression algorithm t...

Страница 27: ...elect the Video 1 Video 4 and Set the video setup Click apply to set the other video setting Date Time Display the current time User Text Output the TEXT entered by the user Support a maximum of 30 characters Click Apply to make above setting effective 27 ...

Страница 28: ... bandwidth VIN Source Select the Video 1 Video 4 and Set the video setup Click save to set the other video setting Stream Select the Stream Currently it supports only H 264 The function is not supported in MJPEG codec Activation The Region of interest can be enable or disable Quality Set the quality of the set area Click Save to save the current settings Click Cancel to return to the previous sett...

Страница 29: ...ation Codec Select the Audio Codec Currently it supports only codec G 711 Volume Select the Audio Volume from 0 to 10 Sample Rate Select the Audio Sample Rate Currently it supports only 8000 Hz Click Save to make above setting effective 29 ...

Страница 30: ...lect the Video 1 Video 4 and Set the video setup Click save to set the other video setting Activation The Privacy mask function can be enable or disable Area Select the Area1 Area16 and Set the privacy area Click Save to save the current settings Click Cancel to return to the previous setting Click Clear Area to delete the selected Area1 Area16 30 ...

Страница 31: ...l brightness of image can be adjusted to meet your preference Contrast Using this control contrast of image can be adjusted to meet your preference Saturation Using this control Saturation of image can be adjusted to meet your preference Hue Using this control Hue of image can be adjusted to meet your preference Click Save to save the current settings Click Cancel to return to the previous setting...

Страница 32: ...e way in which a camera determines the exposure Shutter Speed If this speed is faster the moving object can be photographed without the ghost effect However picture can be dark if there is no sufficient lighting Slow Shutter Level Slow shutter Level lets you adjust the amount of light striking the sensor and essentially determines when the video sensor sends out its batch of data for processing Ga...

Страница 33: ...on the image sensor is removed all the time The sensitivity will be enhanced in the dark light condition but the image is black and white Schedule In this mode Day Night mode is converted accordance with the scheduled time Color Level It is a level to change Night mode into Day mode when Day Night mode is Auto B W Level It is a level to change Day mode into Night mode when Day Night mode is Auto T...

Страница 34: ... Set the video setup Click save to set the other video setting WDR Wide Dynamic Range The WDR function can be enable or disable WDR Level Select the WDR level depending on the difference in brightness between the darkest and lightest part of an image Click Save to save the current settings Click Cancel to return to the previous setting Click Default to settings to the factory defaults 34 ...

Страница 35: ...on White Balance can be enable or disable White Balance Mode Select White Balance depending on the lighting conditions RGB Gain The R G B gain can be set only when the White Balance Mode is set to Manual Click Save to save the current settings Click Cancel to return to the previous setting Click Default to settings to the factory defaults 35 ...

Страница 36: ...g 3D Noise Reduction 3DNR function enables to suppress noise and retain good video quality in low light conditions Mirror Reverse the video from side to side Flip Reverse the video from up to down Click Save to save the current settings Click Cancel to return to the previous setting Click Default to settings to the factory defaults 36 ...

Страница 37: ...and Set the video setup Click save to set the other video setting Flicker This function Enable to enhance the flicker situation Click Save to save the current settings Click Cancel to return to the previous setting Click Default to settings to the factory defaults 37 ...

Страница 38: ...Setup Network Setup Network Status This menu will show you all the information of Network setting in the camera However you cannot change those here 38 ...

Страница 39: ...the Subnet Mask Format is same as the IP address Default Gateway Default the Gateway IP Address Format is same as the IP address Preferred DNS Server Define the DNS server IP address Format is same as the IP address Alternate DNS Server Define the Secondary DNS server IP address Format is same as the IP address HTTP Port The HTTP port can be set to 80 which default or in between 1025 to 60000 HTTPS ...

Страница 40: ...rk Setup Auto IP Settings General Setting Auto IP Settings function can be enable or disable Auto IP Settings Information It displays the unique id or Auto IP address Click Apply to make above setting effective 40 ...

Страница 41: ...authentication WS Usertoken Allows to access with WS User Token of ONVIF authentication WS Usertoken Digest Allows to access with WS User Token and Digest of ONVIF authentication Discovery Mode The discovery function can be enable or disable Click Apply to make above setting effective 41 ...

Страница 42: ...ngs General Setting UPNP function can be enable or disable Friendly Name Define the friendly name Support a maximum of 30 characters and special character can not be used _ can be used Click Apply to make above setting effective 42 ...

Страница 43: ... setup is completed by entering User Name and Password registered in that DDNS site DDNS Provider Site Address DynDNS www dyndns com No IP www no ip com If you setup DDNS properly the IP address of your camera will be updated automatically whenever IP address is changed or system is rebooted If IP updating to DDNS site is failed camera will keep retrying in 1min interval Click Apply to make above ...

Страница 44: ...th in FTP server to store video For the path name English Alphabets numbers and special characters _ can be used FTP Port Define the FTP Server Port If Port is not appropriate it is impossible to access to FTP Server User ID Define User ID to access to the FTP Server Fill out the correct User ID registered in the FTP Server Password Define Password to access to the FTPServer Fill out the correct Pass...

Страница 45: ... Fill out the correct User ID registered in the SMTP Server Password Define the Password to access to SMTP Server Fill out the correct Password registered in the SMTP Server E Mail Sender Define the e mail address of E Mail Sender It will be displayed as the sender when the camera sends an E mail E Mail Receiver Define the e mail address of E Mail Receiver It will be displayed as the Receiver when th...

Страница 46: ...Read or Read Write mode Activation It can be enable or disable selected mode Read Write name Define Read name and Write name Security Level Select one of no auth no priv auth no priv auth priv Authentication Algorithm Select MD5 or SHA as the authentication method Authentication Password The Authentication Password is an encryption for authentication and they are at least 8 digits and up to 30 digi...

Страница 47: ...ion is disconnected after the specified time out RTP Multicast Check RTP Multicast On Off To activate RTP Multicast 1 Click On button 2 Enter accessible RTP Multicast IP port for video stream control RTP packet TTL 3 Click Apply button It is possible to set each RTP Multicast for CH1 3 Click Apply to make above setting effective Click this button when completed setup each channels It shows RTSP Conne...

Страница 48: ...tion rules List It indicates the custom action rule information added to Action rules list Click Add to add custom action rules Click Modify to modify selected item from the action rules list Click Delete to delete selected item from the action rules list 48 ...

Страница 49: ...les Add Modify Name Define name of action rules Input text cannot be exceed limited 4 15 Action1 Action5 Select the action to take If the event occurs Click Save to save the current settings Click Cancel to return to the previous menu 49 ...

Страница 50: ...d by setting Image transfer rate and Pre Post alarm duration Descriptions Number of Image Define Number of image transferred per second Pre alarm Duration Define duration of image transfer before an event Post alarm Duration Define duration of image transfer after an event Click Apply to make above setting effective 50 ...

Страница 51: ...putsdependsonthecameramodel Mode Select the monostable bistable for relay mode Idle State Select whether the contact is normally opened or is closed Duration Relay out is operated during the setting time If bistable mode is selected this function is activation Click Apply to make above setting effective 51 ...

Страница 52: ...t Rules List It indicates the custom Event Rule information added to Event Rules list Click Add to add custom event rules Click Modify to modify selected item from the event rules list Click Delete to delete selected item from the event rules list 52 ...

Страница 53: ...ion detection network disconnection temperature alert sensor detection Click Cancel to return to the previous setting You need a event one more Rules Select the action rule defined in the Trigger Action Action rule menu Click Save to save the current settings Click Cancel to return to the previous setting 53 ...

Страница 54: ...k save to set the other video setting Area Set the motion detected area You can set up to four areas Activation Enable or Disable motion detection function Sensitivity Define the sensitivity of motion detection If High value is selected it will detect very small motion while it becomes relatively insensitive when Low value is selected Click Save to save the current settings Click Cancel to return t...

Страница 55: ...e Mode Select the either Fahrenheit and Celsius Threshold Define the temperature at which the event trigger is occurred Temperature It indicates the current temperature of the IP camera Click Apply to make above setting effective 55 ...

Страница 56: ...ut Device Setup Select input device type from OFF N O N C Operation OFF Ignore this Input sensor NO Thecontactisnormallyopenandclosedwhenactivated NC Thecontactisnormallyclosedandopenwhenactivated Click Apply to make above setting effective 56 ...

Страница 57: ...want to record video Click Save to save the current settings Recording List Display the information about the recording settings Record 0 4 Storage 1 Record 1 5 Storage 2 Record 2 6 Storage 3 Record 3 7 Storage 4 Click Modify to modify the selected item in the recording list 57 ...

Страница 58: ...tly only supports Ts Type Storage Select the storage type SD Card Disabled selection is not allowed Continous If continous mode is turned on Start the continuous recording without any other setting Pre Duration Define duration of recording before an event Post Duration Define duration of image transfer after an event Click Save to save the current settings Click Cancel to return to the previous se...

Страница 59: ...e Refresh button to refresh the records list Click Filter to view the filtered recorded video Recording List Display the information to the recording video Click Play to view the selected item in list of recorded video Click Remove to delete the selected item in list of recorded video Click Download to download the selected item in list of recorded video 59 ...

Страница 60: ...1 Recording Video Recording Video Viewer Play the recorded video RecordingVideoInformation Displaythe informationaboutthe recordedvideo Click Replay toviewtherecordedvideoagain Click Back to return to the previous menu 60 ...

Страница 61: ...Setup Record Setup Storage Configuration Display the SD card information mounted from device When you select the item in Storage list You can set the functions related to the SD card 61 ...

Страница 62: ...der than selected time Overwrite If it is set ON and remained space of SD card reach to less than 8MB new data will start to be overwritten on the oldest data However if it is set OFF and remained space of SD card reach to less than 8MB image recording will be stopped Unmount remove the SD card from the device Format Delete the all contents that stored in SD card Click Apply to make above setting ...

Страница 63: ...the recording IP filter type Click Apply to make above setting effective Filter IP Address Display the filtered IP address IP Address Define the IP address you want to apply the IP filter Click Add to add the ip address to the list Click Remove to remove the ip address selected in the list Click Remove All to remove all ip in the list 63 ...

Страница 64: ...Setup Security Setup RTSP Authentication Configuration RTSP Authentication RTSP Authentication can be enable or disable Click Apply to make above setting effective 64 ...

Страница 65: ...MD5 It does not require a certificate on the client side TLS It relies on client side and server side certificates to perform authentication EAPOL Version Select the EAPOL Version ID Type the ID to identify the client in the IEEE 802 1X authentication server Password Type the Password to identify the client in the IEEE 802 1X authentication server Verify Verify Password CA Certificate Select the C...

Страница 66: ...e Select an installed certificate If you can not select a certificate please install the certificate from the Security Certificates menu HTTPS connection Policy Select one of HTTP HTTPS HTTP and HTTPS depending on the connected user authority Click Apply to make above setting effective When HTTPS mode is chosen input https IP Address to connect to the camera 66 ...

Страница 67: ...ed certificate Delete Delete the selected certificate Create Certificate signing request This is the encoded data that contains the necessary information for issuing the certificate They must be filled in when creating the CSR Certificate Signing Request Install Certificate Install Certification CA Certificate It show the installed CA certificates Install CA Certificate Install Certification see the...

Страница 68: ... private key Certificate Name Enter a unique name to identify certificate Select File Choose certification file OK Request installing certificate Cancel Cancel install certificate and then back to certificates configuration Detail for Install CA Certification Certificate Name Enter a unique name to identify CA certificate Select File Choose CA certification file OK Request installing CA certificate Cancel Cance...

Страница 69: ...Setup Security Setup Service Configuration Telnet The Telnet function can be enable or disable Click Apply to make above setting effective 69 ...

Страница 70: ...Setup System Setup System Information System Capability information Device Name You can define the device name Click Apply to make above setting effective 70 ...

Страница 71: ...uploading will be displayed using Progress Bar If you assign the wrong file name an error massage will be shown Warning 1 Do not turn off the power of camera during the Firmware update Otherwise the system can be stuck to be unstable If updating is finished the system will be rebooted automatically 2 Please make sure to check the Notice shown on screen If firmware update is completed the camera will r...

Страница 72: ...orrect User ID registered in the FTP Server Password Define Password to access to the FTP Server Fill out the correct Password registered in the FTP Server FTP Upload Path Define a path in FTP server to store video For the path name English Alphabets numbers and special characters _ can beused Click Save to make above setting effective SAVE Save FTP information CANCEL Click Cancel to return to the pr...

Страница 73: ...mm dd or mm dd yy Current Date Time Shows the current date and time setting in the Camera Synchronize with my computer Set the date time using those of PC currently connected Setup manually Set the date time by typing manually Synchronize with time sever Time Zone NTP Choose time server available to connect to current camera Date Time will be updated automatically every hour when connected Click A...

Страница 74: ...cksforwardonehourfrom standardtime during thesummer months andbackagaininthefall inordertomakebetteruseofnaturaldaylight General Setting DST function can be enable or disable Date Time Settings Set the Start time and end time that the DST apply Click Apply to make above setting effective 74 ...

Страница 75: ...erator or Viewer Viewer Only monitoring is allowed Operator Most of the functions are allowed except Setup Administrator All functions are allowed The ID and Password are limited to 10 characters Click Apply to make above setting effective Click Cancel to return to the previous menu Modify Modify the information of the user accounts registered For admin account only Password function can be modified...

Страница 76: ...em Setup System Log Filter Select a date sort or type of log to filter the log Click the Refresh button to refresh the log list Click Filter to view the filtered log System Log List The filtered log is displayed 76 ...

Страница 77: ... factory defaults Return the setup to the factory default All Reset all Settings to the factory defaults Except Network Settings Except Network related settings reset all others to the factory default Click Apply to make above setting effective 77 ...

Страница 78: ...Setup System Setup Restart If you click the RESTART menu a message box will be shown to confirm Click the OK button to restart 78 ...

Страница 79: ...Setup System Setup System Open SourceLicense This menu will show you all the list of System Open Source License in the camera Open Source Name Version License 79 ...

Страница 80: ...ompt or Command Prompt to determine your IP address For information on how to do this please read the FAQ Start Start Control Panel Network and sharing center Manage network connections Select either Internet Protocol Ver 4 TCP IPv4 or Internet Protocol Ver 6 TCP IPv6 Click Properties Properties Select either Internet Protocol Ver 4 TCP IPv4 or Internet Protocol Ver 6 TCP IPv6 Click on Change adap...

Страница 81: ...ork and sharing center Manage network connections Select either Internet Protocol Ver 4 TCP IPv4 or Internet Protocol Ver 6 TCP IPv6 Click Properties Properties Select either Internet Protocol Ver 4 TCP IPv4 or Internet Protocol Ver 6 TCP IPv6 Click on Change adapter options in Ethernet Settings Network Internet Click Properties Select the Ethernet Right click and choose Properties 81 ...

Страница 82: ... 99 of the time the cable s connection to the unit is causing this problem Try using a different network cable or crossover cable for PCconnection only Try reinserting the cable if this still doesn t solve the problem call our Support Center 4 I can access the video server on my LAN but not from the Internet Verify that your router if applicable has port forwarding properly configured If accessing f...

Страница 83: ...Unit inches mm Dimension Specifications 7 5 192mm 3 3 84mm 83 ...

Страница 84: ...PM EST A purchase receipt or other proof of the date of the original purchase is required before warranty service is rendered This warranty only covers failures due to defects in materials and workmanship which arise during normal use This warranty does not cover damages which occurs in shipment or failures which are caused by products not supplied by the Warrantor or failures which result from ac...

Страница 85: ... do not allow the exclusion or limitation of incidental or consequential damages or limitations on how long an implied warranty lasts so the above exclusions or limitations may not apply to you This warranty gives you specific legal rights and you may also have other rights from vary from state to state If the problem is not handled to your satisfaction then write to the following address Digital ...

Страница 86: ... 4U 5BNQB 4BMFT 0GGJDF MPPNGJFME WF FSSJUPT BMJGPSOJB 64 1 9 XXX JHJUBM 8BUDIEPH DPN UFDIOJDBMTVQQPSU EXDD UW 5FDIOJDBM 4VQQPSU 1 64 BOBEB OUFSOBUJPOBM SFODI BOBEJBO 5FDIOJDBM 4VQQPSU PVST POEBZ SJEBZ BN UP QN BTUFSO 4UBOEBSE 5JNF ...

Отзывы: