Digital Watchdog DWC-MPH2W28TW Скачать руководство пользователя страница 50

49

Setup - Record Setup
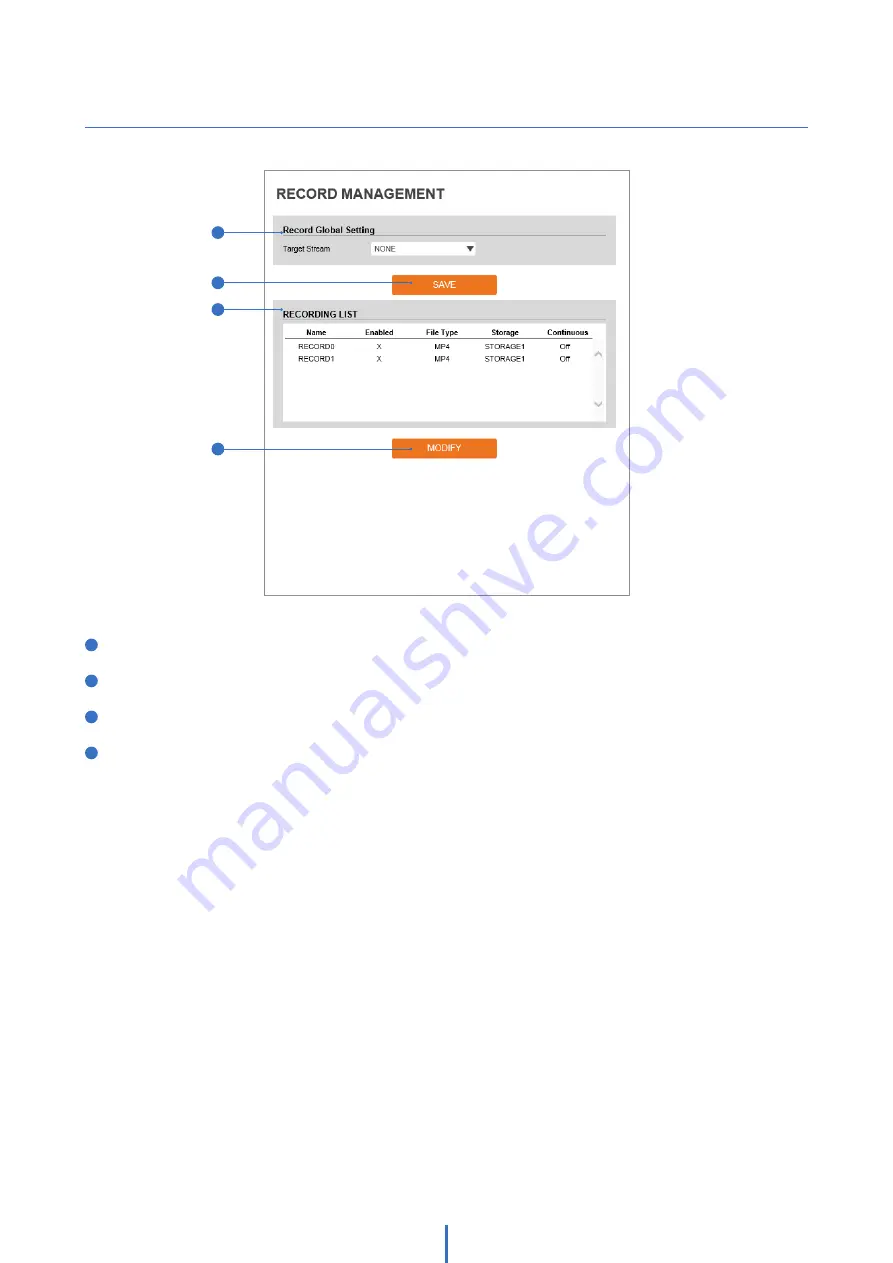
Record Management 

1

3

2

4

1


Target Stream -

 Select the channel you want to record video.

2

 Click ‘Save’ to save the current settings.

3


Recording List -

 Display the information about the recording settings.

4

 Click ‘Modify’ to modify the selected item in the recording list.

Содержание DWC-MPH2W28TW

Страница 1: ...camera please read this manual carefully Be sure to keep it handy for future reference MEGApix IVA 2 1MP 1080p pinhole ATM IP camera DWC MPH2W28TW IVA license pre loaded DWC MPPH2W28TW IVA license pr...

Страница 2: ...his product in any way 10 When cleaning do not spray water directly onto parts of the product Doing so may cause re or electric shock Precaution Operating Before using make sure the power supply and a...

Страница 3: ...ptacles and the point where they exit from the apparatus 11 Only use attachments accessories specified by the manufacturer 12 Use only with cart stand tripod bracket or table specified by the manufact...

Страница 4: ...ings 27 Settings Camera setup Video enhancement 28 Settings Network setup 29 Settings Trigger action setup 40 Settings Event setup 44 Settings Security setup 55 Settings System setup System informatio...

Страница 5: ...ock Ferrite Core Cable Clamps 3ea Surface Mount Bracket Anchor Blocks M4x25 5ea Tapping Screws TP1 M4x20 3ea Tapping Screws TS1 M4x25 5ea Screws TP2 M3x6 Ni 2ea Tapping Screws TP1 M3x20 2ea Pinhole Co...

Страница 6: ...5 Introduction Part Name Camera Terminal Ports Lan Port Reset Button DIN Connector Camera Port Side Plates SD Card Slot Power Adapter Port...

Страница 7: ...ng surface where the camera lens will be installed 2 Peel off one side of the double sided tape included with the camera and attach it to the flat surface of the pinhole cover Aligning the grooves on...

Страница 8: ...racket 1 Drill a hole on the mounting surface and insert an anchor block into the hole 2 Secure the pan tilt bracket to the mounting surface using the tapping screws M4x25 included and tighten it into...

Страница 9: ...the main unit with the mounting holes and secure it to the mounting surface using the included tapping screws Main Unit Installation Reset to the Factory Default Resetting the camera Press the reset...

Страница 10: ...sion Follow the illustrations below to connect the camera without a PoE enabled Switch Two Options Use a PoE enabled switch to connect data and power through a single cable and begin viewing and recor...

Страница 11: ...r is used for devices such as a PIR and a door window sensor C Ground 1 Output 0 to 5 VDC Max load 50mA 2 Camera connection Connect the camera module s cable to the main unit 3 Power When using a non...

Страница 12: ...camera s SD Card locate the SD card slot at the front of the main unit 2 Insert a class 10 SD card into the SD card slot by pressing the SD card into the slot until it clicks into position Do not ins...

Страница 13: ...sswords must have a minimum of 8 characters with at least 4 combinations of uppercase letters lowercase letters numbers and special characters Passwords cannot contain the user ID d Click change to ap...

Страница 14: ...log in again by pressing the RE LOGIN button Internet Explorer After three failed attempts or the cancel button is clicked you will experience a login fail Other Browsers After the Cancel button is c...

Страница 15: ...image frames will display live images depending on the set buffer time Users will see the delayed images based on the set delay time 4 Channel Select button Select a stream produced from the camera b...

Страница 16: ...ONVIF UPNP DDNS FTP SMTP SNMP HTTP ACTION RTSP Trigger Action ACTION RULES IMAGE TRANSFER RELAY OUT Events EVENT RULES MOTION DETECTION TEMPERATURE ALARM Record MANAGEMENT CONFIGURATION RECORD LIST V...

Страница 17: ...c the subcategories may be changed accordingly 3 Description Input the additional description of the selected channel Max 30 alphanumeric characters may be used including spaces 4 Resolution Select vi...

Страница 18: ...er number of P frames for this setting 7 Pro le The pro le de nes the subset of bitstream features in H 264 H 265 HEVC stream including color reproduction and additional video compression H 264 Main H...

Страница 19: ...VBR control mode The Target Quality of the video can be setup 11 Smart Core Off Smart RC 12 Extension Option 13 Click Apply to save all settings O You cannot use the Extension Option SVC T On The H 26...

Страница 20: ...Setup Video Audio Setup OSD Configuration 1 2 3 1 Date Time Display the current time 2 User Text Output the TEXT entered by the user Support a maximum of 30 characters 3 Click Apply to save all settin...

Страница 21: ...e qualities of movement in the scene without compromising the bandwidth 1 Stream Select the Stream Currently supports only H 264 H 265 HEVC The function is not supported in the MJPEG codec 2 Activatio...

Страница 22: ...t to hide on screen to protect privacy 1 Activation Enable or disable the privacy mask function 2 Area Select Area1 Area16 then draw the privacy mask in the video display 3 Click Save to save all sett...

Страница 23: ...appear 3 Contrast The higher the number the stronger the contrast between colors in the image will appear 4 Saturation The higher the number the more saturated the colors in the image will appear 5 H...

Страница 24: ...er Speed If this speed is faster the moving object can be photographed without the ghost effect However the picture can be dark if the lighting is insufficient 5 Slow Shutter Level Slow shutter Level...

Страница 25: ...rdance with the scheduled time 2 Color Level This level determines when the camera will change from Night mode B W to Day mode color while set to Auto The lower that this value is set the lower the li...

Страница 26: ...ting conditions may cause detail loss in the camera s view due to high contrast 1 WDR Wide Dynamic Range Enable or disable the feature 2 Click Save to save all changes Click Cancel to return to the pr...

Страница 27: ...depending on the lighting conditions 3 RGB Gain The R G B gain can be set only when the White Balance Mode is set to Manual 4 Click Save to save all settings Click Cancel to return to the previous set...

Страница 28: ...Reduce digital noise in low light conditions improving video quality 2 Mirror Reverse the video horizontally 3 Flip Reverse the video vertically 4 Click Save to save all settings Click Cancel to retur...

Страница 29: ...nvironmental situations where the camera s image appears to flicker change the Hz values to improve the camera s image 2 Click Save to save the current settings Click Cancel to return to the previous...

Страница 30: ...29 Setup Network Setup Network Status This menu displays the camera s current network settings To make any changes to the settings you must go to the appropriate network settings tab...

Страница 31: ...ng host within the network the IP address of the router that is most commonly used 5 Preferred DNS Server Address of the decentralized system used to translate alphabetic names into IP addresses 6 Alt...

Страница 32: ...etwork Setup Auto IP Settings 1 3 2 1 General Setting Enable or disable the Auto IP Settings 2 Auto IP Settings Information Display the camera s Unique ID and Auto IP address 3 Click Apply to save all...

Страница 33: ...thout ONVIF authentication WS Usertoken Allow access to the camera with WS User Token of ONVIF authentication WS Usertoken Digest Allow access to the camera with WS User Token and Digest of ONVIF auth...

Страница 34: ...3 1 General Setting Enable or disable the UPNP function 2 Friendly Name Define the friendly name Support a maximum of 30 characters and special characters Do not use Acceptable special characters incl...

Страница 35: ...sername and password registered in that DDNS site If you setup DDNS properly the IP address of your camera will be updated automatically whenever the IP address is changed or the system is rebooted If...

Страница 36: ...Path Define a path in FTP server to store video For the path name English Alphabet numbers and special characters _ can be used 4 FTP Port Define the FTP Server Port If the port is not appropriate it...

Страница 37: ...ll out the correct User ID registered in the SMTP Server 6 Password De ne the Password to access the SMTP Server Fill out the correct Password registered in the SMTP Server 7 E Mail Sender De ne the e...

Страница 38: ...ode 4 Activation Select mode to enable or disable 5 Read Write name De ne Read name and Write name 6 Security Level Select one of no auth no priv auth priv 7 Authentication Algorithm Select MD5 or SHA...

Страница 39: ...Server Enter the HTTP address of the receiving server This is the server that will receive the HTTP action notification from the camera PORT Enter the port number for the receiving server User ID Ente...

Страница 40: ...ervice to ensure data transfer performance 4 RTP Multicast Check RTP Multicast Start Stop To activate RTP Multicast 1 Click the On button 2 Enter accessible RTP Multicast IP the port for video stream...

Страница 41: ...ction rules List It indicates the custom action rule information added to the Action rules list 2 Click Add to add custom action rules Click Modify to modify selected items from the action rules list...

Страница 42: ...odify 1 2 3 1 Name Define the name of the action rules Input text cannot exceed the limit 3 15 characters 2 Action1 Action5 Select the action to take If the event occurs 3 Click Save to save all setti...

Страница 43: ...tion 2 Click Apply to save all settings Image Transfer Configuration Setup Trigger Action Setup Number of Images Pre alarm Duration Post alarm Duration Descriptions De ne the number of images transfer...

Страница 44: ...relay outputs available depends on the camera model 2 Mode Select the monostable bistable for relay mode 3 Idle State Select whether the contact is normally opened or is closed 4 Duration Relay out i...

Страница 45: ...nt Rules List It indicates the custom Event Rule information added to the Event Rules list 2 Click Add to add custom event rules Click Modify to modify selected items from the event rules list Click D...

Страница 46: ...o return to the previous setting You need at least one event 3 Rules Select the action to take when the rule is active Select from sending notifications to an SMTP server an FTPO server or start recor...

Страница 47: ...an set up to four areas 3 Activation Enable or Disable motion detection function 4 Sensitivity De ne the sensitivity of motion detection If a high value is selected it will detect very small motion wh...

Страница 48: ...perature 1 3 2 4 1 Mode Select Fahrenheit or Celsius 2 Threshold De ne the temperature at which the event trigger occurs 3 Temperature It indicates the current temperature of the IP camera 4 Click App...

Страница 49: ...NO NC Operation Ignore this input sensor The contact is normally open and closed when activated The contact is normally closed and open when activated 1 Input Device Setup Select input device type fr...

Страница 50: ...3 2 4 1 Target Stream Select the channel you want to record video 2 Click Save to save the current settings 3 Recording List Display the information about the recording settings 4 Click Modify to modi...

Страница 51: ...ently the camera supports MP4 file type 4 Storage Select the storage type SD Card Disabled selection is not allowed 5 Continuous If continuous mode is enabled the camera will start recording automatic...

Страница 52: ...t Display the information of the recorded video 5 Click Play to view the selected item in the list of the recorded video results Click Download to download the selected item When you click Download th...

Страница 53: ...rd Setup 1 2 3 1 Recording Video Viewer Play the recorded video 2 Recording Video Information Display information about the recorded video 3 Click Replay to view the recorded video again Click Back to...

Страница 54: ...53 Storage Configuration Setup Record Setup Display the SD card information mounted on the device Select an item from the Storage List to configure its related functions...

Страница 55: ...stored images older than the selected time 3 Overwrite If ON is selected once the SD card has less than 8MB storage available new data will start to overwrite the oldest data If OFF is selected once t...

Страница 56: ...ion 2 IP Filter Type Select the recording IP filter type 3 Click Apply to save all settings 4 Filter IP Address Display the filtered IP address 5 IP Address Define the IP address you want to apply the...

Страница 57: ...56 Setup Security Setup RTSP Authentication Configuration 1 2 1 RTSP Authentication Enable or disable the RTSP authentication 2 Click Apply to save all settings...

Страница 58: ...de TTLS MD5 It does not require a certificate on the client side TLS It relies on client side and server side certificates to perform authentication 3 EAPOL Version Select the EAPOL Version 4 ID Type...

Страница 59: ...If you cannot select a certi cate please install the certi cate from the Security Certi cates menu 2 HTTPS connection Policy Select one of HTTP HTTPS HTTP and HTTPS depending on the connected web ONVI...

Страница 60: ...selected certificate 4 Delete Delete the selected certificate 5 Create a Certificate signing request This is the encoded data that contains the necessary information for issuing the certificate They m...

Страница 61: ...rivate key 3 Certi cate Name Enter a unique name to identify a certi cate 4 Select File Choose the certi cation le 5 OK Request installing a certi cate 6 Cancel Cancel install certi cate and then back...

Страница 62: ...Con guration Setup Security Setup 1 2 1 Auto Lock Enable or disable the function When enabled the system will lock itself for five 5 minutes after three 3 failed login attempts 2 Click Apply to save...

Страница 63: ...Setup System Setup System Information 1 2 3 System Capability information 1 Device Name You can define the device name 2 Location You can define the device s location 3 Click Apply to save all settin...

Страница 64: ...after inspection 1 Shows Uptime SD card NAND EEPROM Audio chip Important file system and NTP Status Warning If the camera is abnormally terminated a download button will appear on the diagnostics page...

Страница 65: ...another camera Check the box next to Upload Enter the backup key for the configuration backup Click Select File to locate the configuration backup file and select it on your computer The file name and...

Страница 66: ...of uploading will be displayed using Progress Bar If you assign the wrong le name an error message will be shown Warning 1 Do not turn off the power to the camera during the firmware update Interrupt...

Страница 67: ...time format yy mm dd or mm dd yy 3 Current Date and Time Current date and time setting in the Camera 4 Synchronize with my computer Set the date time using those of the PC currently connected 5 Setup...

Страница 68: ...locks forward one hour from standard time during the summer months and back again in the fall to make better use of natural daylight 1 General Setting Enable or disable the DST function 2 Date and Tim...

Страница 69: ...us menu 3 Modify Modify the information of the user accounts registered For the admin account only the password can be modi ed 4 Delete Delete the selected user account The admin account cannot be del...

Страница 70: ...2 1 Filter Select a date time sort or type of log to lter the log 2 Click the Refresh button to refresh the log list Click Filter to view the ltered log Click Backup to back up the ltered log 3 System...

Страница 71: ...actory defaults Return the setup to the factory default 2 Click Apply to save all settings All Reset all Settings to the factory defaults Except Network Settings and User Settings Reset all camera set...

Страница 72: ...71 Setup System Setup Restart If you click the RESTART menu a message box will be shown to con rm Click the OK button to restart...

Страница 73: ...72 System Open Source License Setup System Setup This menu shows a list of all the System Open Source License information in the camera including Open Source Name Version License etc...

Страница 74: ...plug in You may need to remove some plug ins to have enough storage for a new plug in 5 Upload Plug In Once a new plug in file is selected click the UPLOAD PLUG IN button to start the update The Progr...

Страница 75: ...ce 7 Install VLC to display live video 8 The camera s IP address settings can be set to STATIC from the DW IP Finder or the camera s web viewer by going to Setup Network Network Settings 9 If the IP c...

Страница 76: ...te before you con gure setup or install the IP Camera Even though your IP is not dynamic you will benefit by registering your device with a DDNS service In this case just remember hostname dyndns com...

Страница 77: ...t a STATIC IP address for the camera 3 Con gure your IP Camera s TCP IP settings for network connectivity by selecting Setup from the main interface and selecting TCP IP located on the left of the set...

Страница 78: ...n on how to choose a unique IP and match your network read the FAQ i The IP address you assign must be a private IP For information on how to choose a private IP please read the FAQ i You must use the...

Страница 79: ...CP IP properties 1 Network Type DYNAMIC 2 DDNS Server Use the DDNS server 3 Web Port 80 Camera Gateway or Router at ISP Public Line Internet i To connect the IP Camera directly to a modem power down a...

Страница 80: ...lay Trying to Reconnect If the ACTIVE light on the IP Camera has gone o and is now back on again ashing the IP Camera has rebooted After the system reboots completely remove the power supply from the...

Страница 81: ...web port assigned to the IP camera 6 Access your IP camera via the Internet If you use cases B C 1 Open Internet Explorer 2 Type the address of the IP camera 3 If you use a router enter the routers s...

Страница 82: ...nt IP address subnet mask default gateway and DNS servers 7 I can t connect In the case of a connection failure Modem Reboot Modem Reboot Finished Router Reboot Router Reboot Finished IP Camera Reboot...

Страница 83: ...82 Specifications Dimensions Unit inches mm 5 62 143mm 2 36 60mm 1 41 36mm 4 88 124mm 4 21 107mm 0 55 14 05mm 0 81 20 6mm 1 08 27 5mm 0 96 24 5mm 1 1 28 1mm Main Unit Camrea Sensor...

Страница 84: ...Multi rate for Preview and Recording Bitrate Control Multi Streaming CBR VBR at H 264 H 265 Controllable frame rate and Bandwidth Edge Storage Micro SD Micro SDHC Micro SDXC card not included Special...

Страница 85: ...PM EST A purchase receipt or other proof of the date of the original purchase is required before warranty service is rendered This warranty only covers failures due to defects in materials and workma...

Страница 86: ...do not allow the exclusion or limitation of incidental or consequential damages or limitations on how long an implied warranty lasts so the above exclusions or limitations may not apply to you This wa...

Страница 87: ...ouse 16220 Bloomfield Ave Cerritos CA USA 90703 PH 866 446 3595 FAX 813 888 9262 www Digital Watchdog com technicalsupport dwcc tv Technical Support PH USA Canada 1 866 446 3595 International 1 813 88...

Отзывы: