Digital Watchdog DW-VHD4 Скачать руководство пользователя страница 11


Web Viewer 


1.


Using a computer that has access to the internet, open an Internet Explorer browser. 

2.


In the address bar, enter the DVR’s fixed IP address or the DDNS address. Press Enter 
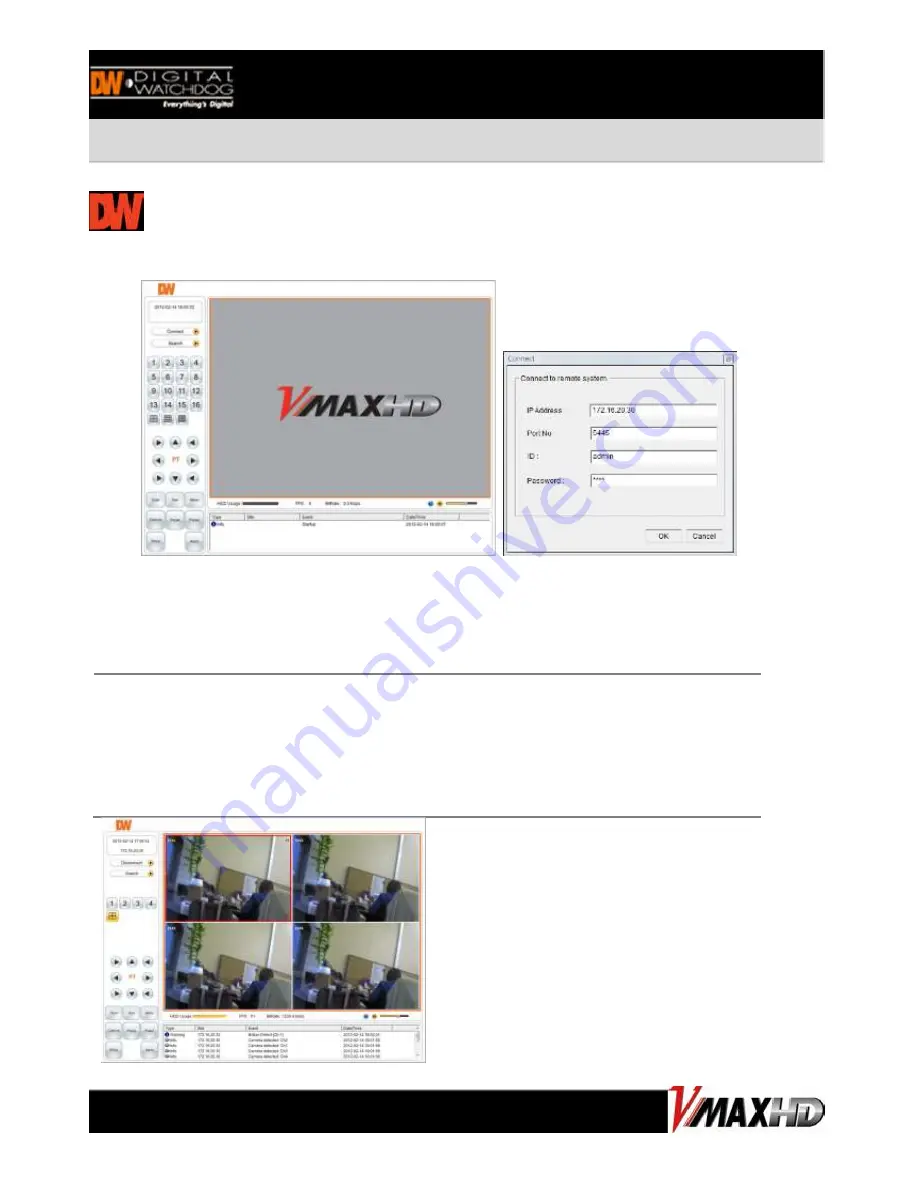
3.


Select the “Connect” icon then below configuration window appear. 

4.


Enter the DVR’s IP address, assigned port number (default 5445), User ID and Password. 

N

OTE


I

n order to connect to the VMAX HD remotely, Network configuration must be setup in the 

DVR. Please see section 3.4 Network for more information in User Manual 

If you are trying to connect to the DVR from outside the network, make sure the DVR’s ports 

are  forwarded  in  your  router.  Please  consult  your  Network  Administrator  or  Internet  Service 

Provider for more information.


CONNECTING TO THE VMAX HD 

Содержание DW-VHD4

Страница 1: ...ote Controller Items Power Cord Rack Mount Bracket USB Mouse 1 1 1 1 2 Brackets 4 Screws 1 Administrator Login Admin Password 1111 ATTENTION PLEASE This document is a Quick Start Guide Please refer to the user manual for more detailed information Tel 866 446 3595 813 888 9555 www Digital Watchdog com Technical support hours 8 30AM to 8 00PM Eastern Time Monday thru Friday ...

Страница 2: ... HDD Record Network and Backup Play Fast Forward Rewind or pause Goes to search mode Start Emergency Recording USB Port Ver 2 0 for Mouse Operation Backup Device or Firmware Update Turn DVR On Off Open Close the DVD s protecting door Exit Menu or back to previous menu 17 LED Indicator Indicate Setup menu display Functions Change the cameras display Mode between single channel 4 channel view Change...

Страница 3: ...REAR PANEL ...

Страница 4: ...ot be interrupted Do not press any buttons on the front keypad mouse or remote controller Do not unplug the power cord or turn the DVR during the boot process DVR INSTALLATION Initial Setup When performing initial setup it is recommended that you setup the DVR s Date Time Format the HDDs and Setup the DVR s recording and Network Configuration Setting these options on a later date may interfere wit...

Страница 5: ...Select DAYLIGHT SAVING and select the appropriate daylight saving time zone OFF Daylight saving is off USA Applies the USA daylight saving time EU Applies the EU daylight saving time If EU is selected select GMT AREA and set the time difference with the standard time OTHERS If the time zone is neither USA nor EU manually enter beginning and ending dates for the Daylight saving period INITIAL SETUP...

Страница 6: ... the recording schedule Set the Recording Schedule Select the desired recording mode and click on a specific day and time to assign the recording mode Using your mouse you can also click hold and drag to select multiple times and days You can apply different recording schedules for each of the channels You can also copy the schedule of one channel and select COPY or select ALL and click COPY to ap...

Страница 7: ...445 respectively This information is necessary when connecting to the DVR externally If necessary modify the ports according to your network requirements NOTE Some internet service providers block port 80 It is recommended that you change the DVR s web port to 81 or 82 just in case 4 Network Stream Use this section to setup the streaming resolution of the DVR s video over the internet The higher t...

Страница 8: ...t is connected to the same network as the DVR and go to Start Programs Accessories Command Prompt 4 Enter the command ipconfig and press enter Write down the following information subnet mask Gateway This is your router s IP address 5 Open an internet explorer webpage and enter the gateway address in the address bar Enter user ID and password to access your router Contact your Internet Service Pro...

Страница 9: ...Name you have selected is available click Register to complete the registration 2 Server 2 dyndns com You can use this option if you wish to setup a Domain Name using the dyndns com server Note This service requires subscription and payment 3 Server 3 Auto DDNS This is an easy auto DDNS setup feature If selected the DVR will automatically register itself with okddns com This feature will setup DDN...

Страница 10: ...ainname okddns com Go to DDNS to setup a DDNS account for the DVR Select SERVER 1 and select a DDNS service from the drop down list These are free and require only subscription Once you have the DDNS information enter the user name and password and the set hostname to save the DDNS settings in the DVR HOW TO USE SERVER 3 1 You can input your hostname what you want and select APPLY in order to regi...

Страница 11: ...IP address assigned port number default 5445 User ID and Password NOTE In order to connect to the VMAX HD remotely Network configuration must be setup in the DVR Please see section 3 4 Network for more information in User Manual If you are trying to connect to the DVR from outside the network make sure the DVR s ports are forwarded in your router Please consult your Network Administrator or Intern...

Страница 12: ...E QUICK STEUP if you want to use full system configuration defined in other menus NOTE Deactivate QUICK SETUP to use the configuration from the other menus Help The HELP button will help you understand how to setup several important settings such as DDNS NOTIFICATION BACKUP SCHEDULE NETWORK and CAMERA without the user s manual book For example if you need help on how to set NETWORK click HELP butt...

Страница 13: ... root directory Copy the firmware upgrade file to that folder Connect the USB flash drive on the front panel Go to Menu System System Information and select SYSTEM UPGRADE Follow the instructions as below When upgrade is complete the system will ask to reboot Follow instructions on the screen to reboot the system and make sure current firmware is the one you just updated ...

Отзывы: