Digital View AVP-1600 Скачать руководство пользователя страница 7

Specifications subject to change without notice 

© Digital View Ltd – Doc Ver 1.2:  3 Dec, 2010 (AVP-1600_manual.doc)  

Page 

7 of 35


CONNECTION & OPERATION


CAUTION:

 Never connect or disconnect parts of the display system when the system is powered up 

as this may cause serious damage. 
 

CONNECTION 

Connection and usage is quite straight forward (it is useful to have the relevant connection diagram 
available at this time): 
1. 

LCD panel & Inverter:

 Connect the inverter (if it is not built-in the panel) to the CCFT lead 

connector of the LCD panel. 

2. 

LVDS type panels:

 Plug the LVDS signal cable direct to CN1 (if necessary).  Insert the panel 

end of the cable to the LCD panel connector.   

3. 

TTL single pixel type panels:

 Plug the signal cables direct to CN2. Plug the other end of 

cables to the LCD connector board (if connector board is required, otherwise the signal can 
be direct plug to the LCD panel connector).  Then plug the board connector to the LCD panel 
connector. 

4. 

Inverter & Controller:

 Plug the inverter cable to CNB1 and CNA1 (if necessary).  Plug 

another end to the connector on the inverter. 

5. 

Function switch & Controller:

 Plug the OSD switch mount cable to CNC1 on the controller 

board and another to the OSD switch mount. 

6. 

LED 1 :

 Plug in a 3-way with dual color LED to connector LED1 on the controller board for 

indicating the controller status. 

7. 

       IR & Controller:

 Plug in a 3-way with IR sensor to connector IR1 on the controller board.  

8. 

Jumpers :

 Check all jumpers are set correctly.  Details referring the connection diagram at  


http://www.digitalview.com/controllers/csg.php


9. 

Jumpers & Inverter & Panel voltage:

 Particularly pay attention to the settings of JA3, JA6, 

JB2, JB3.  JB2 & JB3 are used for inverter control (read inverter specification and information 
on the jumper table to define the correct settings).  JA3 & JA6 are used for panel voltage 
input (read panel specification and information on the jumper table to define the correct 
settings). 

10. 

Video input configuration selection on CNV2 :

 Enable Composite video 2 & S-Video 2 

inputs support on CNV2 when setting JP2 open. Enable Composite video 2 -4 inputs support 
when setting JP2 closed. 

11. 

Power supply & Controller:

 Plug the DC 12V / 24V power in to the connector PP2. You    

can consider to use DigitalView mating power cable P/N 426013800-3, 160mm. Please read 
the jumper table in page 11-12 to define the correct settings. Otherwise it may break down 
the panel. 

12.

       Power on:

 Switch on the controller board and panel by using the OSD switch mount. 


CAUTION

: Never connect or disconnect parts of the display system when the system is powered up 

as this may cause serious damage. 


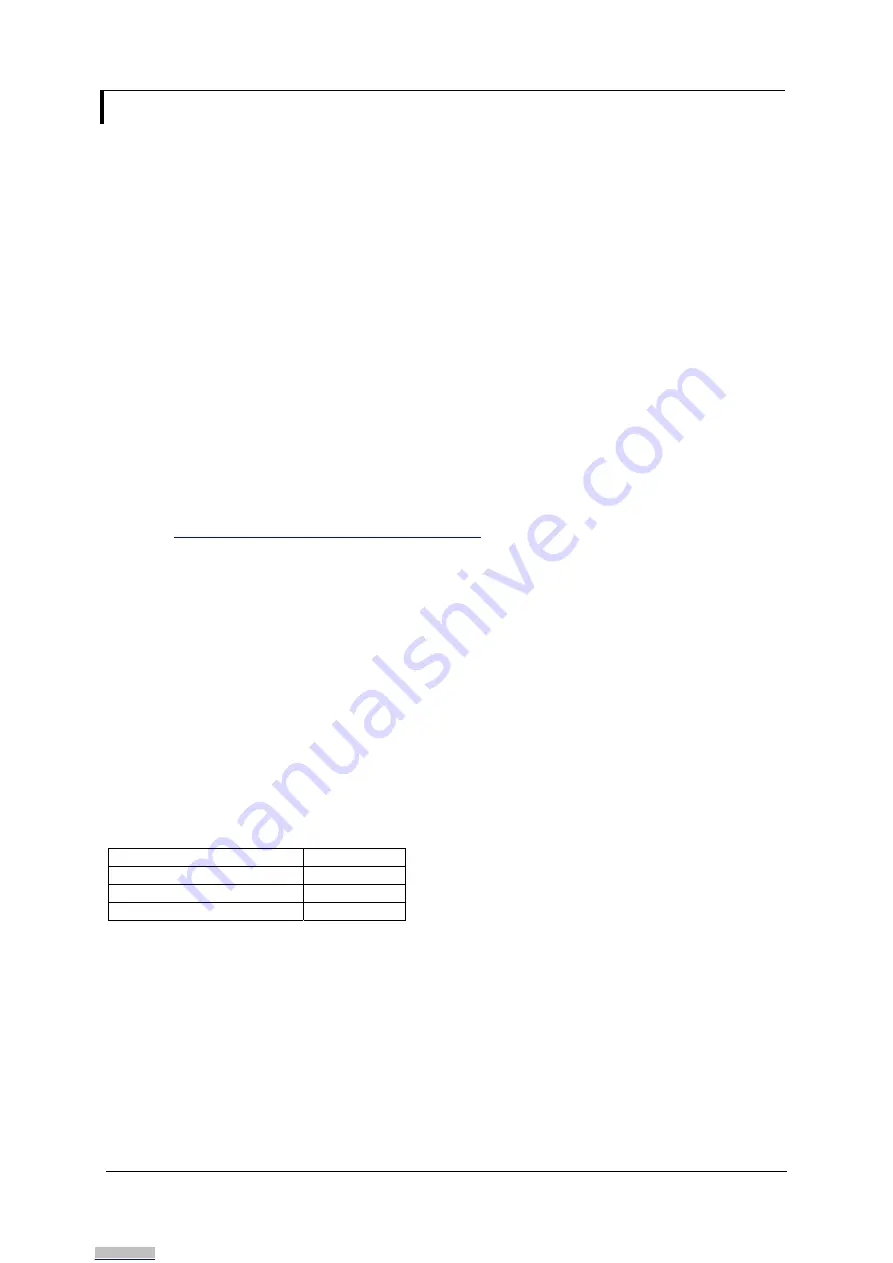
Controller LED status (LED1) :  

State LED 

color 

No signal & backlight off 

RED 

No signal & backlight on 

ORANGE 

With signal & backlight on  

GREEN 


General: 


If you are using supplied cables & accessories, ensure they are correct for the model of panel and 
controller. 


If you are making your own cables & connectors refer carefully to both the panel & inverter 
specifications and the section in this manual, “Connectors, Pinouts & Jumpers” to ensure the 
correct pin to pin wiring. 


OPERATION 

Once the system has been connected and switched on there are a number of functions available 
to adjust the display image as summarized in the following sections. The settings chosen will be 
saved for each mode independently. 
 

Downloaded from

Arrow.com.

Downloaded from

Arrow.com.

Downloaded from

Arrow.com.

Downloaded from

Arrow.com.

Downloaded from

Arrow.com.

Downloaded from

Arrow.com.

Downloaded from

Arrow.com.

Содержание AVP-1600

Страница 1: ...use the controller 11 Connectors pinouts jumpers Essential connection information 19 Controller dimensions 20 Application notes 22 Troubleshooting 23 Specifications 24 Appendix I Video Mode Support T...

Страница 2: ...ble from the Digital View website as follows Ensure all parts are on hand Check controller and add on board switch jumper settings errors may damage the panel Prepare the source Connect the parts Unde...

Страница 3: ...built into LCD 6 Inverter cable 7 Function controls 8 Function controls cable 9 Status LED Optional 10 IR sensor Optional 11 Audio add on board optional 12 RS 232 control interface 13 AV cable J1 S Vi...

Страница 4: ...nal cables are no longer than 46cm 18 inches If those wire cabling is utilized these can be made into a harness with cable ties Care should be taken when placing the cables to avoid signal interferenc...

Страница 5: ...24VDC power input Power Input 12V DC 24VDC is required this should be a regulated supply The power rating is depending on the panel and inverter used Normally power supply with 3 5Amp current output s...

Страница 6: ...signal interference Heat Ventilation Heat generated from other sources for example the backlight of a very high brightness panel may generate significant heat which could adversely affect the control...

Страница 7: ...JA3 JA6 JB2 JB3 JB2 JB3 are used for inverter control read inverter specification and information on the jumper table to define the correct settings JA3 JA6 are used for panel voltage input read panel...

Страница 8: ...nu on state SEL UP SEL UP increase the setting moves the selector to the next function under OSD menu on state decrease the setting moves the selector to the previous function under OSD menu on state...

Страница 9: ...Increase decrease saturation level Press or Total 128 steps Exit Exit the OSD menu and save the settings Color Color Temperature 4 Adjust the warmness of the image displayed The higher temperature the...

Страница 10: ...ialize the setting stored in non volatile memory Sharpness Adjust sharpness level Press or Total 49 steps Exit Exit the OSD menu Volume adjustment Volume level adjustment Press or Total 100 steps Exit...

Страница 11: ...atching type PHR 5 Matching video cable P N 426000500 3 CNV2 Auxiliary video input JST 6 way B6B PH K Matching type PHR 6 Matching video cable for composite 2 4 P N 426002300 3 Matching video cable fo...

Страница 12: ...switch control Open Switch mount control JT1 Composite 2 video in terminator enable Open composite video 2 input is not terminated Close composite video 2 input is terminated with 75 JT2 Composite 1 v...

Страница 13: ...ht inverter must support 24V supply Because CNA1 pin 1 and CNB1 pin 2 will output 24VDC if input 24VDC via PP2 JA3 JA6 location on board Please pay attention to the jumper settings on JA3 JA6 which ar...

Страница 14: ...0x600 Sharp LQ104S1DG21 800x600 Sharp LQ121S1DG41 800x600 ON OFF ON OFF Toshiba LTM12C289 Tested 800x600 OFF ON ON OFF Sharp LQ084S3DG01 Tested 800x600 ON ON OFF OFF Sharp LQ121S1LG41 Tested 800x600 N...

Страница 15: ...ble OFF Disable 4 Selection of TTL LVDS panel connection ON LVDS OFF TTL Support in V1 03 00 or up firmware version or up only The most current list can be found the controller solution generator at h...

Страница 16: ...ative LVDS clock for B channel 31 GND Ground 32 GND Ground 33 VDD 3 3V 5V Panel power supply 3 3V 5V selected by JA3 JA6 34 VDD 3 3V 5V Panel power supply 3 3V 5V selected by JA3 JA6 35 VDD 3 3V 5V Pa...

Страница 17: ...ND Ground CN8 RS 232 serial control JST B6B XH A Matching type XHP 6 PIN SYMBOL DESCRIPTION 1 SDATA Reserved 2 SCLK Reserved 3 VCC 5V 4 TXD RS 232 Tx data 5 GND Ground 6 RXD RS 232 Rx data CNA1 Auxili...

Страница 18: ...connector 3 pin header PIN DESCRIPTION 1 Green LED pin anode 2 LED pin common cathode 3 Red LED pin anode IR1 Infra Red sensor connector JST B3B XH A Matching type XHP 3 PIN SYMBOL DESCRIPTION 1 GND...

Страница 19: ...the holes shown above can be used for mounting the PCB they are 3 2mm in diameter CAUTION Ensure adequate insulation is provided for all areas of the PCB with special attention to high voltage parts...

Страница 20: ...enable pin or the enable pin is not used then DPMS will not be operational Pin 3 should be matched to the inverters specification for the enable or disable pin CNB1 PIN DESCRIPTION 3 Enable Further j...

Страница 21: ...5 RPOT must be supplied installed by user 3 BVR_B Voltage tapped from top of potentiometer the node of R1 and RPOT 4 BVR_WIP Voltage tapped from wiper arm of RPOT 5 BVR_A Voltage tapped from bottom o...

Страница 22: ...nd Tubes generally in this order If half the screen is dimmer than the other half Check cabling for the inverter For a specific backlight tube check the AC pins orientation CAUTION Never reverse any D...

Страница 23: ...x 24VDC 5A max 5 Controller power consumption Approx 4W controller logic only no panel and inverter are involved Controller dimensions 142mm x 92mm x 17 6mm Storage temperature limits 40o C to 70o C O...

Страница 24: ...d from Arrow com Downloaded from Arrow com Downloaded from Arrow com Downloaded from Arrow com Downloaded from Arrow com Downloaded from Arrow com Downloaded from Arrow com Downloaded from Arrow com D...

Страница 25: ...fc Right button pressed Button equivalent Left button 0xfd Left button pressed Button equivalent 2 Parameter setting immediate relative reset and query Function Command Description Acknowledge if enab...

Страница 26: ...cted 0 S video 1 Composite video 1 2 S video 2 3 Composite video 2 0 Composite video 1 1 Composite video 2 2 Composite video 3 3 Composite video 4 0x42 0x31 Composite 1 0x42 0x32 Composite 2 0x42 0x33...

Страница 27: ...cklight brightness Disable backlight Enable backlight Reset Query Backlight working status Backlight on off 1 normal Default OSD Lock 0xf6 n 0 1 r R OSD Lock Off OSD Lock On Reset Query 0 OSD Lock Off...

Страница 28: ...0x57 W 0x77 w 0x58 X 0x78 x 0x59 Y 0x79 y 0x5A Z 0x7A z Downloaded from Arrow com Downloaded from Arrow com Downloaded from Arrow com Downloaded from Arrow com Downloaded from Arrow com Downloaded fr...

Страница 29: ...aded from Arrow com Downloaded from Arrow com Downloaded from Arrow com Downloaded from Arrow com Downloaded from Arrow com Downloaded from Arrow com Downloaded from Arrow com Downloaded from Arrow co...

Страница 30: ...d from Arrow com Downloaded from Arrow com Downloaded from Arrow com Downloaded from Arrow com Downloaded from Arrow com Downloaded from Arrow com Downloaded from Arrow com Downloaded from Arrow com D...

Страница 31: ...UTTON In input source selection mode pressing this button to select Composite 1 source Support in V1 03 00 or up firmware version or up only P N 559000106 3 DigitalView remote control unit without DV...

Страница 32: ...ut right The Audio add on board P N 416940020 3 design for connection with DV controllers on the audio connector CN7 It provides audio input ports and output port for sound amplification Downloaded fr...

Страница 33: ...ed from Arrow com Downloaded from Arrow com Downloaded from Arrow com Downloaded from Arrow com Downloaded from Arrow com Downloaded from Arrow com Downloaded from Arrow com Downloaded from Arrow com...

Страница 34: ...provide as much detail as possible for use of this product it cannot be relied upon as an exhaustive source of information This product is for use by suitably qualified persons who understand the natu...

Страница 35: ...from Arrow com Downloaded from Arrow com Downloaded from Arrow com Downloaded from Arrow com Downloaded from Arrow com Downloaded from Arrow com Downloaded from Arrow com Downloaded from Arrow com Dow...

Отзывы: