


E-65
6. Using On-Screen Menu
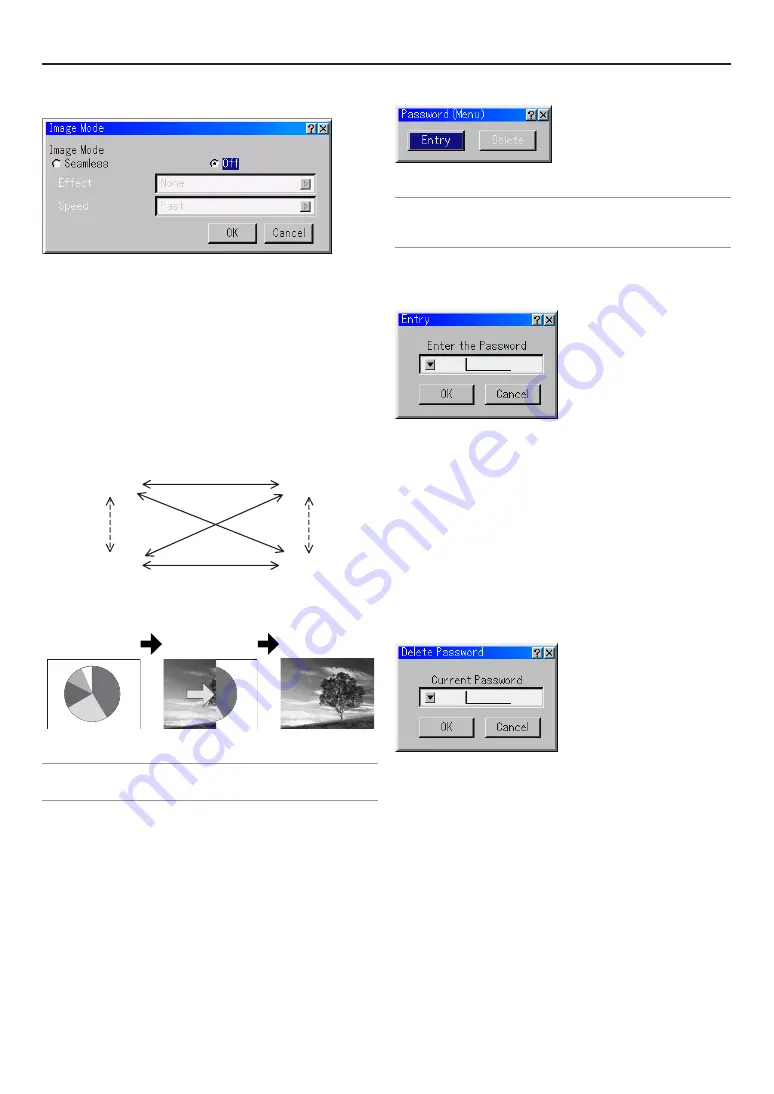
Image Mode
Installation of the MM-IMGPRO and MM-SCALING options per-
mits the instantaneous switching of signals between two input
interface boards when “Seamless” of the “Image Mode” is se-
lected.
• Seamless Mode - active
- Select an input
- Wait for “Transition Ready” to be displayed on the LCD screen
- Press the ENTER button to display the input.
- Next input appears immediately.
• Seamless operates between left and right input slots. The solid
lines in the following diagram are seamless switching and the
dotted lines are regular switching.
• Switching between slots on the same side is the same as Im-
age Mode set to off.
SLOT1
SLOT3
SLOT2
SLOT4
• Alpha Blending, Wipe, and Box In/Out image effects can be
selected at the time of switching. When an effect is selected it
is initiated on pressing ENTER as above.
[Before switching]
[During switching]
[After switching]
• The drawings show an example of how “Effect-Wipe Right” works.
NOTE: Please request installation of the MM-IMGPRO and MM-SCALING options
from your dealer or service person. The customer should never open the cabinet
under any circumstances.
Setting a Password
A password can be set for your Projector to avoid operation by
an unauthorized person.
There are two password options: one for menu and the other for
logo.
When a password is set, doing any one of the following opera-
tions will display the Password input screen.
For Menu:
*
Changing the menu to Advanced
*
Editing the custom menu
For Logo:
*
Changing the background
Procedures for Password setting apply to both Menu and Logo.
Entry
To assign your password:
NOTE:
• Up to 15 alphanumeric characters can be assigned.
• Only numbers can be entered when you use the remote control Source/Input
buttons.
1. Type a password.
Highlight “Entry” and press the ENTER button.
The “Enter the Password” screen will be displayed.
Make sure that "
H
" is highlighted and then press the ENTER button.
The Software keyboard appears. Use the Software keyboard to type a
password and then highlight “OK” on the “Enter the Password” screen
and press the ENTER button.
The “Confirm Password” screen will be displayed.
2. Type the same password again. Highlight “OK” on the “Confirm Pass-
word” screen and press the ENTER button.
Your password will be assigned.
Delete
To delete your password:
1. Highlight “Delete” and press the ENTER button.
The “Current Password” screen will be displayed.
2. Use the Software keyboard to type your password. Highlight “OK” on
the “Current Password” screen and then press the ENTER button.
Your password will be deleted.
In case you forget your password, follow the steps below to de-
lete it.
1. Select the Advanced menu from the Basic menu.
The “Password” entry screen will be displayed.
2. Use the Software keyboard to type “1111”.
Highlight “OK” on the “Password” entry screen and then press the EN-
TER button.
The “Password Warning!!” message will be displayed.
3. Use the Software keyboard to type “3333”.
Highlight “OK” on the “Password” entry screen and then press the EN-
TER button.
The “Password Warning!!” message will be displayed.
Содержание HIGHlite 12000Dsx+
Страница 34: ...E 34...
Страница 72: ...E 72...
Страница 73: ...E 73 7 Maintenance 1 Cleaning the Cabinet and the Lens E 74...
Страница 81: ...E 81 Lens Center 108 4 3 926 36 5 670 26 4 400 15 8 425 16 7 242 9 5 Unit mm inch 8 Appendix HIGHlite 8000Dsx...
Страница 88: ...E 88...
Страница 89: ...E 89...
Страница 90: ...E 90...


