background image

Digital Projection 

E-Vision 6000 Series 

A TOUR OF THE MENUS 

Operating Guide

41

Rev D July 2014

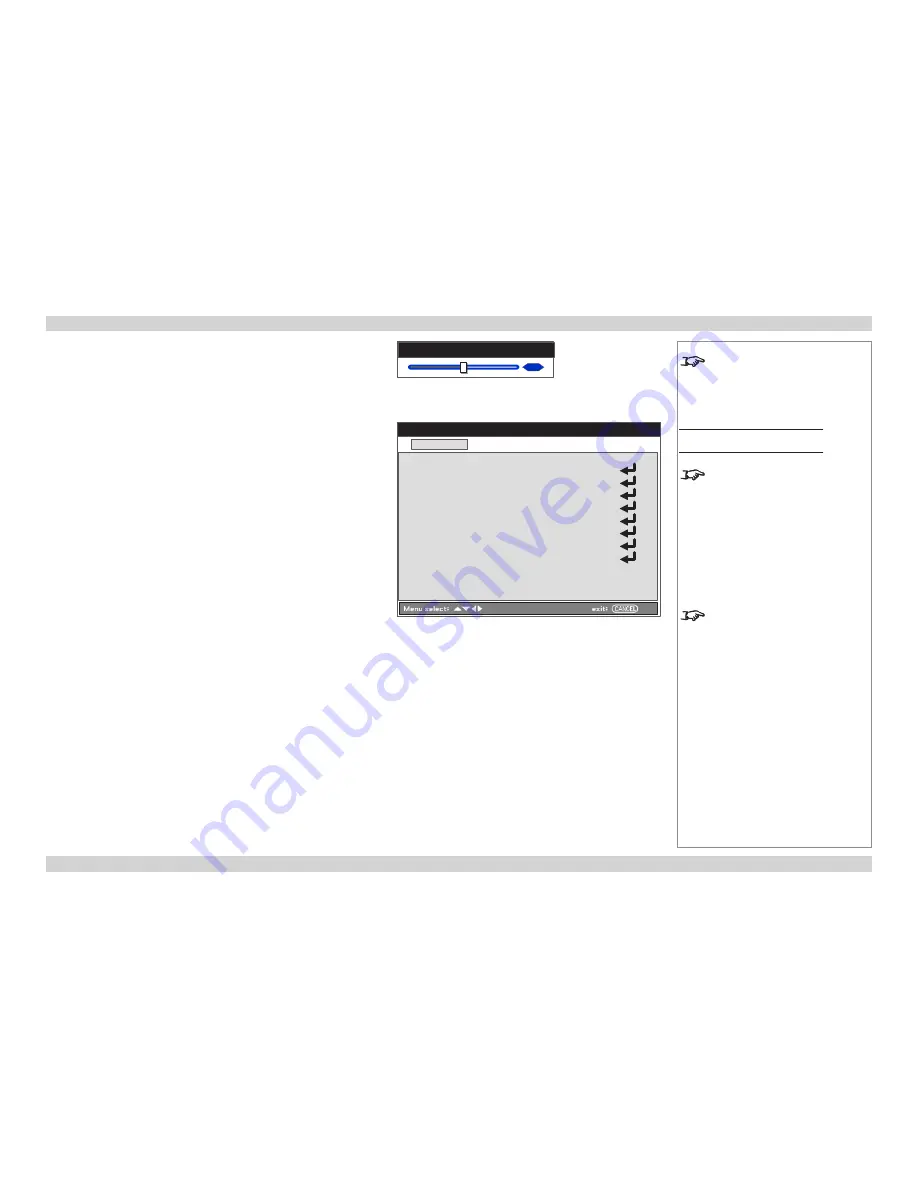
Volume control

Select 

Volume

 from the main menu to bring out the volume slider.

To exit the volume slider, press 

MENU

 or 

RETURN

.

Setting menu

The 

Setting

 menu contains three tabs: 

Basic

Installation

 and 

Option

.

Basic tab

• 

Keystone


Adjust horizontal and vertical keystone values.

• 

Lamp control


Choose between 

Normal

 and 

Eco

. Using the 

Eco

 mode extends lamp 

life and reduces fan noise.

• 

Lamp mode


Choose whether you will use both lamps simultaneously (

Dual

) or one at 

a time (

Lamp 1

 or 

Lamp 2

).

• 

Lamp interval


If not in dual lamp mode, set the time period the projector will run each 

lamp before switching to the other. Choose from 

Off

1 week

4 weeks 

and 

2000H

.

• 

Language 

Set the language for all menus.

• 

Lens Shift, Zoom and Focus 

Adjust as required.

Notes

 The 

 and 

VOLUME -


controls have dedicated buttons 

on both the remote control and 

the control panel.

Setting menu

Basic tab

 In 

Eco

 mode the lamp will run at 

80% power.

 The 

Lens Shift

Zoom

 and 

Focus


controls have dedicated buttons on 

the projector control panel.

Setting

Image

Installation

Option

Basic

Keystone
Lamp control

Normal

Lamp mode

Dual

Lamp interval

1 week

Language

English

Lens Shift
Zoom
Focus

30

Volume

Содержание E-Vision 6000 Series

Страница 1: ...RT GUIDE CONNECTION GUIDE OPERATING GUIDE REMOTE COMMUNICATIONS GUIDE 113 375D E Vision 6000 Series High Brightness Digital Video Projector L E N S S H IF T Z O O M F O C U S M E N U E N TE R R E TU R N S O U R C E PO W ER W AR NI NG LA M P1 LA M P2 A U TO ...

Страница 2: ...lowed WARNING this symbol indicates that there is a danger of physical injury to yourself and or damage to the equipment unless the instructions are closely followed NOTE this symbol indicates that there is some important information that you should read Product revision Because we at Digital Projection continually strive to improve our products we may change specifications and designs and add new...

Страница 3: ...owing key features Swappable color wheels for high brightness and color critical applications BrilliantColor for increased system brightness DynamicBlack for improved black levels in dark scenes Vertical and horizontal keystone correction Control via LAN and RS232 Motorized lens mount A serial number is located on the back of the projector Please record it here Notes ...

Страница 4: ...heel 10 POSITIONING THE SCREEN AND PROJECTOR 11 OPERATING THE PROJECTOR 12 Switching the projector on 12 Selecting an input signal 12 Adjusting the lens 13 Zoom 13 Focus 13 Shift 13 Adjusting the image 14 Orientation 14 Aspect Ratio 14 Picture 14 Switching the projector off 14 CONNECTION GUIDE 15 SIGNAL INPUTS AND OUTPUTS 17 Computer 1 17 Computer 2 17 Computer 3 17 Component 17 Video or S Video 1...

Страница 5: ... Adjust menu 36 Image 36 Image Options 39 Video 40 Volume control 41 Setting menu 41 Basic tab 41 Installation tab 42 Installation tab continued 43 Option tab 45 Information menu 46 Usage time tab 46 Input tab 46 Network tab 46 Version tab 46 Reset menu 46 MENU MAP 47 REMOTE COMMUNICATIONS GUIDE 51 INTRODUCTION 53 SERIAL PORT CONTROL COMMANDS 54 Header code 54 Examples 54 The commands 55 Set Comma...

Страница 6: ...14 E Vision 6000 Series High Brightness Digital Video Projector INSTALLATION AND QUICK START GUIDE L E N S S H IF T Z O O M F O C U S M E N U E N TE R R E TU R N S O U R C E PO W ER W AR NI NG LA M P1 LA M P2 A U TO ...

Страница 7: ...tors 6 The Power indicator 6 The Warning indicator 6 The Lamp indicators 7 Changing The Lens Lamps And Color Wheel 8 Removing the lens 8 Fitting the lens 8 Changing the lamp 9 Changing the color wheel 10 Positioning The Screen And Projector 11 Operating The Projector 12 Switching the projector on 12 Selecting an input signal 12 Adjusting the lens 13 Zoom 13 Focus 13 Shift 13 Adjusting the image 14...

Страница 8: ...ector is shipped without a lens A four segment color wheel optimized for brightness is fitted as standard Use the six segment color wheel for optimized color The power cable supplied will be appropriate to the shipping destination 2 x AAA batteries User Manual on disc 115 759 Important Information 113 380 Projector Power cable L E N S S H IF T Z O O M F O C U S ME NU EN TE R RE TU RN SO UR CE PO W...

Страница 9: ...stem see the Operating Guide The upper wheel and the PAGE UP PAGE DOWN buttons do not perform any function on this projector The remote will function well within a radius of about 7 meters 23 feet and 15 degrees above or below the projector level Lens Connection panel Mains input Control panel Adjustable foot Front infra red window Rear infra red window Air inlet Air inlet Air outlet Lamp and colo...

Страница 10: ...tor control panel as shown on the right The following buttons are identical POWER on the remote control and on the control panel on the remote control and ENTER on the control panel SOURCE and AUTO on both devices VOLUME VOLUME on the remote control and the LEFT and RIGHT arrow buttons on the control panel Notes For full details of how to use the controls and the menu system see the Operating Guid...

Страница 11: ...amber Cooling Flashing amber Warming up Flashing green Power on Normal On green The Warning indicator The Warning indicator will switch on or flash in different patterns to show different error situations Condition Warning indicator behaviour Projector working normally Off Cover error Flash and pause red pause Temperature error Two flashes and pause red pause Power error Three flashes and pause re...

Страница 12: ...ndicators will show which lamp is in use and whether it is in Normal or Eco mode Condition Lamp indicators behaviour Lamp off Off End of lamp life Flashing red No lamp Flash and pause red pause Lamp error Six flashes and pause red pause Cooling lamp Flashing amber Re light up sequence Flashing green Lamp life over On red Eco mode On amber Normal mode On green ...

Страница 13: ...ens Lamps And Color Wheel Removing the lens 1 Remove the lens cap 2 Push in the lens release lever and turn the lens anti clockwise 3 Remove the lens Fitting the lens 1 Position the lens so that the label marked O is at the top and gently insert it all the way into the lens mount 2 Turn the lens clockwise until it clicks into place Notes 1 2 3 1 2 ...

Страница 14: ...de open the lamp compartment cover as shown in the picture 2 Unscrew the two captive screws securing the lamp module 3 Pull firmly upwards on the handle to remove the lamp module 4 Insert a new lamp module 5 Fasten the screws 6 Replace the lamp compartment cover Notes The lamp and color wheel must be changed only by suitably qualified personnel 1 2 3 4 5 6 ...

Страница 15: ...ove the color wheel 4 Insert a new color wheel 5 Fasten the screws 6 Replace the lamp compartment cover Notes A four segment color wheel optimized for brightness is fitted as standard Use the six segment color wheel for optimized color Keep the unused color wheel in the zipper bag in which the six segment color wheel was packaged The bag prevents dust from falling or collecting on the color wheel ...

Страница 16: ...ngth 12 mm 0 5 in can be used to attach the projector to a ceiling mount optional accessory Notes Ensure that there is at least 50 cm 20 in of space between the ventilation outlets and any wall and 10 cm 4 in on all other sides If ceiling mounting ensure there is 30 cm 12 in of space between the projector and ceiling Do not stack the projectors Do not tilt the projector more than 10 from side to s...

Страница 17: ...ndicator will show steady green 3 Select the default language Selecting an input signal Connect an input source to the projector The signal should be automatically detected by the projector and should be displayed within two or three seconds If more than one signal is connected then select the input you want to display 1 On either the control panel or remote press MENU 2 From the list of available...

Страница 18: ...s Use the FOCUS buttons on the control panel to adjust the lens until the image is sharp Or on the remote control 1 Press MENU and from the list of options that appears on the screen select SETTING 2 On the BASIC tab select FOCUS then use the LEFT and RIGHT arrow buttons to adjust the focus Shift Use the LENS SHIFT buttons LEFT RIGHT UP and DOWN on the control panel to adjust the position of the i...

Страница 19: ...nd Normal Picture 1 Press MENU and from the list of options that appears on the screen select ADJUST 2 On the IMAGE tab access various picture settings such as Brightness and Contrast Switching the projector off 1 Press on the control panel or STANDBY on the remote control then press the button a second time within 5 seconds to confirm your intention to switch off The lamp will switch off and the ...

Страница 20: ...D July 2014 CONNECTION GUIDE E Vision 6000 Series High Brightness Digital Video Projector L E N S S H IF T Z O O M F O C U S M E N U E N TE R R E TU R N S O U R C E PO W ER W AR NI NG LA M P1 LA M P2 A U TO ...

Страница 21: ...17 Component 17 Video or S Video 17 Monitor Out 17 Supported Signal Input Modes 18 Control Connections 20 Screen Trigger 20 USB 20 Serial Port 20 LAN 20 Wiring Details 21 Signal inputs and outputs 21 Computer 1 21 Computer 2 22 Computer 3 23 Component 24 Video and S Video 25 Monitor Out 26 Control connections 27 Screen Trigger output 27 Serial Port 27 LAN connection 27 ...

Страница 22: ...onnectors Connect a pair of audio cables to the L and R audio connectors or a single audio cable to the L connector Video or S Video Connect a composite video cable to the single RCA phono connector or an S Video cable to the 4 pin mini DIN Connect a pair of audio cables to the L and R audio connectors or a single audio cable to the L connector Monitor Out Connect an analog monitor VGA cable to th...

Страница 23: ...0 1125 33 75 ü ü ü 1080p50 1920 x 1080 50 1125 56 25 ü ü 1080p60 1920 x 1080 60 1125 67 5 ü ü COMPUTER 480p 640 x 480 59 9 526 31 5 ü ü ü VGA72 640 x 480 72 8 521 37 9 ü ü ü VGA75 640 x 480 75 500 37 5 ü ü ü VGA85 640 x 480 85 509 43 3 ü ü ü SVGA56 800 x 600 56 3 625 35 2 ü ü ü SVGA60 800 x 600 60 3 629 37 9 ü ü ü SVGA72 800 x 600 72 2 666 48 1 ü ü ü SVGA75 800 x 600 75 625 46 9 ü ü ü SVGA85 800 x...

Страница 24: ... WXGA60 1366 x 768 59 8 799 47 8 ü ü ü continued WXGA 60 1440 x 900 59 9 933 55 9 ü ü ü SXGA75 1152 x 864 75 900 67 5 ü ü ü SXGA60 1280 x 960 60 1000 60 ü ü ü SXGA60 1280 x 1024 60 1067 64 ü ü ü SXGA75 1280 x 1024 75 1067 80 ü ü ü SXGA 60 1400 x 1050 60 1088 65 3 ü ü ü WSXGA 1680 x 1050 60 1088 65 3 ü ü ü UXGA60 1600 x 1200 60 1250 75 00 ü ü ü MAC MAC13 640 x 480 66 6 526 35 0 ü ü ü MAC16 832 x 62...

Страница 25: ...Address of the projector can be set by using the Network submenu which can be found in the Advanced Setting submenu in the Installation menu Once the LAN IP Address has been set it is possible to assign a Host Name and Domain Name to the projector and to set up an Alert Mail address and PJLink password A number of basic picture and input settings can be controlled directly using the embedded LAN C...

Страница 26: ...nnector 1 R 2 G 3 B 4 unused 5 Digital Ground H Sync 6 R Ground 7 B Ground 8 G Ground 9 5v 10 Digital Ground V Sync DDC 11 unused 12 SDA 13 H Sync 14 V Sync 15 SCL Audio input 3 5mm mini jack Tip Left Ring Right Sleeve Ground Notes For full details of all input settings see the Setting menu in the Operating Guide Computer 1 video pin view of female connector Sleeve Ring Tip Computer 1 audio ...

Страница 27: ... RGsB or YCrCb 5 x 75 ohm BNC RGBHV RGsB YCrCb Green Green Sync Y Blue Blue Cb Red Red Cr Hsync Vsync Audio input 3 5mm mini jack Tip Left Ring Right Sleeve Ground Notes For full details of all input settings see the Setting menu in the Operating Guide R Cr G Y B Cb H V Computer 2 video Sleeve Ring Tip Computer 2 audio ...

Страница 28: ... Shield 12 unused 13 unused 14 5 V Power 15 Ground 16 Hot Plug Detect 17 TMDS Data 0 18 TMDS Data 0 19 TMDS Data 0 Shield 20 unused 21 unused 22 TMDS Clock Shield 23 TMDS Clock 24 TMDS Clock Audio input 3 5mm mini jack Tip Left Ring Right Sleeve Ground Computer 3 video pin view of female connector Notes High Definition Content Protection HDCP is supported on this input For full details of all inpu...

Страница 29: ... 24 Rev D July 2014 Component Video input 3 x RCA Phono YCrCb YPrPb Cr Pr Y Y Cb Pb Audio 2 x RCA Phono Left or Mono audio Right audio L R Y Pb Cb Pr Cr Notes For full details of all input settings see the Setting menu in the Operating Guide Component audio Component video ...

Страница 30: ...Video S Video input 4 pin mini DIN 1 Y Ground 2 C Ground 3 Luminance Y 4 Chrominance C Shared audio input for Video and S Video 2 x RCA Phono Left or Mono audio Right audio S Video pin view of female connector L R Notes For full details of all input settings see the Advanced menu in the Operating Guide Video Video and S Video shared audio input ...

Страница 31: ...nced menu in the Operating Guide Monitor Out Video output analog computer VGA 15 way D type connector 1 R 2 G 3 B 4 unused 5 Digital Ground H Sync 6 R Ground 7 B Ground 8 G Ground 9 5v 10 Digital Ground V Sync DDC 11 unused 12 SDA 13 H Sync 14 V Sync 15 SCL Audio output 3 5mm mini jack Tip Left Ring Right Sleeve Ground Monitor Out video pin view of female connector Sleeve Ring Tip Monitor Out audi...

Страница 32: ...Received Data RX 3 Transmitted Data TX 4 unused 5 Signal Ground 6 unused 7 unused 8 unused 9 unused LAN connection RJ45 socket Serial Port pin view of female connector Notes Only one remote connection can be used at any one time For more information see the Installation menu in the Operating Guide For information about how to set the LAN IP configuration see the Operating Guide Sleeve Tip Screen T...

Страница 33: ...Digital Projection E Vision 6000 Series Connection Guide This page is intentionally left blank ...

Страница 34: ...D July 2014 E Vision 6000 Series High Brightness Digital Video Projector OPERATING GUIDE L E N S S H IF T Z O O M F O C U S M E N U E N TE R R E TU R N S O U R C E PO W ER W AR NI NG LA M P1 LA M P2 A U TO ...

Страница 35: ...33 Changing slider values 34 Executing commands 34 Editing numeric fields 34 A Tour Of The Menus 35 Main menu 35 Input menu 35 Adjust menu 36 Image 36 Image Options 39 Video 40 Volume control 41 Setting menu 41 Basic tab 41 Installation tab 42 Installation tab continued 43 Option tab 45 Information menu 46 Usage time tab 46 Input tab 46 Network tab 46 Version tab 46 Reset menu 46 Menu Map 47 MAIN ...

Страница 36: ...ne Menu Status Mute Volume Auto Blank Zoom Zoom Source Freeze Laser Power MENU display the MAIN menu go back to the previous menu POWER switch SOURCE select an input source FREEZE freeze the current image frame AUDIO VOLUME MUTE switch both video and sound On and Off LASER use the remote control as a screen pointer BLANK switch video On and Off STATUS see information about lamp usage projector run...

Страница 37: ...d Tabs and page The active tab is highlighted When you move to a different tab a different page opens below Items on the page These can be sub menus settings sliders numeric fields or commands Available and unavailable items Unavailable items appear grayed out Whether an item is available may depend on other settings Notes Some menu options and controls may not be available due to settings in othe...

Страница 38: ...age using the UP and DOWN arrows move back to the tabs by pressing MENU or RETURN Accessing sub menus Some menu items are sub menus They open new pages which in turn contain menu items To access a sub menu navigate within the page using the UP and DOWN arrows until the sub menu is highlighted and press ENTER Editing settings Each setting contains a list of values to choose from You can change the ...

Страница 39: ...ill see a confirmation message Use the LEFT and RIGHT arrows to select OK or RETURN and press ENTER again to confirm your choice Editing numeric fields 1 Navigate to the item containing the fields and press ENTER to access it 2 Move from field to field within the line using the LEFT and RIGHT arrows 3 Alter the value of a field by pressing the UP and DOWN arrows Once you have made your changes on ...

Страница 40: ...tion and Option Information View your current configuration Reset Restore the factory default settings Use UP and DOWN to highlight a menu and press ENTER to open the highlighted menu Input menu This setting controls the input source used by the projector Choose from the following input sources Computer 1 VGA Computer 2 RGBHV RGsB or YCrCb Computer 3 DVI D Component Video S Video To set the input ...

Страница 41: ...djust menu contains three tabs Image Image Options and Video Image The Image tab is used to alter picture settings Image select Select one of the display modes as required Detail setting This sub menu contains image adjustment options Contrast Brightness Sharpness Color and Tint Set the sliders for these settings as required Reset Restore factory default settings Adjust Image Image Options Video I...

Страница 42: ...and black level Black detail Increased shadow detail at the expense of elevated black levels Press LEFT or RIGHT to change the setting Color temp Choose a value from 5000 warmer to 10500 cooler BrilliantColor Allows for increased projector brightness at the expense of accurate color reproduction Notes Adjust menu Image tab Detail setting sub menu Basic tab Color temp and BrilliantColor are not ava...

Страница 43: ... source or viewing environment Notes Adjust menu Image tab Detail setting sub menu White Balance tab Adjust menu Image tab Detail setting sub menu Color correction tab Detail setting Basic White balance Color correction White Balance Red Green Blue Contrast R Contrast G Contrast B 50 50 50 50 50 50 Detail setting Basic White balance Color correction Color correction Red Green Blue Yellow Magenta C...

Страница 44: ...rom the edges of your image by cropping the edges or increasing the size of the image to force the edges off screen Unwanted artefacts along the image edges usually occur when the projector is connected to a low quality input souce Choose a level of overscan between 0 and 15 PC adj Control the position of the projected image Horizontal and Vertical Move the image along the horizontal or vertical a...

Страница 45: ...f it does not you can choose a specific color space RGB uses RGB color space SDTV sets the color space to that defined in ITU R BT 601 HDTV sets the color space to that defined in ITU R BT 709 Film Set to Auto or specify the pulldown extraction method as required Notes Adjust menu Video tab 3D Y C separation is only available on the Video and S Video inputs Color matrix is not available on the Vid...

Страница 46: ...imultaneously Dual or one at a time Lamp 1 or Lamp 2 Lamp interval If not in dual lamp mode set the time period the projector will run each lamp before switching to the other Choose from Off 1 week 4 weeks and 2000H Language Set the language for all menus Lens Shift Zoom and Focus Adjust as required Notes The VOLUME and VOLUME controls have dedicated buttons on both the remote control and the cont...

Страница 47: ... Rear Communication speed Sets the Serial Port RS232 baud rate Longer cable connections may require lower speeds Display time Sets the amount of time a menu is displayed on the screen Background Defines what appears on the screen when there is no input signal PIN code lock When the PIN code lock is enabled a security password will need to be entered before the projector can be used or before the l...

Страница 48: ...e PC control Choose from PC Control RS232 or Network LAN as the remote connection used for external control of the projector Notes Setting menu Installation tab See the next page for a detailed description of all settings and commands available from the Network setting sub menu In Power saving standby mode the following functions are not available Monitor Out HTTP server functions Network mode so ...

Страница 49: ...s Notes Setting menu Installation tab Network setting Setting menu continued Network setting sub menu The Network setting menu contains the following settings DHCP Set DHCP to Enable if the IP address is to be assigned by a DHCP server or Disable if it is to be set here IP Address Subnet Gateway and DNS If DHCP is set to Disable edit these settings as required In order for the settings to take eff...

Страница 50: ...ect is set to Auto the projector will cycle the inputs until a source is detected If set to Last the default input will be the last used Color system Choose the color system for Video and S Video Select from Auto NTSC PAL and SECAM Message If you do not want projector status messages to be displayed set Message to Off Filter warning Choose a Filter warning time interval from the list or select Off...

Страница 51: ...peed Lamp life remaining Lamp time and Filter time Clear lamp1 time Clear lamp2 time and Clear filter time Use when replacing lamps or cleaning the filter To reset any of the above settings 1 Select one of the options and click ENTER 2 In the confirmation dialog select OK and click ENTER again to confirm your choice Notes The lamp life percentage shown here is based on expected lamp life in contro...

Страница 52: ... 50 Color correction Red 60 0 60 0 0 0 Green 60 0 60 0 0 0 Blue 60 0 60 0 0 0 Yellow 60 0 60 0 0 0 Magenta 60 0 60 0 0 0 Cyan 60 0 60 0 12 0 Contrast 0 100 50 Brightness 0 100 50 Sharpness 0 31 15 Color 0 100 50 Tint 0 100 50 Reset Notes The default values of the Gamma Color temp and BrilliantColor settings depend on the Image select setting Some of the information in this menu map is summarised S...

Страница 53: ... Dual Lamp1 Lamp2 Lamp interval Off 1 week 4 weeks 2000H Language English German French Italian Spanish Swedish Japanese Simplified Chinese Traditional Chinese Lens shift Zoom Focus Menu Sub Menus and Controls Notes The range and default values of the PC adj settings depend on the input standard Some of the information in this menu map is summarised See the actual menu on the projector for full de...

Страница 54: ... 30 Screen trigger Off On Fan control Normal Max Default input select Last Auto Computer 1 Computer 2 Computer 3 Component Video S Video Color system Video Auto NTSC PAL SECAM S Video Auto NTSC PAL SECAM Message Off On Filter warning Off 100H 200H 500H 1000H Search mode Normal Fine RESET Current signal All data Clear lamp1 time Clear lamp2 time Clear filter time Menu Sub Menus and Controls Notes S...

Страница 55: ...This page is intentionally left blank ...

Страница 56: ... 2014 E Vision 6000 Series High Brightness Digital Video Projector REMOTE COMMUNICATIONS GUIDE L E N S S H IF T Z O O M F O C U S M E N U E N TE R R E TU R N S O U R C E PO W ER W AR NI NG LA M P1 LA M P2 A U TO ...

Страница 57: ...n 53 Serial Port Control Commands 54 Header code 54 Examples 54 The Commands 55 Set Commands 55 Get Commands 56 Remote Commands 57 LAN Control Utility 58 Power ON OFF 58 Picture and Volume controls 58 Source Select 58 Mute 58 Projector Status 58 LAN Configuration 59 Settings 59 Host Name 59 Domain Name 59 Mail 59 PJLink 60 ...

Страница 58: ...l system in three different ways The projector s features can be controlled via a serial connection using the control strings described in this guide The projector s features can be controlled via a LAN connection using the industry standard PJLink commands A number of basic picture and input settings can be controlled directly using the embedded LAN Control utility Notes ...

Страница 59: ...R Remote commands header code r command CR Header code The header code comprises the following character ASCII Hex 7E Examples Power On ASCII P N CR Hex 7E 50 4E 0D Set brightness to 25 ASCII s B 25 CR Hex 7E 73 42 32 35 0D Get brightness brightness is 18 in this example ASCII q B CR The projector returns 18 Hex 7E 71 42 0D The projector returns 31 38 Simulate pressing of BLANK remote key ASCII r ...

Страница 60: ... 0D Select Input 6 S Video s B CR 7E 73 42 0D Brightness the value to be set between 0 and 100 the default is 50 s C CR 7E 73 43 0D Contrast the value to be set between 0 and 100 the default is 50 s R CR 7E 73 52 0D Color the value to be set between 0 and 100 the default is 50 s N CR 7E 73 4E 0D Tint the value to be set between 0 and 100 the default is 50 s A CR 7E 73 41 0D Screen the value to be ...

Страница 61: ...1 0D Lamp1 Hours Between 0 and 2000 q L2 CR 7E 71 4C 32 0D Lamp2 Hours Between 0 and 2000 q B CR 7E 71 42 0D Brightness Between 0 and 100 q C CR 7E 71 43 0D Contrast Between 0 and 100 q R CR 7E 71 52 0D Saturation Between 0 and 100 q N CR 7E 71 4E 0D Tint Video Between 0 and 100 q A CR 7E 71 41 0D Screen One of the following 4 3 16 9 15 9 Crop Letterbox Native Normal q T CR 7E 71 54 0D Color Tempe...

Страница 62: ... J CR 7E 72 4A 0D KEYSTONE r M CR 7E 72 4D 0D MENU r S CR 7E 72 53 0D STATUS r T CR 7E 72 54 0D MUTE r Z CR 7E 72 5A 0D ZOOM Digital r Y CR 7E 72 59 0D ZOOM Digital r B CR 7E 72 42 0D BLANK r F CR 7E 72 46 0D FREEZE r V CR 7E 72 56 0D VOLUME r W CR 7E 72 57 0D VOLUME r N CR 7E 72 4E 0D ENTER r 00 CR 7E 72 30 30 0D FOCUS r 01 CR 7E 72 30 31 0D FOCUS r 02 CR 7E 72 30 32 0D ZOOM r 03 CR 7E 72 30 33 0...

Страница 63: ...lect Click on the buttons to switch to the required input Mute Click to switch video sound and OSD on or off Projector Status The panel shows the status of the lamps and filters Click on Refresh to update the readings Notes The LAN IP Address of the projector can be set from Installation Advanced Setting Network in the menu Use a straight cable to connect to a hub or network or a crossed cable to ...

Страница 64: ...d appear Settings Host Name Up to 60 alpha numeric characters can be entered Press the Apply button to confirm the new name Domain Name Up to 60 alpha numeric characters Press the Apply button to confirm the new name Mail When enabled an email will be sent to up to three specified addresses when the lamp reaches the end of its usable life or if an error occurs on the projector Press the Apply butt...

Страница 65: ...Class 1 The projector signal inputs have the following PJLink equivalents Projector input PJ Link input Parameter Computer 1 RGB 1 11 Computer 2 RGB 2 12 Computer 3 DIGITAL 1 31 Component VIDEO 3 23 Video VIDEO 1 21 S Video VIDEO 2 22 Notes The PJLink specification can be downloaded from http pjlink jbmia or jp english click on the Specifications link The PJ link password can be set at http LAN IP...

Отзывы: