


Getting Started Guide
(continued)
12
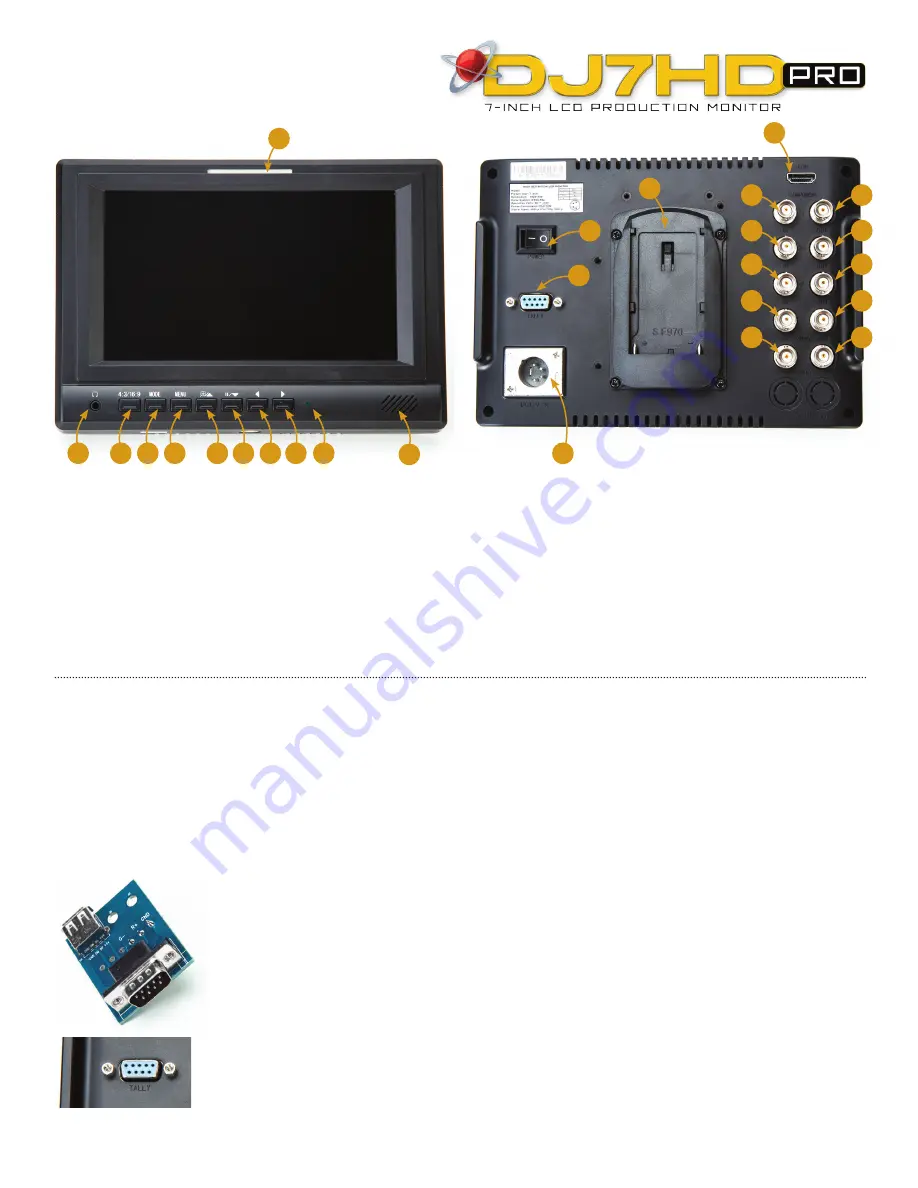
Speaker
13
Power Indicator Light
14
Volume up adjustment, or when
in OSD menu, to confirm and
indicate a value increase
15
Volume down adjustment, or
when in OSD menu, to confirm
and indicate a value decrease
16
Image pause key, or in OSD menu,
for adjustment selection (down)
17
Image magnification key, or when
in OSD menu, for adjustment
selection (up). This button is
also used to activate the Peaking
Focus Assist feature.
18
MENU key
19
MODE key/Input signal selection
20
Image ratio adjustment key
21
Earphone jack (Audio Output)
22
TALLY light/indicator
23
HDMI HD signal input
24, 25 & 26
Component YPbPr input
27, 28 & 29
Component YPbPr output
30
Composite video input
31
Composite video output
32 & 33
Audio input
(Left and right, double channel)
34
Power DC12V input
35
Tally signal input
36
Battery plate
37
Power switch
Front Panel View
Rear Panel View
Signal Formats
Video signal
Signal formats Supported
Composite video
PAL/NTSC auto recognize
Component (Y/Pb/Pr) 1080/ 24p/ 24psf/ 25p/ 30p/ 50i/ 60i/ 50p/ 60p;
720/ 50p, 720/ 60p; 480i, 480p; 576i, 576p
HDMI
1080/ 24p/ 24psf/ 25p/ 30p/ 50i/ 60i/ 50p/ 60p;
720/ 50p, 720/ 60p; 480i, 480p; 576i, 576p
Specifications
Size:
8.1” x 5.6” x 2.4”/
205x143x60mm
Weight:
1.4 lbs/635g (monitor alone
in neoprene cover); 2 lbs/907g
(monitor with battery attached);
3.6 lbs/1.6kg (monitor plus all
accessories)
Panel Size:
7” TFT LCD
Dot Resolution:
1024×600 pixel
Dot pitch:
0.05mm(w) x 0.15mm(h)
Brightness:
250cd/m
2
Contrast:
700:1
Display ratio:
16:9/4:3 (adjustable)
Backlight:
LED
Response Time:
10ms
Viewing Angle:
75°/ 75° (L/R),
70°/ 75° (U/D)
Signal input:
HDMI, Composite,
Component YPbPr, Audio
Signal output:
Composite,
Component YPbPr, Audio
Input formats supported
(HDMI
& YPbPr): 480i, 480p, 576i, 576p,
720p, 1080i, 1080p
Color System:
PAL/ NTSC
Input Voltage:
DC 7V-12V
Power Consumption:
≤10W
Operating Temperature:
-10°C~55°C
Storage Temperature:
-20°C~65°C
Power Adapter Plug Type:
US
Power Input:
100~240V; 50/60Hz
Power Output:
12V, 1500mA
Tally Kit
The Tally Connection Kit included with your
monitor consists of a small adapter card which
fits into the Tally port on the rear panel of the
monitor. A USB port on the end of the card
can be used to link the monitor to a Tally light
switch controller when shooting in a multi-
camera production environment. The signal
received controls when the Tally light on the
front of the monitor will be lit, indicating to the
talent and to the cameraman that the camera
attached to the monitor is live.
12
13
35
37
14
15
16
17
18
19
20
34
21
24
27
25
28
26
30
32
29
31
33
22
23
36
(continued on next page
>
)