


Replacing SA7x FRUs
7.9 SDI Cable Removal and Installation
11. Pull the frame free of the chassis by reaching into the frame and grasping the
sheet metal in front of the fan. Set the frame on an antistatic work surface.
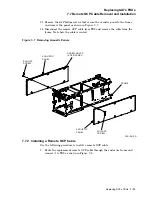
12. Lay the frame on either side and remove one of the two acoustic panels.
Remove the six Phillips screws that secure the acoustic panel to the frame,
and remove the panel. (Refer to Figure 7–7.) Turn the frame over and remove
the other acoustic panel.
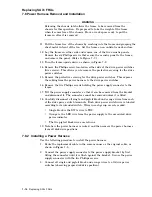
13. Turn the frame right side up, exposing the internal enclosure SDI cables on
the top of the frame as shown in Figure 7–10.
14. Remove the stand-off screws securing the internal Port A or Port B SDI cable
to the frame.
15. Cut the tie-wraps to remove the SDI cable from the SDI harness.
16. Note how the SDI cable is routed, and then remove it from all disk drive
positions.
Figure 7–10 SA7x Enclosure Internal SDI Cables
PORT A
PORT B
SDI CABLE
PORT A
SDI CABLE
PORT A
SDI CABLE
PORT A
SDI CABLE
PORT B
SDI CABLE
PORT B
CXO-2617A
STANDOFF
SCREW
(4 PLACES)
Replacing SA7x FRUs 7–19


